Group Policy can and is also used to manage
security and configuration settings within Active Directory. Many
settings apply to server role configurations to standardize security and
configurations, but one main configuration of the Active Directory
domain group policies is to set the password policy for all the users in
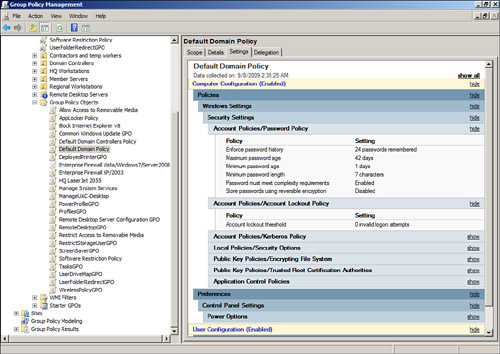
the domain. To configure the values for the domain password policy
settings, the default domain policy needs to be edited. The password
policy settings are contained in the Computer
Configuration\Policies\Windows Settings\Security Settings\Account
Policies\Password Policy settings node. Figure 1 displays the default password policy settings for Windows Server 2008 R2 domains.
When administrators review or
need to update the domain password policy, an account lockout policy
should also be defined. The account lockout policy determines how many
failed password attempts will be tolerated before a user account is
locked, and whether the account will be automatically unlocked. The following list contains the three account lockout settings:
Account Lockout Duration— This setting defines how many minutes an account will remain locked out before it is automatically unlocked by the system. Account Lockout Threshold— This setting defines the number of failed logon attempts that will be allowed before the user account is locked out. Reset Account Lockout Counter After— This setting defines the number of minutes before the bad logon count is returned to zero.
Fine-Grained Password Policies
New for Windows Server
2008 and also included with Windows Server 2008 R2 domains is a feature
called fine-grained password policies. This feature is only available in
domains operating in Windows Server 2008 or later domain functional
level. A fine-grained password policy is a password policy that can be
defined and applied to a single user or a set of users. This can be a
very valuable feature for organizations that require interoperability
with legacy systems or applications that require service accounts that
cannot adhere to the standard domain password policy. Fine-grained
password policies are stored in the domain Password Settings Container
and are defined as Password Settings Objects. To create a new Password
Settings Object, perform the following steps:
1. | Log on to a designated Windows Server 2008 R2 administrative server.
| 2. | Click Start, click in the Search pane, type in MMC, and press Enter.
| 3. | When the Microsoft Management Console opens, click the File menu and select Add/Remove Snap-In.
| 4. | In
the Add/Remove Snap-In window, in the Available Snap-Ins list, locate
and double-click on ADSI Edit to add it to the Selected Snap-Ins list.
Click OK to close the Add/Remove Snap-In window. If the ADSI Edit
snap-in is not listed, install the Remote Server Administration Tools
from the Add Features option in Server Manager, and then repeat this
step again.
| 5. | Back in the MMC, in the tree pane, right-click the ADSI Edit node and select Connect To.
| 6. | When
the window opens to select a naming context, the default naming context
will be the default selection; do not make any changes and click OK.
| 7. | In the tree pane, expand the default naming context to reveal the domain naming context; in this example, it is named dc=companyabc,dc=com.
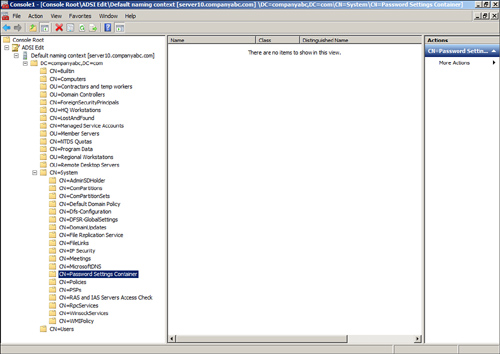
| 8. | Expand
the domain naming context to reveal the CN=System node. Expand the
System node to reveal the Password Settings Container, as shown in Figure 2.
| 9. | Right-click the Password Settings Container and select New Object.
| 10. | When the Create Object window opens, select the msDS-PasswordSettings object class, and click Next.
| 11. | On the Common-Name page, type in Fine-GrainedPSO and click Next.
| 12. | On the Password Setting Precedence page, type in 5 and click Next.
| 13. | On the msDS-PasswordReversibleEncryptionEnabled page, set the value to False and click Next.
| 14. | On the msDS-PasswordHistoryLength page, set the value to 5 and click Next.
| 15. | On the msDS-PasswordComplexityEnabled page, set the value to False and click Next.
| 16. | On the msDS-MinimumPasswordLength page, set the value to 6 and click Next.
| 17. | On
the msDS-MinimumPasswordAge page, set the value to -864000000000 and
click Next. This is the equivalent of 1 day and the negative symbol must
be added.
| 18. | On the msDS-MaximumPasswordAge page, set the value to -77760000000000 and click Next. This is the equivalent of 90 days.
| 19. | On the msDS-LockoutThreshold page, set the value to 0 and click Next. Setting this value to zero keeps the account unlocked.
| 20. | On the msDS-LockoutObservationWindow page, set the value to -9000000000 and click Next. This is the equivalent of 15 minutes.
| 21. | On the msDS-LockoutDuration page, set the value to -9000000000 and click Next. This is the equivalent of 15 minutes.
| 22. | On the final page, click Finish to create the Password Settings Object (PSO).
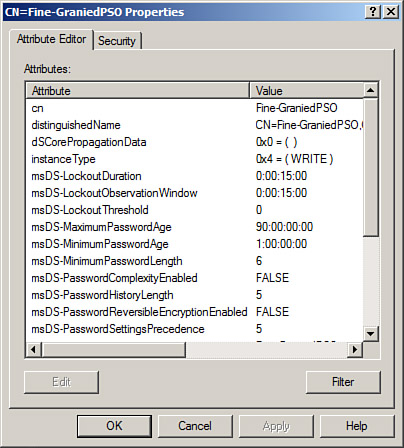
| 23. | After
the PSO is created, select the Password Settings Container in the tree
pane. In the Settings pane, right-click the new Fine-GrainedPSO object,
and select Properties.
| 24. | When the Fine-GrainedPSO opens, click the Filter button and check the Show Only Attributes That Have Values check box.
| 25. | Review the configured settings, as shown in Figure 3, and click OK when finished.
|
Now
that a new fine-grained password policy is created, the
Fine-GrainedPSO, the policy can be applied to specific user accounts. To
apply this PSO to a user account, perform the following steps:
1. | Open
the properties of the Fine-GrainedPSO. If necessary, click the Filter
button and uncheck the Show Only Attributes That Have Values check box.
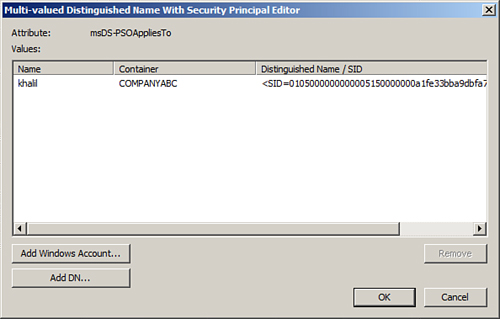
| 2. | Scroll down and locate the msDS-PSOAppliesTo attribute and double-click it to open the property pages.
| 3. | Click on the Add Windows Account button to locate users using the Select Users, Computers or Groups window.
| 4. | In the Select Users, Computers or Groups window, type in the name of a user and click OK.
| 5. | If the user is located, the logon and distinguished name of the user is added to the msDS-PSOAppliesTo window, as shown in Figure 4. Click OK. Repeat the process to add additional users if required.
| 6. | Click OK again to close the Fine-GrainedPSO and close the ADSI Edit snap-in.
| 7. | Log
on to a workstation or server with a user account added to the policy
and change the password to verify that the Fine-GrainedPSO has been
applied properly.
|
Even though fine-grained
password policies should only be used if necessary and sparingly, after
administrators know about it, many accounts will suddenly need to be
added to a PSO that is less restrictive than the domain password policy.
To audit the users to whom PSOs apply, the PSOs in the Password
Settings Container should be reviewed regularly.
|
