Group Policy enables administrators to define how the
end-user experience and desktop will be configured. Also, with
user-based group policies, end users can be granted or denied access to
certain Windows applications and features and even can be limited from
reading or writing to removable media. Common user group policy
configurations include, but are not limited to, the following:
Start menu configuration
Restricting Control Panel and display settings
Internet Explorer settings
Software restrictions
Microsoft Management Console restrictions
Screensaver settings
Mapping network drives
Installing printers
Creating desktop shortcuts
Application-specific
configurations, including customizing Microsoft Office if the
administrative templates are loaded and used in the policy
Network configuration settings
Folder redirection and offline file settings
Managing the user
environment and desktop with group policies, for the most part, can be
used to configure the graphical user interface for the user and to
impose security restrictions to increase the reliability of the computer
systems in use. In some cases, application shortcuts can be added to
the desktop and applets can be hidden from view in the Control Panel or
Start menu, but in more restrictive cases, they can be hidden and
restricted from execution. Many organizations would like the end-user
desktop to be very simple and present the end users with only the
necessary applications relevant to their job. Although this is an
extreme case, it can be performed by configuring the settings located in
the User Configuration\Policies\Administrative Templates\Start Menu and
Taskbar Settings node. A more functional Start menu GPO extension can
also be used to manage the configuration of the Start menu for Windows
XP, Windows Vista, and Windows 7 by configuring settings located in the
User Configuration\Preferences\Control Panel Settings\Start Menu node.
Desktop security is also a
very big concern for companies, now more than ever. One easy
configuration organizations can use to better secure end-user desktops
is to implement a password-locking screensaver. Automatic desktop
locking with screensavers can be a very handy configuration, but sales
and remote users should be granted extended computer idle time before a
screensaver kicks in and locks the system in the middle of a sales presentation
or a web-based meeting. Screensaver settings can be configured in the
User Configuration\Policies\Administrative Templates\Control
Panel\Personalization Settings node. To enable a password-protected
screensaver with a blank screen screensaver that works on every version
of Windows, the following four settings must be configured:
Enable Screen Saver— Enabled
Password Protect the Screen Saver— Enabled
Force Specific Screen Saver— Enabled “scrnsave.scr”
Screen Saver Time Out— Enabled “900”, to go to screensaver after 15 minutes of inactivity
Another of the biggest
pain points for companies is being able to back up end-user data, which,
by default, is stored on the local drive of the computer system the
user logs on to. When users log on to multiple computers or Remote
Desktop Services systems, administrators can configure users with
roaming profiles and/or specific Remote Desktop Services profiles, which
follow them between systems and are stored on server shares. This
configuration is set on the actual user object and is not necessarily a
Group Policy setting.
Remote Desktop Services
profiles are great for Remote Desktop Services systems, but implementing
roaming profiles for an entire company on every computer can introduce
challenges because each time the user logs on to a system, the entire
profile is copied to the local computer and when the user logs off, the
profile is copied back to the server. The larger the profile gets, the
longer it takes to copy the profile between the server shares and the
computer system. On Remote Desktop Services systems, it is very easy for
administrators to remotely log off and complete the copy of the profile
back to the server share. However, for end-user workstations, when
roaming profiles get large, many users do not wait for the profile copy
to complete and manually shut down the system or unplug it from the
network. This, of course, can cause profile corruption and, even worse,
data loss. Group Policy settings can be used to mitigate these issues
somewhat and restrict the data that is included in the roaming profile.
To improve Remote Desktop Services profile and standard roaming profile
performance, administrators can use Group Policy to redirect user
folders to server shares using folder redirection.
Configuring Folder Redirection
Folder redirection can be used
to redirect certain special folders in the end user’s profile to server
shares. Special folders such as the Documents folder, which is the
default folder for users to store and access their data, can be
redirected to server shares. The following are some basic rule-of-thumb
guidelines when using this Group Policy extension:
Allow the system to create the folders—
If the folders are created by the administrator, they will not have the
correct permissions. But properly configuring the share and NTFS
permissions on the server share is essential in providing a functional
folder redirection experience.
Enable client-side caching or offline file synchronization—
This is important for users with portable computers but is not the
desired configuration for folder redirection on Remote Desktop Services
systems. Furthermore, when storing data on end-user workstations, it may
violate regulatory and/or security requirements to allow for cached
local copies.
Use fully qualified (UNC) paths or DFS paths for server share locations— For example, use \\Server1.companyabc.com\UserProfiles or \\companyabc.com\UserProfiles\ if DFS shares are deployed.
Before folder redirection
can be expected to work, share and NTFS permissions must be configured
appropriately. For folder redirection to work properly, configure the
NTFS as follows:
Configure the share folder to not inherit permissions and remove all existing permissions.
Add the file server’s local Administrators group with Full Control of This Folder, Subfolders, and Files.
Add the Domain Admins domain security group with Full Control of This Folder, Subfolders, and Files.
Add the System account with Full Control of This Folder, Subfolders, and Files.
Add the Creator/Owner with Full Control of Subfolders and Files.
Add
the Authenticated Users group with both List Folder/Read Data and
Create Folders/Append Data – This Folder Only rights. The Authenticated
Users group can be replaced with the desired group, but do not choose
the Everyone group as a best practice.
The share permissions of
the folder can be configured to grant administrators Full Control and
Authenticated Users Change permissions.
To redirect the Documents
folder to a network share for Windows Vista, Windows 7, Windows Server
2008, and Windows Server 2008 R2 systems, perform the following steps:
1. | Log on to a designated Windows Server 2008 R2 administrative server.
|
2. | Click Start, click All Programs, click Administrative Tools, and select Group Policy Management.
|
3. | Add the necessary domains to the GPMC as required.
|
4. | Expand the Domains node to reveal the Group Policy Objects container.
|
5. | Create a new GPO called UserFolderRedirectGPO and open it for editing.
|
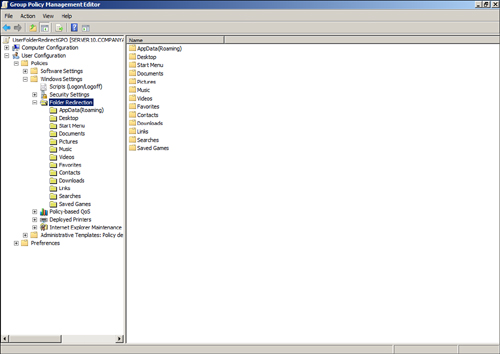
6. | After
the UserFolderRedirectGPO is opened for editing in the Group Policy
Management Editor, expand the User Configuration node, expand Policies,
expand Windows Settings, and select the Folder Redirection node to
display the user profile folders that are available for redirection, as
shown in Figure 1. Keep in mind that the folders in this section and detailed in Figure 27.19
represent the folders available in Windows Vista, Windows 7, Windows
Server 2008, and Windows Server 2008 R2 user profiles. If Windows 2000,
Windows XP, or Windows Server 2003 profiles require folder redirection,
configuring the Documents folder for redirection is supported work but
will require additional testing against each edition and service pack
level of the legacy operating system that the policy applies to.
|
7. | In the Settings pane, right-click the Document folder and select Properties.
|
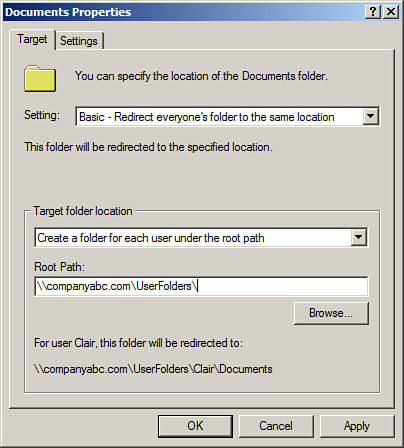
8. | On
the Target tab, click the Setting drop-down list arrow, and select
Basic – Redirect Everyone’s Folder to the Same Location, which reveals
additional options. There is another option to configure folder
redirection to different locations based on group membership, but for
this example, select the basic redirection option.
|
9. | In
the Target Folder Location section, there are several options to choose
from and each should be reviewed for functionality; for this example,
select Create a Folder for Each User Under the Root Path. This is very
important if multiple folders will be redirected; more details are
explained in the following steps.
|
10. | In Root Path field, type in the server and share name, for example \\companyabc.com\UserFolders, as shown in Figure 2.
Notice how the end-user name and Document folder will be created
beneath the root share folder. This requires that the end users have at
least Change rights on the share permissions and they must also have the
Create Folder and Create File NTFS permissions on the root folder that
is shared.
|
11. | Select
the Settings tab and uncheck the Grant the User Exclusive Rights to
Documents check box. If necessary, check the check box to also apply
redirection to Windows 2000, Windows XP, and Windows Server 2003
operating systems.
|
12. | Click
OK to complete the folder redirection configuration. A warning pop-up
opens that states that this policy will not display the Folder
Redirection node if an administrator or user attempts to configure or
view this group policy using policy management tools from Windows 2000,
Windows XP, or Windows Server 2003. Click Yes to accept this warning and
configure the folder redirection.
|
13. | Back in the Group Policy Management Editor window, close the GPO.
|
14. | In the GPMC, link the new UserFolderRedirectGPO policy to an OU with a user account that can be used to test this policy.
|
15. | Log
on to a Windows Vista, Windows 7, or a Windows Server 2008 system with
the test user account. After the profile completes loading, click the
Start button, and locate and right-click the Documents folder. Select
the Location tab and verify the path. For example, for a user named
Khalil, the path should be \\companyabc.com\UserFolders\Khalil\Documents.
|
If the folder is not
redirected properly, the Windows Vista or later system might need to
have a domain policy applied that forces Synchronous Foreground Refresh
of group policies. Also a very common configuration error is the NTFS
and share permissions on the root folder. In most cases, however, a few
logons by the particular user will get the settings applied properly.
Each
of the default folder redirection folders will automatically be
configured to synchronized with the server and be available offline.
When additional server folders need to be configured to be available
offline, perform the following steps:
1. | Locate the shared network folder that should be made available offline.
|
2. | Right-click the folder and select Always Available Offline.
|
As long as the server share
allows offline synchronization and the client workstation also supports
this, as they both do by default, that is all that is necessary.
Removable Storage Access
Windows Server 2008 R2,
Windows Vista, and Windows 7 group policies provide several settings
that can be used to control how removable devices and removable storage
can be used. Some of these settings apply to CD and DVD drives and
media, but many are designed to control the read and write permission to
removable disks such as external USB drives and memory sticks. These
settings can be configured in a computer group policy but can also be
configured in the User Configuration node to deny write access to
removable media, as shown in Figure 3. The settings are located in User Configuration\Policies\Administrative Templates\System\Removable Storage Access.

Managing Microsoft Management Console Access
Microsoft has
standardized the deployment of management and configuration tools to use
Microsoft Management Console (MMC) snap-ins. By default, all users can
open a blank MMC and add snap-ins to the console. The snap-ins loaded on
a particular machine are the
only ones that can be added. Having access to each snap-in can
unnecessarily expose configuration information to undesired individuals.
Also, depending on the function of the snap-in, functions might be
available to standard users that can impact the performance of
production systems. For example, a user can add the Active Directory
Users and Computers snap-in to an MMC console and can then create
queries that run against the domain controller, causing unnecessary load
on the system. To restrict access to the MMC or specific MMC snap-ins
using domain group policies, perform the following steps:
1. | Log on to a designated Windows Server 2008 R2 administrative server.
|
2. | Open the Group Policy Management Console from the Administrative Tools menu.
|
3. | Add the necessary domains to the GPMC as required.
|
4. | Expand the Domains node to reveal the Group Policy Objects container.
|
5. | Either create a new GPO or edit an existing GPO.
|
6. | After
the GPO is opened for editing in the Group Policy Management Editor,
expand the User Configuration node, expand the Policies node, and select
Administrative Templates.
|
7. | Expand the Administrative Templates node and select Windows Components.
|
8. | Scroll
down and select Microsoft Management Console in the tree pane. Expand
this node to reveal the Restricted/Permitted Snap-Ins node and select
it.
|
9. | With
the Restricted/Permitted Snap-Ins node selected in the tree pane, a
list of well-known snap-ins is displayed in the Settings pane. Select
and open the Active Directory Users and Computers snap-in. Configure the
setting to Disabled to block the use of this snap-in for the users to
whom this policy will apply and click OK.
|
10. | After
the snap-in is disabled, close the policy and link it to the desired OU
that contains the users who need to be restricted from using the
disabled snap-in.
|
