Manual
Encrypted Communications Using Outlook
Specific
to this article, encryption is used for email communications to allow
users to send and receive secured communications. An encryption system
is built in to Exchange Server that allows users within an Exchange
Server environment to send email messages to other users within their
Exchange Server environment in an encrypted manner. The problem with the
default encryption in Exchange Server is that it does not provide
encryption outside of the company’s Exchange Server environment. So,
most organizations do not use the built-in email encryption in Exchange
Server, but rather use a more standard method of encrypted
communications built on the PKI standard.
You have several
methods of providing encrypted communications between users within and
external to a Microsoft Exchange Server and Outlook email system. Users
can each get a certificate from an organization such as VeriSign and
perform encrypted communications. Or, an organization can purchase an
enterprise license of Pretty Good Privacy (PGP) that provides encryption
between users and organizations also using PGP email security. In this
example, the use of individual VeriSign certificates is noted.
In this case, a user
who wants to encrypt messages between himself and someone else needs to
get an individual email certificate and install that certificate in his
Microsoft Outlook email client software. In this example using VeriSign,
the user would go to www.verisign.com/authentication/individual-authentication/digital-id/index.html and for approximately $20 per year, both
individuals wanting to conduct secured communications can purchase a
certificate. The individuals share the public portion of their
certificates with the other individuals and they can now send encrypted
messages back and forth.
To acquire a
certificate, do the following:
1. | Go to a certificate provider such as VeriSign, and sign
up and purchase a digital ID: www.verisign.com/authentication/individual-authentication/digital-id/index.html.
|
2. | Follow the instructions to download and install the
certificate in your Outlook client.
|
3. | Have the individual you want to communicate with do the
same.
|
This process of
purchasing, downloading, and installing a certificate needs to be done
only once per year.
Note
If you use multiple
computers, you need to install the certificate on each machine on which
you run the Outlook client to be able to send and receive encrypted
email messages.
After you have
downloaded and installed the certificate on your computer, you need to
configure Outlook to support the certificate. To do so, do the
following:
1. | Launch Outlook.
|
2. | For Outlook 2003 and earlier, choose Tools, Options,
and then click the Security tab. For Outlook 2007, choose Tools, Trust
Center, and then click Email Security.
|
3. | Click the Settings button.
|
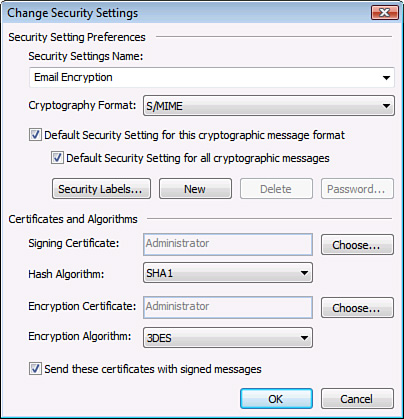
4. | In the Security Settings Name text box, type Email
Encryption. Using the Cryptographic Format list arrow, choose
S/MIME. Check the Default Security Setting for This Cryptographic
Message Format and the Default Security Settings for all Cryptographic
Messages check boxes.
|
5. | Next to the Signing Certificate box, click Choose.
|
6. | From the Select Certificate page, select the
certificate that was previously installed and click OK.
|
7. | Using the Hash Algorithm list arrow, choose SHA1. Using
the Encryption Algorithm list arrow, choose 3DES.
|
8. | Check the Send These Certificates with Signed Messages
check box.
|
9. | The
settings should look similar to the ones shown in Figure 1. Click OK to
apply these settings, and then click OK again.

|
The Outlook client is
now ready to send signed and encrypted emails. Individual users,
depending on how computer savvy they are, might have difficulties
signing up, downloading, and installing the certificate, and then
configuring Outlook to send emails. In addition, because the
certificates are individual based, each individual user has to do this process themselves
every year and for every system on which they conduct email
communications.