As you cannot make public folders members of
a DAG, the key to making them highly available is to use public folder replicas. A
public folder replica is a copy of an existing public folder hosted on separate
Exchange Server 2010 Mailbox servers. These replicas stay up to date through
periodic replication. In this lesson, you will learn how to add and remove public
folder replicas, how you can modify the replication interval, and what steps you
need to take to successfully back up and restore public folders.
1. Public Folder Replicas
Public folder replication is the method through which you can make public
folder content highly available. Public folder replication replicates public
folder content and the public folder hierarchy to other public folder databases.
In the event that a Mailbox server hosting a public folder fails, clients will
automatically redirect to the closest public folder replica. It is important to
remember that although you can put a public folder database on a Mailbox server
that is a member of a DAG, public folders cannot leverage the DAG replication
process to replicate content.
Public folder content and the public folder hierarchy replicate independently
of each other. Every public folder database stores a copy of the hierarchy,
including information about which public folder databases host content replicas
of specific folders. Hierarchy replication occurs automatically when you modify
a folder name, a replica list, a folder’s position in the public folder
tree, or folder permissions. A content replica is a copy of a folder that
includes all that folder’s content. Content replicas replicate only to the
public folder databases that you choose. For example, you have public folder
databases on three Mailbox servers. Each of those three public folder databases
will have a copy of the public folder hierarchy, and this copy of the public
folder hierarchy updates when changes occur. You decide to configure a public
folder so that a replica is hosted on both the first and the third Mailbox
servers. In this case, unlike the public folder hierarchy data, only the first
and third servers will host the actual public folder content. Each public folder
replica replicates according to a configured schedule that usually sets at the
public folder database level. You will learn about configuring replication
schedules later in this lesson.
To
configure a public folder to replicate to a public folder database hosted on
another Mailbox server, perform the following general steps:
From the Toolbox node of the EMC, open the Public Folder Management
Console.
In the Public Folder Management Console, select the parent node of the
folder that you wish to configure to replicate.
Click on the desired folder in the middle pane and then click on
Properties on the Actions pane and then click on the Replication
tab.
The Replication tab will display the current host public folder
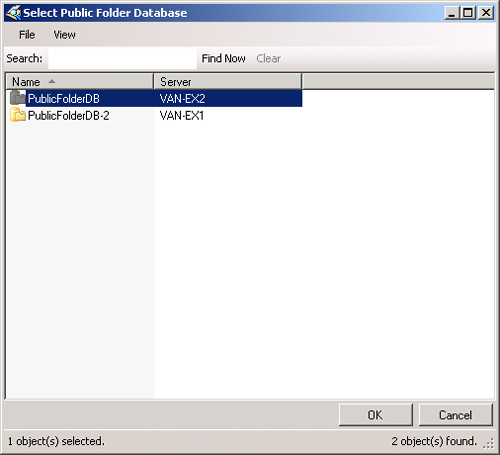
databases. Click on the Add button. In the Select Public Folder Database
dialog box, shown in Figure 1, select
the additional public folder databases to which you want the public
folder to replicate and then click OK.
You can use the Set-PublicFolder cmdlet with the Replicas
parameter to specify on which public folder databases the replica should reside.
You need to include the current public folder database as well as any additional
public folder databases when choosing to add replicas. For example, to configure
the public folder ExamplePF, already present on database PublicFolderDB, to have
a new replica on PublicFolderDB-2, issue the following command:
Set-PublicFolder -Identity '\ExamplePF' -Replicas 'PublicFolderDB','PublicFolderDB-2'
To remove a public folder replica, change the list of public folder databases
after the Replicas parameter. For example, if public folder ExamplePF has
replicas on public folder databases PublicFolderDB and PublicFolderDB-2 and you
want to remove the replica from database PublicFolderDB, issue the following
command:
Set-PublicFolder -Identity '\ExamplePF' -Replicas'PublicFolderDB-2'
You can suspend public folder
replication by issuing the Suspend-PublicFolderReplication
cmdlet. Suspending public folder replication applies only to content
replication, and public folder hierarchy data will continue to replicate. You
can resume public folder replication by issuing the
Resume-PublicFolderReplication cmdlet. You can trigger
an update of the public folder hierarchy by using the
Update-PublicFolderHierarchy cmdlet. For example, to
update the public folder hierarchy on server VAN-EX1, issue the following
command:
Update-PublicFolderHierarchy -Server 'VAN-EX1'
You can trigger the update of a particular replica by using the
Update-PublicFolder cmdlet or by right-clicking on the
replica in the middle pane in the Public Folder Management Console and then
clicking on Update Content.
2. Replication Schedules
Replication schedules determine how often Exchange updates a specific public
folder replica. Exchange Server 2010 public folders do not support continuous
replication and replicate on only a periodic basis. The default settings have
content replication occurring every 15 minutes. You can configure replication
schedules on the level of the public folder database or on the level of the
individual public folder. Schedules that you configure on the public folder
replica level override those that you configure at the public folder database
level. If you are using the EMC, you can configure the replication period by
editing the settings on the Replication tab of a public folder database’s
properties dialog box. The replication periods that you can set using the
drop-down menu are as follows:
Always Run
Never Run
Run Every Hour
Run Every 2 Hours
Run Every 4 Hours
Use Custom Schedule
When you choose a custom schedule, you block out the times that replication
can occur during the week. For example, by using a custom schedule, you can
configure public folder replication to occur during off-peak periods or only
during specific times of the day. When you configure the replication interval to
Always Run or Use Custom Schedule, you need to set a replication period. The
replication period determines how often updates occur during the scheduled
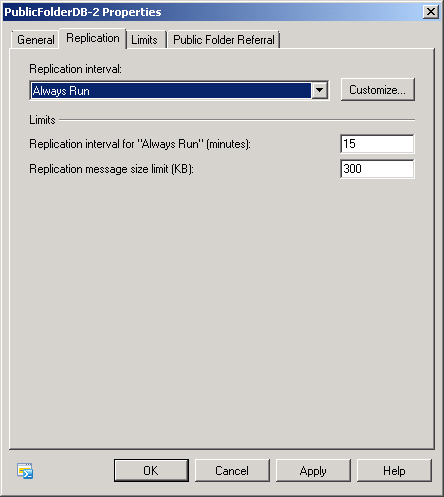
replication windows. Figure 2 shows
replication schedule set to Always Run, and updates will occur every 15
minutes.
You can
also configure public folder database replication by using the
Set-PublicFolderDatabase cmdlet with the
ReplicationPeriod and ReplicationSchedule parameters. When using the Replication
Schedule parameter, you can configure specific times or choose the Always
option, in which case replication occurs according to the set period. For
example, to set replication to occur every 20 minutes on a public folder
database named PF-DB-ALPHA, issue the following command:
Set-PublicFolderDatabase -ReplicationPeriod '20' -ReplicationSchedule 'Always' -Identity
'PF-DB-ALPHA'
If you want to have different replication schedules for individual public
folders, you can configure how public folder replication occurs at the public
folder replica level. Configuring a replication schedule at this level overrides
the replication schedule configured at the public folder database level. To
configure a replication schedule at the public folder level, edit the settings
on the Replication tab of a specific public folder replica’s properties.
To edit these settings, you must ensure that you disable the Use Public Folder
Database Replication Schedule option. You can then configure the same
replication intervals that are available for public folder database replication.
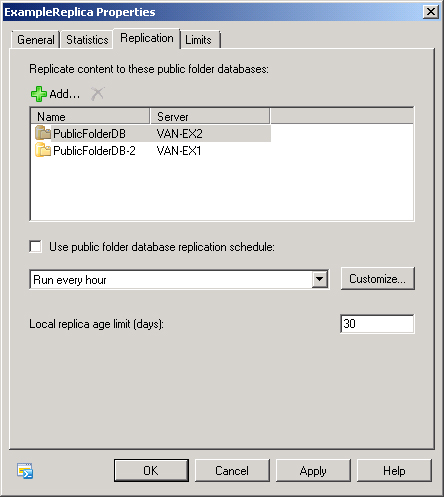
Figure 3 shows a replication scheduled
once every hour and a replica age limit of 30 days.
If you are using the EMS, you can configure public folder replication using
the Set-PublicFolder cmdlet with the ReplicationShedule and
UseDatabaseReplicationSchedule parameters. To configure the public folder named
ExampleReplica hosted on server van-ex1.adatum.com to Always Replicate, use the
following command:
Set-PublicFolder -Identity "\ExampleReplica' -Server 'Van-ex1.adatum.com'
-UseDatabaseReplicationSchedule $false -ReplicationSchedule 'Always'
3. Public Folder Backup and Restore
You can back up public folders as a part of the normal Windows Server Backup
process. Performing a full server backup with
Windows Server Backup backs up all public folder database and transaction log
files.
Performing
public folder database recovery is different from performing mailbox database
recovery. When you recover a public folder, you can use recovery mode to mount
the folder, extracting items from the mounted recovery database and merging them
back into the appropriate mailbox database. You cannot mount public folder
databases as recovery databases, and you need to overwrite the existing database
with the contents of the public folder database that you are recovering from
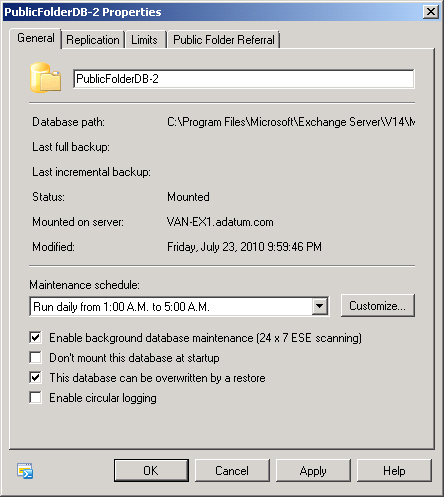
backup. You accomplish this by enabling the This Database Can Be Overwritten By
A Restore option for the public folder database prior to overwriting it with the
restored files. You can configure this option by editing the database
properties, as shown in Figure 4, or by
using the Set-PublicFolderDatabase cmdlet with the
AllowFileRestore parameter set to $true.
The most common form of public folder recovery is the recovery of individual
public folders that have been deleted where that deletion has replicated to
other public folder databases. You can recover specific deleted public folders
using Outlook as long as the deleted public folder is within the retention
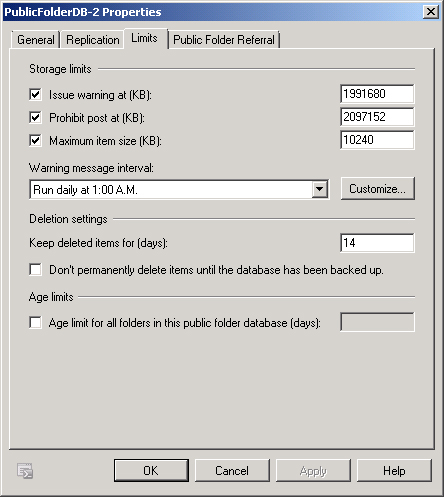
period. You can configure the retention period for a public folder database
using the Set-PublicFolderDatabase cmdlet or through the
EMC by editing the properties of the public folder database and configuring the
setting on the Limits tab, as shown in Figure 5. The default deleted item
retention period for public folder databases is 14 days.
To recover a deleted public folder using Outlook, perform the following
general steps:
Log on using an account that has full control over the public folders
to be recovered.
Access the Public Folders node in Outlook. Select the parent node of
the node that contained the deleted public folder.
On the Tools menu, select Recover Deleted Items. This launches the
Recover Deleted Items dialog box.
Select the public folders that you wish to recover and then click the
Recover Selected Items button.
Note:
Remember that you cannot use DAGs to ensure that public folders are highly
available.