4. Mailbox Database Copies
A mailbox database copy is a copy of an existing mailbox database that
Exchange Server 2010 keeps up to date through continuous replication. Once you
have created a DAG and added Mailbox servers as members, you are able configure
mailbox database copies. There are several conditions when configuring mailbox
database copies. These conditions include the following:
The mailbox database copy that you are creating must be of a mailbox
database that already exists on a server within the DAG.
You can create a mailbox database copy of only a mailbox database that
is in the same DAG. You cannot create a mailbox database copy of a
mailbox that is in a different DAG.
The active copy of the mailbox
database that you are creating a copy of must be mounted.
Circular logging must not be enabled for the source mailbox database.
You can reenable circular logging after you have added the mailbox
database copy.
DAGs do not support database copies where the round-trip network
latency between Mailbox servers exceeds 250 ms.
A single Mailbox server cannot host more than one instance of a
specific mailbox database copy.
All mailbox database copies must use the same path. For example, if
the first mailbox database uses the path e:\mbx-db-one, all subsequent
mailbox database copies must also use the path e:\mbx-db-one. If volume
E does not exist on a member server within the DAG, it will not be able
to host a copy of that mailbox database.
To create a mailbox database copy, perform the following general steps:
Select the Organization Configuration\Mailbox node from within the
EMC. In the middle pane, select the database for which you wish to
create a database copy.
On the Actions pane, click on Add Mailbox Database Copy. This will
open the Add Mailbox Database Copy Wizard.
The Add Mailbox Database Copy dialog box, shown in Figure 2, will display the servers that
host copies of the database. Click the Browse button to select a server
within the DAG to which you will add the copy.
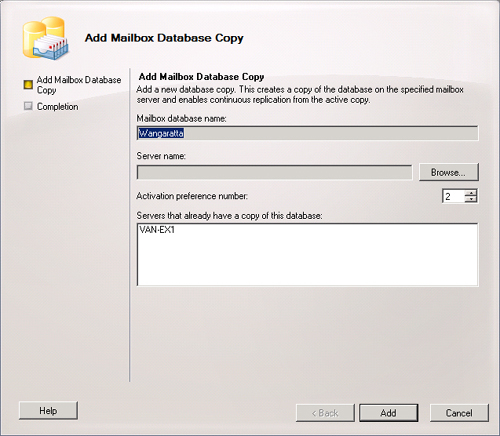
Select an Activation Preference number and then click Add. Click
Finish to close the Add Mailbox Database Copy Wizard.
You can add mailbox database copies by
using the Add-MailboxDatabaseCopy cmdlet. For example, to
add a mailbox database copy of an existing mailbox database named Wangaratta to
DAG member MBX2, with an activation preference of 2, issue the following
command:
Add-MailboxDatabaseCopy -Identity 'Wangaratta' -MailboxServer 'MBX2'
-ActivationPreference '2'
To remove a mailbox database copy, either select the database copy in the EMC
and click Remove on the Actions pane or use the
Remove-MailboxDatabaseCopyRemove-MailboxDatabase cmdlet. cmdlet. You cannot use these
methods to remove the last copy of a mailbox database, which you must delete
using the
You cannot create a database copy of a public folder database. You use public
folder replication to provide redundancy for public folders.
4.1. Activating, Suspending, and Resuming Mailbox Database Copies
You can make a passive database copy active by performing switchover. You
might want to perform switchover when you need to perform maintenance on the
Mailbox server that hosts the active copy of the database, such as when it
is necessary to reboot the server after installing a service pack or a
software update.
When you activate a passive copy, you have the option of using the
override mount dial list. Using the override mount dial settings allows you
to specify the conditions under which the new activation occurs. If you use
None, the default setting of Best Availability is used. The options that you
can select from are as follows:
Lossless
When you choose this setting, the passive database will not
become the active database until all the logs that were
generated on the current active copy are copied to the copy you
are attempting to make active.
Good Availability
The database becomes active as long as the copy queue length
is less than or equal to six. In the event that the copy queue
length is greater than six, Exchange will attempt to replicate
remaining logs to the passive copy prior to mounting the
database. The copy queue length is the number of logs that the
passive copy needs to replicate to become up to date.
Best Effort
The passive copy becomes active automatically, regardless of
the copy queue length. Using this option can result in a large
amount of data loss.
Best Availability
The database will become active as long as the copy queue
length is less than or equal to 12. If the copy queue length is
greater than 12, Exchange attempts to replicate remaining logs
before making the database active.
To make a passive mailbox database
copy active, perform the following general steps:
Select the Organization Configuration\Mailbox node within the
EMC.
In the middle pane, select the Database Management tab. Select the
database and then the database copy that you want to activate. Click
on Activate Database on the Actions pane.
In the Activate Database Copy dialog box, choose the Override
Mount Dial settings option. If you choose None, the default Best
Availability setting is used. Click OK.
You can activate a passive mailbox database copy from the EMS using the
Move-ActiveMailboxDatabase cmdlet. If you do not
specify a setting for the MountDialOverride parameter, it uses the Lossless
setting. For example, to activate database SydneyMBX on server VAN-MBX,
issue the following command:
Move-ActiveMailboxDatabase SydnyMBX -ActivateOnServer VAN-MBX
Just as there are reasons where you need to transfer the active copy of a
database to another database in the DAG, there may be times when you need to
suspend continuous replication for a passive database copy. You cannot
suspend the active mailbox database copy. If you want to perform maintenance
on the server hosting the active mailbox database copy, activate a passive
copy hosted on another server and then suspend the now passive mailbox
database copy. To suspend a mailbox database copy, select the database copy
that you wish to pause and then click Suspend Database Copy. A dialog box
will prompt you to provide a comment and to confirm your wish to suspend
replication. To resume a suspended database copy, select the copy and then
click Resume Database Copy on the Actions pane. You will be asked to confirm
the resumption, and Exchange will display the message entered when the
database copy was suspended. To suspend a passive mailbox database copy, use
the Suspend-MailboxDatabaseCopy cmdlet. For example, to
suspend the passive mailbox database named DB-ALPHA on server VAN-MBX, issue
the following command:
Suspend-MailboxDatabaseCopy -Identity DB-ALPHA\VAN-MBX
To resume a suspended passive mailbox database copy, use the
Resume-MailboxDatabaseCopy cmdlet. For example, to
resume the suspended passive mailbox database named DB-ALPHA hosted on
server VAN-MBX, issue the following command:
Resume-MailboxDatabaseCopy -Identity DB-ALPHA\VAN-MBX
4.2. Seeding Database Copies
Updating a mailbox database copy, also known as
seeding, is the process by which a copy of a
mailbox database is added to a Mailbox server. By default, a new database
copy is populated from the currently active mailbox database copy. Automatic
seeding usually occurs when you create a new mailbox database
copy, though there may be reasons why you want to postpone automatic seeding
and seed from a passive database copy instead. For example, your
organization has three servers that are members of a DAG: two in the city of
Melbourne and one in the city of Darwin. You add a second DAG member server
in Darwin. You want to create a new mailbox database copy on this new DAG
member of a large database that is currently active on one of the Melbourne
servers and where there is a copy of the database on the original server in
Darwin. Through the process of seeding, you can have the new mailbox
database copy populated from the passive copy on the original server in
Darwin rather than having it populated by transferring the entire mailbox
database over the WAN link from Melbourne.
To update or seed a mailbox database copy from a source other than the
active database, perform the following general steps:
Select the Organization Configuration\Mailbox node within the
EMC.
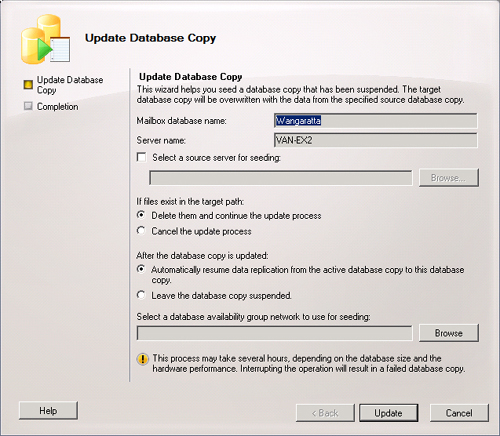
In the middle pane, select the Database Copies tab. Choose the
database copy that you want to update and select Update Database
Copy. It is not possible to update a database copy that is already
up to date.
In the Update Database Copy dialog box, shown in Figure 3, select the source server that
hosts the copy of the database that you wish to use to seed the
database copy. The default seed will be the active copy of the
mailbox database.
You can use the
Update-MailboxDatabaseCopy cmdlet to update/seed a
mailbox database copy. For example, to seed a copy of a database named
Accounting hosted on server Darwin-2 from a passive copy of the database
hosted on server Darwin-1, issue the following command:
Update-MailboxDatabaseCopy -Identity Accounting\Darwin-2 -SourceServer Darwin-1
4.3. Lagged Mailbox Database Copies
A lagged mailbox database copy is a mailbox database copy that reflects
the state of the active mailbox database copy up to 14 days previously. You
can leverage lagged mailbox database copies to recover corrupt data without
having to restore from backup. The two important concepts in configuring
lagged mailbox database copies are replay lag time and truncation lag time.
These work as follows:
Replay Lag Time
The length of time to delay the replay of logs against the
passive database copy. The replay lag timer begins when a log
file successfully replicates to the passive copy. The maximum
replay lag time is 14 days.
Truncation Lag
Time
The length of time a transaction log should be kept after the
log has been replayed to the mailbox database copy. The
truncation lag timer starts after the transaction log has been
successfully replayed to the copy of the database. Delaying the
truncation of log files from the database copy allows you to
recover from failures that impact on the log files for the
active database copy. The maximum allowable setting is 14
days.
To create a lagged mailbox database copy, use the
Add-MailboxDatabaseCopy cmdlet with the
ReplayLagTime and TruncationLagTime parameters. For example, to add a copy
of a mailbox database named DB-ALPHA to mailbox DAG member VAN-EX1 with a
lag time of 14 days and a truncation lag time of 7 days, issue the following
command:
Add-MailboxDatabaseCopy -Identity DB-ALPHA -MailboxServer VAN-EX1 -ReplayLagTime
14.00:00:00 -TruncationLagTime 7.00:00:00
You can use the Set-MailboxDatabaseCopy cmdlet to
modify replay lag time and log truncation lag time. For example, to
reconfigure mailbox database DB-BETA, which is hosted on server VAN-EX2 with
a replay lag time of 10 days and a log truncation lag time of 5 days, issue
the following command:
Set-MailboxDatabaseCopy -Identity DB-BETA\VAN-EX2 -ReplayLagTime 10.00:00:00
-TruncationLagTime 5.00:00:0
When you choose to activate a lagged database copy, you can either replay
all log files and make the lagged copy up to date or choose to replay log
files up to a specific point in time.
Replaying to a specific point in time requires that you manually manipulate
log files using the eseutil.exe utility. The amount of time that it takes to
activate a lagged copy is dependent on the number of log files that you need
to replay. Microsoft suggests a minimum estimate of two logs per second per
database.
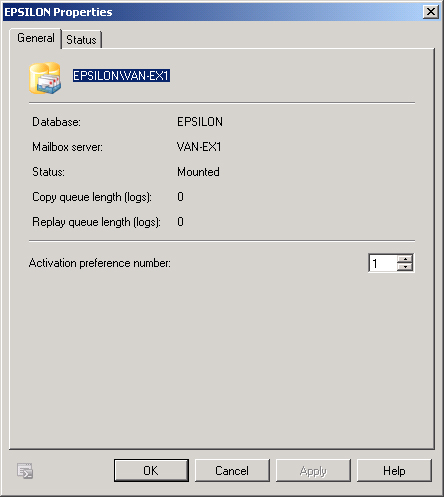
4.4. Failover Priority
The activation preference number for a mailbox database copy, shown in
Figure 4, indicates the order in which
passive mailbox database copies will activate in the event that a failure
occurs with the active mailbox database copy. You can configure the
activation preference number on the general tab of the passive database
copy’s properties dialog box. You can also configure the activation
priority when you create the mailbox database copy or by using the
Set-MailboxDatabaseCopy cmdlet with the
ActivationPreference parameter.