Practice: Configuring, Disabling, and Enabling S/MIME
In this practice session, you will use the registry editor to configure
S/MIME for OWA and the EMS to disable and then enable it. Note that it is
not essential to disable and enable S/MIME for OWA after reconfiguring the
registry settings, but it is good practice to do so.
EXERCISE 1 Managing S/MIME for
OWA
In this exercise, you will manage S/MIME for OWA by using the Regedit
utility to edit the registry on the Exchange Server 2010 Client Access
server VAN-EX1. You specify the time that OWA waits while connecting to
retrieve a single CRL as part of a certificate validation operation. You
specify the time that OWA waits to retrieve all CRLs when validating a
certificate.
You require that any digitally signed email message that is sent from OWA
be clear-signed. Carry out the following procedure:
Log on to the Client Access server VAN-EX1 using the Kim Akers
account.
In the Run box, enter regedit.
Navigate to the following registry key:
HKLM\System\CurrentControlSet\Services\MSExchange OWA\SMIME
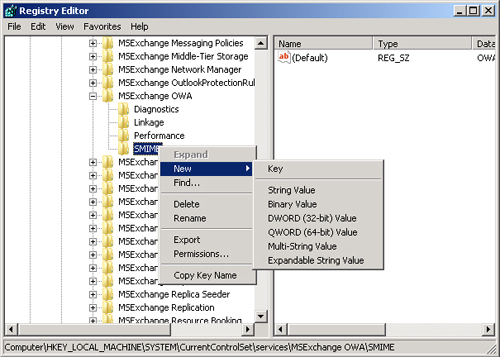
Right-click the MIME key and click New, as shown in Figure 8.
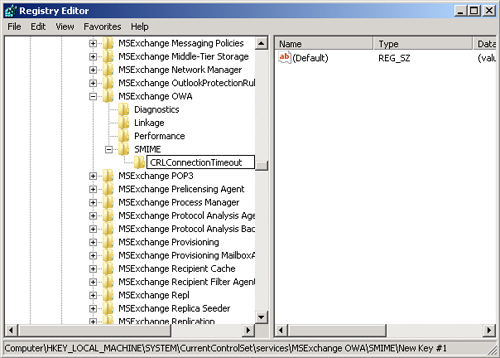
In the new key under SMIME, enter CRLConnectionTimeout, as shown in Figure 9.
Right-click the CRLConnectionTimeout key and click New.
Click DWORD (32-Bit) Value.
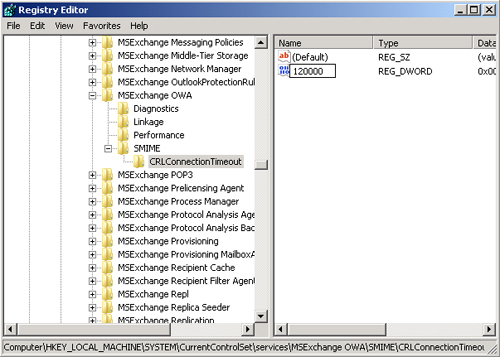
Type 120000, as shown in Figure 10. This
specifies that OWA waits a maximum of 120 seconds while connecting
to retrieve a single CRL as part of a certificate validation
operation before the operation fails. Press Enter.
Right-click the MIME key and click New.
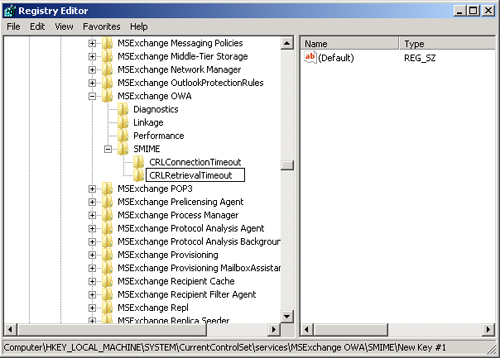
In the new key under SMIME, enter CRLRetrievalTimeout, as shown in Figure 11.
Right-click the CRLRetrievalTimeout key and click New.
Click DWORD (32-Bit) Value.
Type 20000 to specify that OWA
waits a maximum of 20 seconds to retrieve all CRLs when validating a
certificate. Press Enter.
Right-click the MIME key and click New.
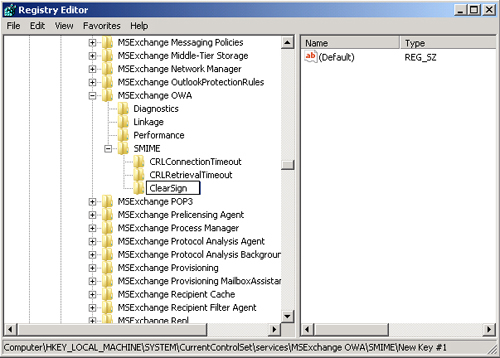
In the new key under SMIME, enter ClearSign, as shown in Figure 12.
Right-click the ClearSign key and click New.
Click DWORD (32-Bit) Value.
Type 1 to require that any digitally signed email message that is
sent from OWA is clear-signed. Press Enter.
Close the registry editor.
EXERCISE 2 Disabling and Enabling S/MIME for
OWA
By default, S/MIME is enabled. In this exercise, you use the EMS to
disable S/MIME on the OWA virtual directory in the default IIS website on
the Client Access server VAN-EX1. You then enable S/MIME on the same
website. You should perform this exercise after you have completed Exercise
1. Carry out the following procedure:
If necessary, log on to the Client Access server VAN-EX1 using the
Kim Akers account.
Enter
the following EMS command:
Set-OWAVirtualDirectory -Identity "owa (Default Web Site)" -SMimeEnabled $false
Enter the following EMS command:
Set-OWAVirtualDirectory -Identity "owa (Default Web Site)" -SMimeEnabled $true
Practice: Configuring the Sender Filtering Agent
In this practice session, you will configure the Sender Filtering agent to
block email from specific senders and specific domains. You will add a
sender to a list of blocked senders without deleting the current list, and
you will configure the Sender Filter agent to block messages that do not
specify a sender in the MAIL FROM: SMTP header.
EXERCISE 1 Block Email from Specific Senders and
Specific Domains
In this exercise, you will specify individual senders, a domain, and a
domain, including its subdomains. Carry out the following procedure:
Log on to the Edge Transport server VAN-EX2 using the Local
Administrator account and start the EMS.
To configure the Sender Filter agent to block messages from the
specific domain fabricam.com, enter the following command:
Set-SenderFilterConfig -BlockedDomains fabricam.com
To configure the Sender Filter agent to block messages from the
treyresearch.com domain and all its subdomains, enter the following
command:
Set-SenderFilterConfig -BlockedDomainsAndSubdomains treyresearch.com
As shown in Figure 13, these Sender Filter configuration commands do not generate an
output. If the commands complete without error, the configuration
changes have been made.

EXERCISE 2 Add a Sender to a List of Blocked
Senders
In this exercise, you will add a sender to a list of blocked senders
without removing the current blocked senders from the list. When you specify
values by using parameters such as BlockedSenders, BlockedDomains, and
BlockedDomainsAndSubdomains, these replace the existing list of blocked
senders. To preserve the existing list, you can use a temporary Shell
variable to add an address or a domain to the blocked senders list. The
following exercise uses the temporary variable $ExerciseListing to add the
sender [email protected] to the blocked senders list. You should perform
this exercise after you have completed Exercise 1. Carry out the following
procedure:
If necessary, log on to the Edge Transport server VAN-EX2 using
the Local Administrator account and start the EMS.
Place the existing Sender Filter list in the variable
$ExerciseListing by entering the following command:
$ExerciseListing = Get-SenderFilterConfig
Use the variable $ExerciseListing to update the Sender Filter list
by entering the following command:
Set-SenderFilterConfig -BlockedSenders $ExerciseListing.BlockedSenders
As shown in Figure 14, the
Sender Filter configuration commands to update the Sender Filter
list do not generate an output. If the commands complete without
error, the configuration change has been made.

EXERCISE 3 Configure the Sender Filter Agent to
Block Messages That Do Not Specify a Sender in the MAIL FROM: SMTP
Header
In this exercise, you will configure the Sender Filter agent to block
messages that do not specify a sender in the MAIL FROM: SMTP header.
Messages that meet this condition are likely to be spam. You should perform
this exercise after you have completed Exercises 1 and 2. Carry out the
following procedure:
If necessary, log on to the Edge Transport server VAN-EX2 using
the Local Administrator account and start the EMS.
Configure the Sender Filter agent to block messages that do not
specify a sender in the MAIL FROM: SMTP header by entering the
following command:
Set-SenderFilterConfig -BlankSenderBlockingEnabled $true
The command to configure the Sender Filter agent to block messages
that do not specify a sender in the MAIL FROM: SMTP header does not
generate an output. If the command completes without error, the
configuration change has been made.