You usually won't see messages in queues because
they're processed and routed quickly. Messages come into a queue,
Exchange Server performs a lookup or establishes a connection, and then
Exchange Server either moves the message to a new queue or delivers it
to its destination.
1. Understanding Queue Summaries and Queue States
Messages remain in a queue when
there's a problem or if they have been suspended by an administrator.
To check for problem messages, use the Queue Viewer to examine the
number of messages in the queues. If you see a queue with a consistent
or growing number of messages, there might be a problem. Again,
normally, messages should come into a queue and then be processed
quickly. Because of this, the number of messages in a queue should
gradually decrease over time as the messages are processed, provided no
new messages come into the queue.
Whenever you click the
Queues tab in the Queue Viewer, you get a summary of the currently
available queues for the selected server. Although queue summaries
provide important details for troubleshooting message flow problems, you
do have to know what to look for. The connection status is the key
information to look at first. This value tells you the state of the
queue. States you'll see include these:
Active An active queue has messages that are being transported.
Ready
A ready queue is needed to allow messages to be transported. When
queues are ready, they can have a connection allocated to them.
Retry A connection attempt has failed and the server is waiting to retry.
Suspended The queue is suspended, and none of its messages can be processed for routing. Messages
can enter the queue, however, as long as the Exchange Categorizer is
running. You must resume the queue to resume normal queue operations.
Administrators can
choose to enable or disable connections to a queue by right-clicking the
queue and selecting Suspend. If a queue is suspended, it is unable to
route and deliver messages.
You can change the queue state
to Ready by right-clicking the queue and selecting Resume. When you do
this, Exchange Server should immediately enable the queue, which allows
messages to be routed and delivered from it. If a queue is in the retry
state, you can force an immediate retry using the Retry command.
Other summary information that you might find useful in troubleshooting includes
Delivery Type Tells you for what type of recipient messages are being queued for delivery.
Next Hop Domain
Tells you the next destination of a delivery queue. For mailbox
delivery and remote delivery queues, this field tells you the next hop
domain. Messages queued for delivery to an EdgeSync server list the
associated site and destination, such as EdgeSync–Default-First-Site To
Internet.
Message Count
Tells you the total number of messages waiting in the queue. If you see
a large number, you might have a connectivity or routing problem.
Next Retry Time
When the connection state is Retry, this column tells you when another
connection attempt will be made. You can click the Retry command to
attempt a connection immediately.
Last Retry Time When the connection state is Retry, this column tells you when the last retry attempt was made.
Last Error
Tells you the error code and details of the last error to occur in a
particular queue. This information can Help you determine why a queue is
having delivery problems.
2. Refreshing the Queue View
Use the queue summaries and queue state information to help you find queuing problems. By default, the queue view is
refreshed every 30 seconds and the maximum number of message items that
can be listed on each page is 1,000.
To change the viewing options, follow these steps:
In the Queue Viewer, on the View menu, click Options.
To
turn off automatic refresh, clear the Auto-Refresh Screen check box.
Otherwise, enable automatic refresh by selecting the Auto-Refresh Screen
check box.
In the Refresh Interval text box, type a specific refresh rate in seconds.
Type
the desired maximum number of messaging items to be displayed per page
in the Number Of Items To Display text box. Click OK.
3. Working with Messages in Queues
To manage queues, you must enumerate
messages. This process allows you to examine queue contents and perform
management tasks on messages within a particular queue.
The easiest way to enumerate
messages is to do so in sets of 1,000. To display the first 1,000
messages in a queue, follow these steps:
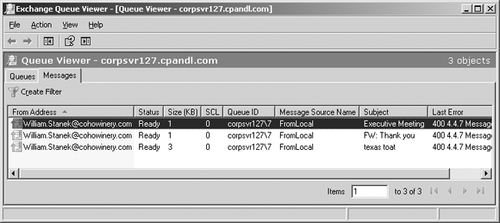
On
the Queues tab in the Queue Viewer, you should see a list of available
queues. Double-click a queue to enumerate the first 1,000 messages, as
shown in Figure 1.
After you enumerate messages in a queue, you can examine message details by double-clicking the entries for individual messages.
You can also create a filter to search for specific types of messages. To do this, follow these steps:
Double-click
the queue with which you want to work. This enumerates the first 1,000
messages in the queue, as discussed previously.
If you haven't previously created a filter, click Create Filter.
Use the first selection list to specify the field you want to use for filtering
messages. You can filter messages by the following criteria: Date
Received, Expiration Time, From Address, Internet Message ID, Last
Error, Message Source Name, Queue ID, SCL, Size (KB), Source IP, Status,
and Subject.
Use
the second selection list to specify the filter criteria. The available
filter criteria depend on the filter field and include Equals, Does Not
Equal, Contains, Does Not Contain, Greater Than, and Less Than.
Use the text box provided to specify the exact criteria to match. For example, if you are filtering messages using the Status field, you might want to see all messages
where the Status field equals Retry. Your filter is automatically
applied, and you can examine message details by double-clicking the
entries for individual messages.
To stop filtering, click the Remove Expression button.
4. Forcing Connections to Queues
In many cases, you can change
the queue state to Ready by forcing a connection. Simply right-click the
queue, and then select Retry. When you do this, Exchange Server should
immediately enable connections to the queue, and this should allow
messages to be routed to and delivered from it.
5. Suspending and Resuming Queues
When you suspend a queue, all
new message transfer activity out of that queue stops and only messages
being processed will be delivered. This means that messages can continue
to enter the queue, but no new messages will leave it. To restore
normal operations, you must resume the queue.
You suspend and resume a queue by completing the following steps:
On the Queues tab in the Queue Viewer, you should see a list of available queues. Right-click a queue, and then select Suspend.
When you're done troubleshooting, right-click the queue, and then select Resume.
Another way to suspend
messages in a queue is to do so selectively. In this way, you can
control the transport of a single message or several messages that might
be causing problems on the server. For example, if a large message is
delaying the delivery of other messages, you can suspend that message
until other messages have left the queue. Afterward, you can resume the
message to resume normal delivery.
To suspend and then resume individual messages, complete the following steps:
On
the Queues tab in the Queue Viewer, you should see a list of available
queues. Double-click the queue with which you want to work.
Right-click the message you want to suspend, and then select Suspend. You can select multiple messages using Shift and Ctrl.
When you're ready to resume delivery of the message, right-click the suspended message, and then select Resume.
6. Deleting Messages from Queues
You can remove messages from queues if necessary. To do this, follow these steps:
On
the Queues tab in the Queue Viewer, you should see a list of available
queues. Double-click the queue with which you want to work.
Right-click
the message you want to remove. You can select multiple messages using
Shift and Ctrl, and then right-click. Select one of the following
options from the shortcut menu:
Remove (With NDR) Deletes the selected messages from the queue, and notifies the sender with a nondelivery report (NDR)
Remove (Without Sending NDR) Deletes the message or messages from the queue without sending an NDR to the sender
When prompted, click Yes to confirm the deletion.
Deleting messages from a queue removes them from the messaging system permanently. You can't recover the deleted messages.
