Implementing a Parent-Child Relationship Between Primary Sites
When
you install an SMS 2003 secondary site, it becomes a child of the
primary site it’s installed from, and, voila, you have a parent-child
relationship. As we discussed, however, primary sites can also enter
into parent-child relationships. Two main requirements must be met to
successfully implement a parent-child relationship between two primary
sites: each site must have an address to the other site, and the child
must identify its parent.
Creating an Address
An address in SMS 2003 is
yet another site setting—that is, a property of the site. A site server
needs to know which other site servers it needs to communicate with—for
sending package information, inventory data, status messages, and site
control information—and how to establish that communication.
Both the parent and
the child need an address to each other. The child sends inventory data,
status messages, discovery data, and site control information to its
immediate parent. The parent site sends package, collection,
advertisement, and site control information to its child. A parent site
can also send this information to any other site below it in the
hierarchy. It does so by routing the information through its child sites
or by configuring an address directly to the other site.
This flow of information is illustrated in Figure 21.
Sites A04 and A05 will report data directly to their parent, site A03.
Site A03 will, in turn, report its data (which includes the data from
sites A04 and A05) directly to its parent, central site A01, as will
site A02. Sites A04 and A05 need an address to site A03, and sites A02
and A03 need an address to site A01. Similarly, site A01 needs an
address to sites A02 and A03, and site A03 needs an address to sites A04
and A05. Site A01 can administer any site below it in the hierarchy. It
can send package and advertisement information to sites A04 and A05 by
routing that information through site A03, for which it has an address.
However, if the SMS administrator configures an address in site A01 for
site A04, site A01 could send information directly to site A04.

An SMS 2003 site delivers information to another site by connecting to that site using a communication mechanism called a sender.
The five available senders are Standard Sender (regular LAN/WAN
connection), Asynchronous RAS Sender, ISDN RAS Sender, X.25 RAS Sender,
and SNA RAS Sender.
These senders connect to a
default share point on the target site named SMS_Site. This shared
folder references the SMS\Inboxes\Despoolr.box\Receive directory and is
created automatically during the installation of a primary or secondary
site server. If you’re running your sites in standard security mode, the
SMS administrator must identify a connection account that has at least
Change access to this share. That could, of course, be the SMS Service
account, but it doesn’t have to be. Using this account to access the
target site server share, the sender copies the data in question to the
target site, keeping track of its progress. When it has finished, the
sender disconnects from the target site. If you’re running your sites
using advanced security mode, SMS will use the Local System account and
computer accounts to connect to this share.
Tip
Since
the SMS Service account is a domain administrator as well, it’s not the
most secure account to use. The more secure approach in standard
security mode would be to create a new account (just a regular user),
password protect it, and give it Change access to the SMS_Site share. |
Creating an Address to Another Site
To create an address to another site, follow these steps:
1. | In the SMS Administrator Console, navigate to the Site Settings folder and expand it.
|
2. | Right-click the Addresses folder and choose New from the context menu. A list of sender address types is displayed, as shown in Figure 22.
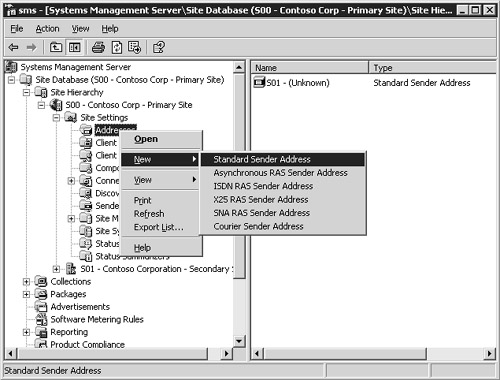
|
3. | Choose
the sender address type you need, to display its Properties dialog box.
Fill in the General tab in the appropriate Properties dialog box as
follows:
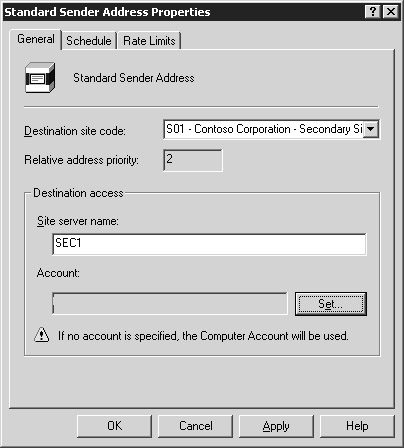
In the Standard Sender Address Properties dialog box, shown in Figure 23,
select the site from the Destination Site Code dropdown list for the
target site. In the Destination Access frame, enter the name of the
destination site’s site server name. Click the Set button to specify the
name and password of the account on the target site that has at least
Change permission for the SMS_Site share on the target site.
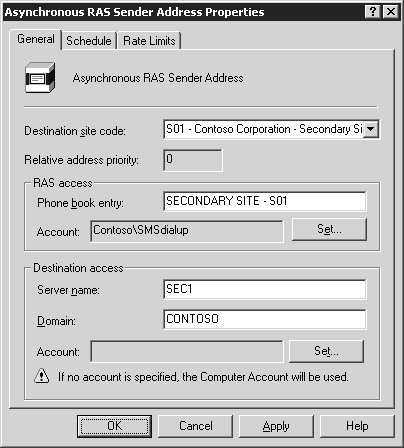
In the Asynchronous RAS Sender Address Properties dialog box, shown in Figure 24,
select the site from the Destination Site Code drop-down list for the
target site. In the RAS Access frame, enter the RAS phone book entry
that references dial-up information for accessing the target site. Click
the Set button to specify the dial-up access account and phone number
to be used when dialing in to the target site. In the Destination Access
frame, enter the name of the target site’s site server name and the
domain of which it is a member. Click the Set button to specify the name
and password of the account on the target site that has at least Change
permission for the SMS_Site share on the target site. If you’re running
in advanced security mode, this account will be displayed as Local
System and you won’t be able to change it.
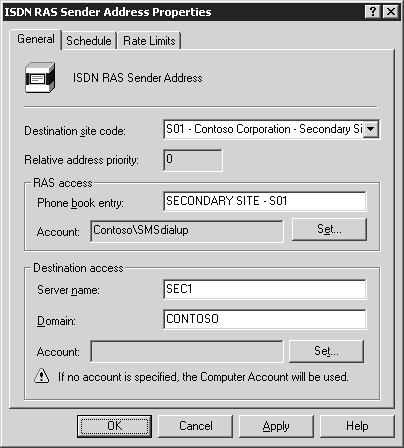
In the ISDN RAS Sender Address Properties dialog box, shown in Figure 25,
select the site from the Destination Site Code dropdown list for the
target site. In the RAS Access frame, enter the RAS phone book entry
that references dial-up information for accessing the target site. Click
Set to specify the dial-up access account and phone number to be used
when dialing in to the target site. In the Destination Access frame,
enter the name of the target site’s site server and the domain of which
it is a member. Click Set to specify the name and password of the
account on the target site that has at least Change permission for the
SMS_Site share on the target site. If you’re running in advanced
security mode, this account will be displayed as Local System and you
won’t be able to change it.
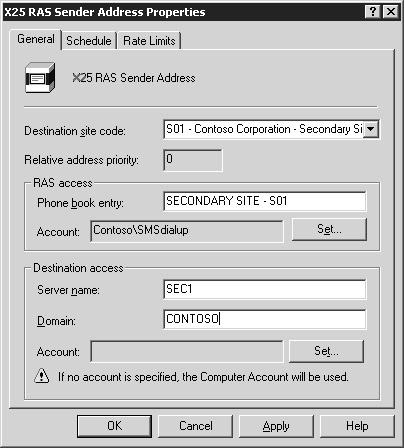
In the X.25 RAS Sender Address Properties dialog box, shown in Figure 26,
select the site from the Destination Site Code dropdown list for the
target site. In the RAS Access frame, enter the RAS phone book entry
that references dial-up information for accessing the target site. Click
the Set button to specify the dial-up access account and phone number
to be used when dialing in to the target site. In the Destination Access
frame, enter the name of the target site’s site server and the domain
of which it is a member. Click Set to specify the name and password of
the account on the target site that has at least Change permission for
the SMS_Site share on the target site. If you’re running in advanced
security mode, this account will be displayed as Local System and you
won’t be able to change it.
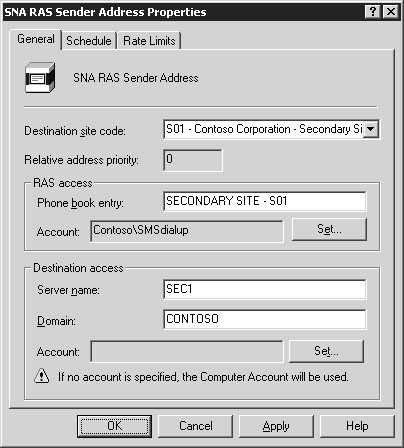
In the SNA RAS Sender Address Properties dialog box, shown in Figure 27,
select the site from the Destination Site Code dropdown list for the
target site. In the RAS Access frame, enter the RAS phone book entry
that references dial-up information for accessing the target site. Click
the Set button to specify the dial-up access account and phone number
to be used when dialing in to the target site. In the Destination Access
frame, enter the name of the target site’s site server and the domain
of which it is a member. Click the Set button to specify the name and
password of the account on the target site that has at least Change
permission for the SMS_Site share on the target site. If you’re running
in advanced security mode, this account will be displayed as Local
System and you won’t be able to change it.
|
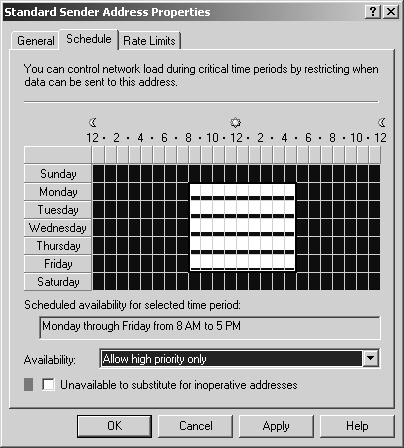
4. | Select the Schedule tab, as shown in Figure 28.
As you can see, by default the sender is available for all priority
send requests at all times. Select the time period you want to modify by
highlighting it using the mouse. In the Availability list, select the
appropriate option: Open For All Priorities, Allow Medium And High
Priority, Allow High Priority Only, Closed. The priority of a send
request such as a package is set when the package is created. Choose
Closed for periods when you don’t want the sender to send anything, such
as during regular backup times. If there are multiple addresses to a
target site, SMS will automatically choose the next sender in order of
priority (based on the Relative Address Priority setting in the General
tab) if the current sender is unavailable for some reason. Select the
Unavailable To Substitute For Inoperative Addresses check box to prevent
this sender from being used as an alternative sender (used when a
higher priority sender is in use or unavailable.)
|
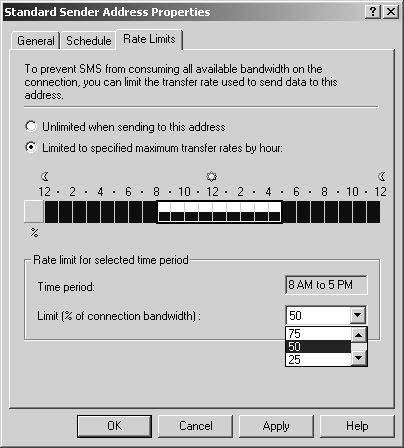
5. | Select the Rate Limits tab, as shown in Figure 29.
Notice that by default SMS can use as much bandwidth as it wants when
transferring data to the target site. Select the Limited To Specified
Maximum Transfer Rates By Hour option and highlight the period of time
you want to modify using the mouse. In the Rate Limit For Selected Time
Period frame, select a preferred bandwidth percentage from the drop-down
list.
|
6. | Click OK to create the address.
|
If
multiple addresses exist for a target site, the order of priority in
which SMS will use them to connect to the target site is the order in
which the addresses were created. This is known as the relative address priority—that
is, the priority of one address relative to another. You can change the
relative priority of an address by right-clicking one of the addresses
in the address pane of the SMS Administrator Console and choosing either
Increment Priority or Decrement Priority from the context menu. If you
have only one address listed, the priority options will be dimmed.
Multiple addresses to
the same target site provide SMS with alternative ways of connecting to
a site and transferring data if one sender is busy or unavailable. This
flexibility can improve performance in the sending process, but with
one caveat. You can install only one sender of each type on the same
site server. For example, you can’t install two Standard Senders on the
same site server, but you can install the Standard Sender once on as
many component site systems as you want.
Identifying the Parent Site
Before you identify a
site’s parent, you must have created an address to that parent site. The
child site will use that address to connect to the parent and transfer
its site control information—including the fact that the parent now has a
new child site. You can then set the parent site by following these
steps:
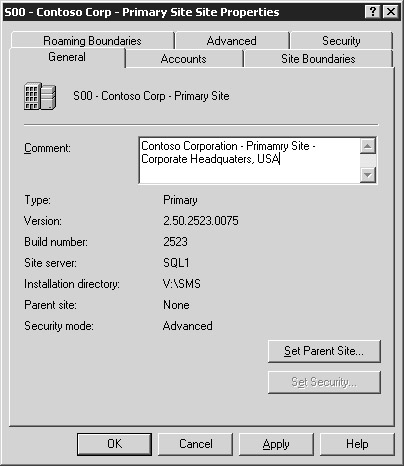
1. | In the SMS Administrator Console, navigate to the site entry and choose Properties from the context menu.
|
2. | The Site Properties dialog box appears, as shown in Figure 30. In the General tab, click the Set Parent Site button.
|
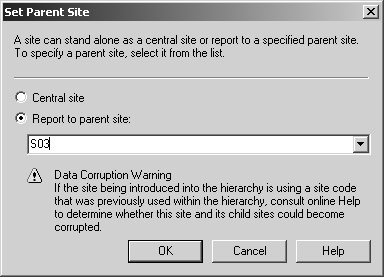
3. | In the Set Parent Site dialog box, shown in Figure 31,
select the Report To Parent Site option, enter the three-character site
code of the parent site, and click OK to return to the Site Properties
dialog box.
|
4. | Click OK again to set the parent site, which starts the site configuration change process.
|
The site
configuration change process includes not only updating the child site
with the new parent site information but also sending data to the parent
site and updating the parent site’s database and site control
information. This process shouldn’t take more than a few minutes, but
factors such as the resource capabilities of both the child and parent
sites, available bandwidth, and other database activity will affect the
length of time it takes for the parent-child relationship to be
established and “recognized” by both parent and child. When you
first create the address entry for the parent or the child, the site
entry should include the site code and should indicate that the site
name is unknown. After the relationship has been established and site
control data has been transferred, this information will be updated to
reflect the actual site name of the addressed site.
You can follow the flow
of the site configuration change process and the transfer of information
that takes place by monitoring the status messages that the SMS
components record at each point in the process. . Table 1 lists the SMS components and the status messages that relate to this process.
Table 1. Status messages generated during the establishment of a parent-child relationship
| SMS Component | Status Message Codes | Description |
|---|
| Discovery Data Manager | 2603, 2607 | Transferring discovery data to the parent site |
| | 2611, 2634 | Updating child discovery data (at the parent site) |
| Inventory Data Loader | 2708, 2709, 2711, 2713 | Transferring inventory data to the parent site |
| Replication Manager | 4000 | Creating jobs to send data to parent site |
| Hierarchy Manager | 3306, 3307 | Processing site control files (at the parent site) |
You can also
monitor the log files associated with the appropriate SMS components for
information regarding the flow of this process if you have enabled
logging for those components. These log files can be found in the
directory SMS\Logs and include Hman.log (Hierarchy Manager), Sched.log
(Scheduler), Sender.log (Sender), DDM.log (Discovery Data Manager), or
Replmgr.log (Replication Manager), depending on which components you
have enabled logging for.
