Up to this point we have looked at using SharePoint
as the primary user interface for Tropical Green employees and
leveraging the MCMS Internet site in a supporting role by pulling
product information off the site. Let’s flip this around and see how the
Tropical Green Internet site, used primarily by our current and
potential customers, can enhance the company intranet. Consider two
potential scenarios that demonstrate how an MCMS site could leverage
SharePoint:
MCMS is used to
implement the Tropical Green Internet site, accessible to any user with
Internet access and a browser. The targeted audiences for the Tropical
Green Internet site are potential new and current customers. SharePoint
is used to implement the Tropical Green intranet, which contains
documents with information on how to care for specific plants as well as
a list of upcoming events provided by Tropical Green. Some events are
only available to employees while others are available to everyone.
Searching MCMS with SharePoint, you can use SharePoint as the search indexer and engine to provide powerful capabilities on the Tropical Green Internet site.
|
Keep in mind
that exposing SharePoint Portal Server hosted content beyond the
employees in your organization requires the use of a SharePoint External
Connector license.
|
The MCMS Connector for SharePoint Technologies
Previously we explored the
Web Parts included with the Connector. These Web Parts were used to
publish MCMS content and integrate MCMS workflow into a SharePoint site.
The Connector also includes user controls and custom placeholders for
use in your MCMS templates to facilitate searching with SharePoint
Portal Server and publishing of documents from a SharePoint Portal
Server document library.
The SharePoint Document
Placeholder enables content owners to link a document managed by
SharePoint Portal Server to be presented within an MCMS posting. The
content owner can also display properties of the linked document in the
MCMS page. The presentation of the document and properties are
controlled using XSLT stylesheets, which can be centrally controlled or
individually applied to where they are needed. Once a document is linked
to an MCMS posting, users can access the document either via SharePoint
Portal Server or an MCMS site, which provides a seamless user
experience for users viewing the document contents, regardless of the
environment they access it from.
Any document stored
within a SharePoint Document Library can be added to a posting via the
SharePoint Document Placeholder. If the display view you choose includes
an icon, the placeholder will use the icon associated with that
document type on the MCMS Server. If the document type is a Microsoft
Office InfoPath form or a Word Markup Language (WordML) document, you
can have the contents of the document displayed in the placeholder
Control. Conversely, all other document types are shown as attachments
and/or the document properties. This is controlled by which XSLT options
you choose to render the document library items.
|
If the document is an
InfoPath form, you need to ensure the user (content consumer) has rights
to the SharePoint site containing the form. This is due to the fact
that the SharePoint Document Library contains the template used to
display the form in InfoPath.
|
When a document is added
to an MCMS posting via the SharePoint Document Placeholder, the document
is copied from the SharePoint Document Library into the MCMS repository
as a local attachment. If the document is of type XML, such as an
InfoPath or WordML document, the XML is saved in the MCMS placeholder as
well (this content in the placeholder is set to readonly
from within the MCMS site). Changes to the document in the SharePoint
Document Library are not automatically reflected in MCMS. The Document
Updater utility is included with the Connector to synchronize changes
done in the document library into MCMS (if the “update automatically”
checkbox has been checked in the SharePoint Document Placeholder control
when creating the posting). The tool, WssDocumentUpdater.exe, can be found in the Connector’s installation directory, C:\Program Files\MCMS Connector for SharePoint Technologies\CMS\bin\. This command-line tool can be set to run at regular intervals using the Windows Task Scheduler.
Using the SharePoint Document Placeholder
Let’s see the SharePoint
Document Placeholder in action. First, we need to create and upload a
document to a SharePoint Document Library:
1. | Create a new Microsoft Word document and enter the following text in the body of the document: This is content that is saved within a Microsoft Word file.
|
2. | Save the document to your desktop with the filename MCMS Published Document.
|
3. | Open Internet Explorer and browse to our SharePoint portal: http://portal.tropicalgreen.net/.
|
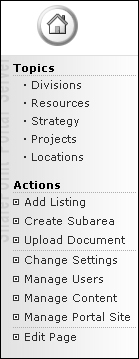
4. | Under the Actions navigation on the left-hand side of the portal, click Upload Document.
|
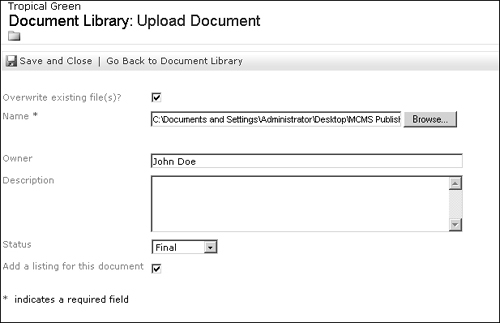
5. | On the Document Library: Upload Document page, click Browse and select the document we just created. Enter your name into the Owner textbox, pick Final in the Status dropdown, make sure Add a listing for this document is checked, and click Save and Close at the top of the form.
 |
6. | On the Add Listing page, accept all the default options by simply clicking the OK button at the bottom of the page.
|
Upon uploading the
document and creating a new listing, you will be automatically taken
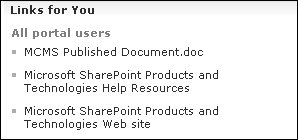
back to our portal homepage. If you look under the Links for You Web Part, you’ll see our document listed at the top of the list:
We now have a
document in a SharePoint Document Library. Now we need to create a new
posting in MCMS using a template that hosts a SharePoint Document
Placeholder. In this situation we’ll use the sample project, CmsSharePointConnector, included with the Connector to demonstrate this placeholder.
|
The CmsSharePointConnector project can be found at C:\Program Files\Microsoft Content Management Server\Sample Data\CmsSharePointConnector\.
We encourage you to do examine the CmsSharePointConnector
sample code as it contains controls and styles that can be used to make
your MCMS postings have the same look and feel—as well as navigation—as
a SharePoint Portal Site.
|
Open Internet Explorer and browse to the CmsSharePointConnector project at http://portal.tropicalgreen.net/CmsSharePointConnector/.
Did you get a 404 Not Found error?
If you did, it’s likely that the CmsSharePointConnector web application has not been excluded from SharePoint’s managed paths. Setting up MCMS and SPS on the Same Virtual Server, to add an excluded path.
The CmsSharePointConnector
homepage contains some information describing the Connector, sample
data, and some useful links. We’re interested in using the Internal
postings and templates, so click the Internal channel link.
As you can see, the main
page within the Internal channel looks just like a SharePoint portal
site. We want to create a new posting using the News template as it
contains a SharePoint Document Placeholder.

1. | Click the Switch To Edit Site link and then click the Create New Page link after the page reloads.
|
2. | When prompted to select a template, click the Internal Template Gallery, and then select the News template.
|
3. | Once the new posting is displayed, enter the following text in the top-most HtmlPlaceholder: My first SharePoint Document Placeholder posting.
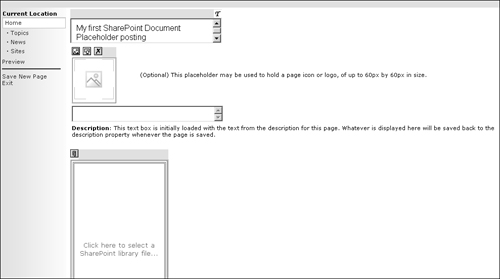 |
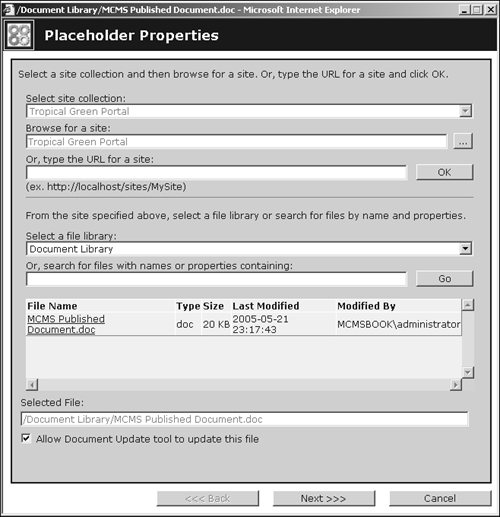
4. | Now it’s time to add the Microsoft Word document we just created and uploaded to the SharePoint Document Library. Activate the Placeholder Properties dialog by clicking on the placeholder that has the following text inside the placeholder container: Click here to select a SharePoint library file...
|
5. | In the Placeholder Properties dialog, select the document we uploaded by clicking on the MCMS Published Document.doc link and click the Next button.
 |
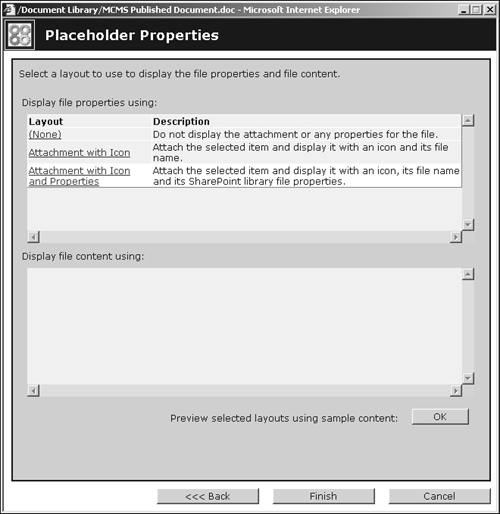
6. | You
will now have the option to select the layout options, which correspond
to either none, an icon with file name, or an icon with file name and
properties. These layout options are configurable in the catalog.xml file and what options are available depends on the file type. Select the Attachment with Icon and Properties option, followed by the Finish button.
|
|
Clicking the OK button next to the Preview selected layouts using sample content:
label will open another window, giving you the option to view the
various ways the document will be displayed within the posting.
|
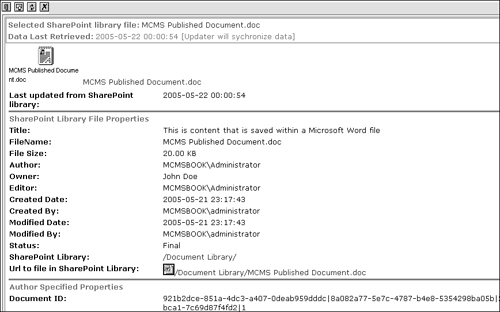
Once you’ve selected
the document and display options, the dialog will close, your posting
will reload, and you will now see how the SharePoint Document
Placeholder displays your document.
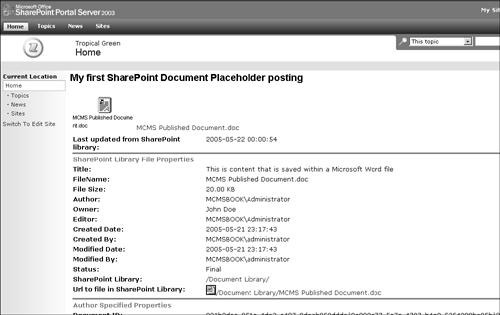
Let’s save and publish the posting by clicking the Save New Page link in the left-hand navigation and giving it a name and display name of My First SP Doc Placeholder Posting. Now publish the posting by clicking the Approve link. After approving the posting, click the Switch to Live Site link to see how your posting really looks when published:
Previously we
mentioned that you could use Extensible Stylesheet Language (XSL)
stylesheets to transform XML from the properties and content of a
document to HTML. A separate stylesheet is used for the document
properties and content. All documents will have XML files for their
document properties, but only InfoPath and WordML files are XML and can
be transformed with a content stylesheet. You specify the stylesheet you
want to use in the transformation in the Placeholder Properties dialog
we just encountered when adding a document. The Connector ships with
default stylesheets that we’ve already used. These stylesheets are found
at C:\Program Files\Microsoft Content Management Server\Server\IIS_CMS\WssIntegration\Dialogs\ WssDocumentFinder\TemplateCatalog\. The default stylesheets included with the Connector are listed in the table below:
| Stylesheet Name | Description |
|---|
| AttachmentIcon.xsl | Displays the document as an icon attachment. Available only if the file attached is a document. |
| AttachmentIconProps.xsl | Displays the document as an icon attachment with its properties. Available only if the file attached is a document. |
| ImageTagOnly.xsl | Displays the image inline. Available only if the file attached is an image. |
| ImageAndProps.xsl | Displays the image inline with its properties. Available only if the file attached is an image. |
The table
above is based on documentation found in the Microsoft Content
Management Server 2002 Connector for SharePoint Technologies help file,
included with the Connector.
The SharePoint
Document Placeholder looks at a single XML file to determine what
stylesheets are available for the different types of files that can be
attached to the placeholder. This file, catalog.xml, can be found in the same directory as the stylesheets outlined above. The catalog.xml file contains the following information on each of the available styles:
Types of files the stylesheet can be applied to, such as jpg, gif, contentxml, or all (noted with an *)
Descriptive name shown in the dropdown of the Placeholder Properties dialog
Description of the stylesheet
URL specifying the location of the XSL stylesheet used in the transformation
A
sample rendering URL, which is an XML file used to mimic the XML feed
sent to the placeholder when a document is attached, giving the user a
preview of the final rendering
In addition, you can also use a specific library that the stylesheet can be applied to using the SpecificWebUrl and SpecificLibrary attributes in the type node of the catalog.xml file. Use the SpecificWebUrl attribute to indicate which WSS or SPS site and the SpecificLibrary attribute to indicate the name of the WSS or SPS library to which the stylesheet can be applied.
You can create your own catalog.xml
file for a specific SharePoint Document Placeholder implementation in
order to restrict or provide certain rendering options for that library.
Simply create a new XML file that conforms to the catalog.xsd schema definition file (found in the same directory as the catalog.xml
and stylesheets) and specify this file in the HTML of your MCMS
template that implements the SharePoint Document Placeholder using the RenderingTemplateCatalogUrl
attribute and specifying the virtual path to your catalog file. For example, if you created a new catalog called mycatalog.xml, the SharePoint Document Placeholder would look like this in the MCMS template file:
<cc1:SharePointDocumentPlaceholderControl
id="SharePointDocumentPlaceholderControl" runat="server"
KeepSynchronized="False" PlaceholderToBind="SPSDocument"
RenderingTemplateCatalogUrl="mycatalog.xml">
</cc1:SharePointDocumentPlaceholderControl>