Frequent Dynamics AX users might notice that some of
the forms contain two sections placed next to each other and allow
moving items from one side to the other. Normally, the right section
contains a list of possible values and the left one contains already
selected values. Buttons in the middle allow moving data from one side
to another. Mouse double-clicking and drag-and-drop are also supported.
Such design improves user experience as data manipulation becomes very
user-friendly. Examples in the standard application are General ledger | Setup | Financial statement | Dimension focuses or Administration | Setup | User groups.
This functionality is based on the SysListPanelRelationTable
application class. Developers only need to create its instance with the
required parameters on the form where the list is required and the rest
is done automatically.
This recipe will show the
basic principle of how to create selected/available lists. We will add
an option to the user to assign inventory items to buyer groups in the Buyer groups form in the Inventory management module setup.
How to do it...
1. In AOT, create a new table named InventBuyerGroupList. Accept the default properties as this table is only for demonstration.
2. Add a new field to the table with the following properties:
|
Property
|
Value
|
|---|
|
Type
|
String
|
|
Name
|
GroupId
|
|
ExtendedDataType
|
ItemBuyerGroupId
|
3. Add another field to the table:
|
Property
|
Value
|
|---|
|
Type
|
String
|
|
Name
|
ItemId
|
|
ExtendedDataType
|
ItemId
|
4. In AOT, open the InventBuyerGroup form and add a new TabPage control with the following properties to the end of the existing tab:
|
Property
|
Value
|
|---|
|
Name
|
Items
|
|
Caption
|
Items
|
5. Add the following line to the form's class declaration:
SysListPanelRelationTable sysListPanel;
6. Override the form's init() with the following code:
void init()

{
container columns;
#ResAppl
;
columns = [fieldnum(InventTable, ItemId),
fieldnum(InventTable, ItemName)];
sysListPanel = SysListPanelRelationTable::newForm(
element,
control::Items,
"Selected",
"Available",
#ImageItem,
tablenum(InventBuyerGroupList),
fieldnum(InventBuyerGroupList, ItemId),
fieldnum(InventBuyerGroupList, GroupId),
tablenum(InventTable),
fieldnum(InventTable, ItemId),
columns);
super();
sysListPanel.init();
}
7. Override pageActivated() on the created tab page:
public void pageActivated()
{;
sysListPanel.parmRelationRangeValue(
InventBuyerGroup.Group);
sysListPanel.parmRelationRangeRecId(
InventBuyerGroup.RecId);
sysListPanel.fill();
super();
}
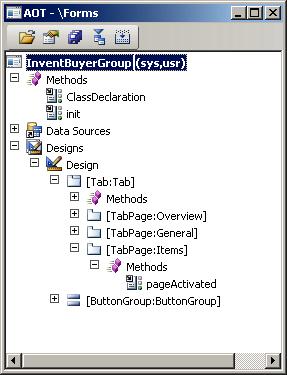
8. The form should look like this in AOT:

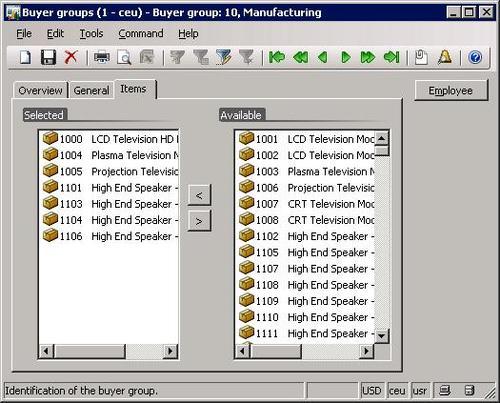
9. To test the list, open Inventory management | Setup | Inventory | Buyer groups, select any group, go to the Items
tab page and use the buttons provided to move records from one side to
the other. You could also double-click or drag-and-drop with your mouse:

How it works...
The table InventBuyerGroupList is used as a relation table between buyer groups and inventory items to support many-to-many relations. The SysListPanelRelationTable class will populate this table with the data automatically.
In terms of form design, the only thing that needs to be added is a new tab page called Items. SysListPanelRelationTable will add all the required controls to this page automatically.
In the form's class declaration, we declare a SysListPanelRelationTable object. The object is created in the form's init() using the static newForm() constructor. It accepts the following parameters:
2. The name of the tab page.
3. The label of the left section.
4. The label of the right section.
5. The number of the image that is shown next to each record in the lists.
6. The relation table number.
7.
The field number in the relation table representing the child table. In
our case it is the item identification number— ItemId.
8. The field number in the relation table representing the parent table. In this case it is the buyer group number— GroupId.
9. The number of the table that is displayed in the lists.
10. A container of the field numbers displayed in each column.
We also have to initialize the list by calling it's member method init() in the form's init() right after super().
The code in the pageActivated()
of the new tab page is triggered once the user opens that tab page. It
populates the lists with the inventory data depending on which buyer
group is selected.
There's more...
The SysListPanelRelationTable
class can only display fields from one table. In the previous example,
we used item number and item name. But what if we want to show other
item related information, which is stored in a different table, for
instance sales price or available quantity?
Another class called SysListPanelRelationTableCallback
exists in the standard Dynamics AX application, which allows creating
customized lists. To demonstrate its capabilities, we will expand the
previous example to display item prices.
First in the form's class declaration, we have to change the list declaration to the following:
SysListPanelRelationTableCallback sysListPanel;
Next we need to create two
methods one for the left list, the other for the right, which generate
and return data containers to be displayed in each section:
container selectedItems()

{
container ret;
container data;
InventTable inventTable;
InventBuyerGroupList groupList;
;
while select groupList
join firstonly inventTable
where inventTable.ItemId == groupList.ItemId
{
data = [inventTable.ItemId,
inventTable.ItemId,
inventTable.ItemName,
inventTable.salesPcsPrice()];
ret = conins(ret, conlen(ret)+1, data);
}
return ret;
}
container availableItems()

{
container ret;
container data;
InventTable inventTable;
InventBuyerGroupList groupList;
;
while select inventTable
notexists join firstonly groupList
where groupList.ItemId == inventTable.ItemId
{
data = [inventTable.ItemId,
inventTable.ItemId,
inventTable.ItemName,
inventTable.salesPcsPrice()];
selected/available listselected/available listmethods, creatingret = conins(ret, conlen(ret)+1, data);
}
return ret;
}
Each method returns a
container of containers. Each container in the main one represents one
line in the section. It contains four items— the first is an
identification number and the rest of them are the three columns.
Next, we replace the form's init() with the following code:
void init()

{
container columns;
#ResAppl
;
columns = [0, 0, 0];
sysListPanel = SysListPanelRelationTableCallback::newForm(
element,
control::Items,
"Selected",
"Available",
#ImageItem,
tablenum(InventBuyerGroupList),
fieldnum(InventBuyerGroupList, ItemId),
fieldnum(InventBuyerGroupList, GroupId),
tablenum(InventTable),
fieldnum(InventTable, ItemId),
columns,
0,
'',
'',
identifierstr(selectedItems),
identifierstr(availableItems));
super();
selected/available listselected/available listmethods, creatingsysListPanel.init();
}
This time we used the static newForm() constructor of SysListPanelRelationTableCallback,
which is very similar to the previous one, but accepts as arguments the
names of methods, which will be used to populate the data in the right
and left sections.
Also notice that
the container that previously contained fields representing each list
column now has three zeros. By doing that, we simply define that there
will be three columns in each list and because the lists actually are
generated outside SysListPanelRelationTableCallback class, we do not need to specify the field numbers of the columns anymore.
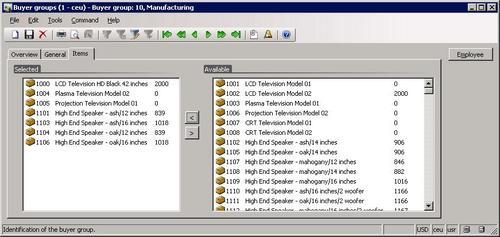
Now, when you run the Buyer groups form both sections contain additional column with item sales price:
