Distribution Points
The distribution point is an
SMS site system that stores the package files, programs, and scripts
necessary for a package to execute successfully at an SMS client
computer. When the site server is installed, it becomes a distribution
point by default. As with CAPs, however, you’ll want to assign other
site systems as distribution points and remove this role from the site
server to reduce its resource requirements and improve its performance
as well as to load balance the potentially significant network traffic
generated by clients downloading package source files.
BITS-Enabled Distribution Points
Advanced Clients,
also known as roaming clients, can take advantage of a new feature
called Background Intelligent Transfer Service (BITS). BITS is a service
that can be enabled on distribution points that serve Advanced Clients.
It’s used to help control the amount of bandwidth used by an Advanced
Client during download, as well as to insure that the Advanced Client
doesn’t necessarily have to wait a lengthy period for a package while,
say, being connected to the network through a slow or unreliable
connection. BITS provides a checkpoint restart of a package. If the
download of package files is interrupted—the connection is lost
accidentally or because the user needs to disconnect—the download can
continue at the point it was interrupted once a new connection is
established rather than starting over from the beginning.
Caution
The
checkpoint restart will restart the download with the last file that
was being accessed at the time the connection was lost. If this was the
10th file out of 20, the download will restart with the 10th file when
the connection is reestablished. However, if your package consists of a
single executable file such as an .EXE or .MSI file, the download will
restart at the beginning, since that was the file that was interrupted. |
The Advanced Client
remains assigned to its original site. However, when the Advanced Client
needs to retrieve an advertised package, it can download or run the
package from a local distribution point, rather than from its assigned
site. Remember this when you choose remote servers to be distribution
points.
To
protect your Advanced Clients from excessive bandwidth consumption,
enable BITS on your distribution points that serve Advanced Clients.
This provides an efficient file transfer mechanism through
client-sensitive bandwidth throttling. It also provides checkpoint
restart download of packages, which allows files to be transferred to
the client in a throttled manner.
Protected Distribution Points
The protected
distribution point is designed to protect network links to distribution
points from unwanted traffic. The SMS administrator specifies which
roaming boundaries or site boundaries Advanced Clients must be in to use
the protected distribution point. Any clients outside those boundaries
are unable to download or run packages from that distribution point.
To restrict access
to a distribution point that’s across a slow or unreliable network
link, plan to enable it as a protected distribution point. This is
beneficial at remote locations, where a small number of SMS clients and a
distribution point are connected to the primary site by a WAN. For
example, consider configuring a protected distribution point on
secondary site servers that are connected to their parent primary site
by a WAN link.
Distribution points are installed through the SMS Administrator Console as a site system setting.
To assign the distribution point role, follow these steps:
1. | In the SMS Administrator Console, navigate to the Site Settings folder and expand it.
|
2. | Highlight the Site Systems folder to display a list of the site systems you have defined.
|
3. | Right-click
the site system you want to assign as a distribution point and then
choose Properties from the context menu to display the Site Systems
Properties dialog box.
|
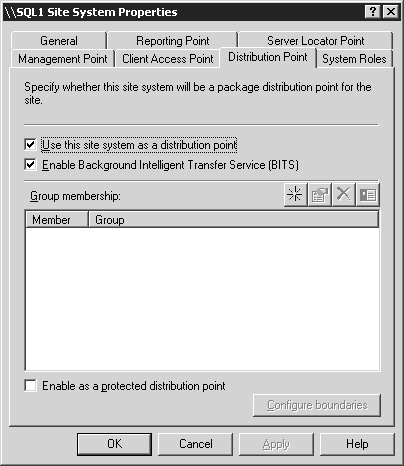
4. | Select the Distribution Point tab, shown in Figure 9.
Select the Use This Site System As A Distribution Point check box. If
you want to enable BITS, select the Enable Background Intelligent
Transfer Service (BITS) check box as well. Then click OK.

|
5. | Click OK again to save this setting and begin the site configuration change process that will set up the new distribution point.
|
If you want to remove
the distribution point role from the site server or disable BITS,
right-click the site server and just follow the same procedures as you
did to assign a distribution point role to the site system; however, you
should clear the Use This System As A Distribution Point or the Enable
Background Intelligent Transfer Service (BITS) check boxes (or both)
when you’re in the Distribution Point tab.
When you enable
the new distribution point, you have identified a change to the site
control information for the site.
The distribution point
is not written to until a package is actually distributed. At that time,
the Distribution Manager thread on the site server checks the
distribution point for the partition with the most free space. On that
partition, it creates a shared folder named SMSPkgx$, where x
is the drive letter of the partition. The share is a hidden share—a
change from earlier versions of SMS. Then the Distribution Manager
component on the site server copies the package and program files to a
subfolder beneath SMSPkgx$. If in the course of copying packages to the
distribution point, you begin to run low on disk space, the Distribution
Manager will find the next partition with the most free space and
create another shared SMSPkgx$ folder there.
Tip
If
you want or need to specify where the package files will be copied on
the distribution point, create the SMSPkgx$ folder and share yourself.
Be sure to give your users at least Read access to the folder and give
the SMS Service account Full Control access. Alternately, you can create
your own share structure using your own naming conventions on each
distribution point (the same structure on each distribution point). Then
when you create your package you can reference the appropriate share
that you want the package files distributed to. |
You can also use the Distribution Point tab in the Site Properties window to create what are known as distribution point groups.
Basically, distribution point groups let you group your distribution
points into more manageable units. Packages can then be targeted to a
distribution point group rather than to individual distribution points.
To create a distribution point group, follow these steps:
1. | In the SMS Administrator Console, navigate to the Site Settings folder and expand it.
|
2. | Highlight the Site Systems folder to display a list of the site systems you have defined.
|
3. | Right-click
any site system you have assigned as a distribution point and choose
Properties from the context menu to display the Site Systems Properties
dialog box.
|
4. | Select the Distribution Point tab, shown in Figure 9.
|
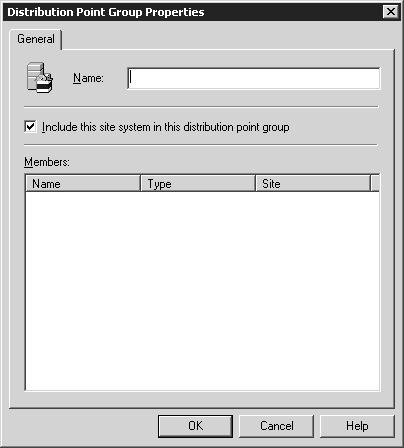
5. | In
the Group Membership frame, click the yellow star button on the right
to display the Distribution Point Group Properties dialog box, as shown
in Figure 10.

|
6. | Enter
the name of the distribution point group you want to create. If you
want the site system you selected to be included in the group you’re
creating, select the Include This Site System In This Distribution Point
Group check box. Then click OK.
|
7. | Click
OK again to save this setting and begin the site configuration change
process that will set up the new distribution point group.
|
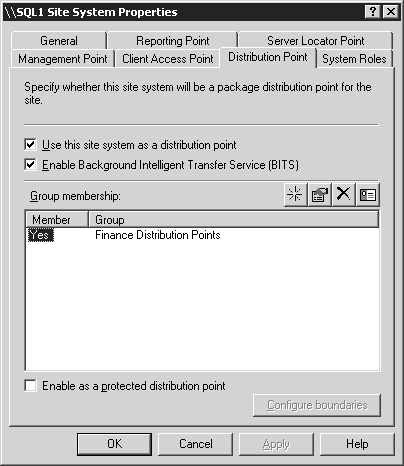
Now
when you create a new distribution point or display the properties of
an existing distribution point site server, any distribution point
groups you created will be displayed in the Group Membership list in the
Distribution tab of the Site Systems Properties dialog box, as shown in
Figure 11, and you’ll have the opportunity to include the distribution point in one or more of the distribution point groups.

Unlike
CAPs, distribution points can be shared among SMS 2003 sites. This
sharing enables you to leverage equipment and place distribution points
closer to the users and clients that will need to access them. The most
significant resource consideration for a distribution point is disk
space. Since you’re copying source files and scripts for package
installation there, you’ll need enough disk space to accommodate all the
packages. The next most significant resource consideration will be
network access and traffic. You can use Network Monitor to track and
gauge this factor. This tool can also help you determine when an
additional distribution point might be necessary. The amount of network
traffic that’s generated will depend on the size of your packages, the
number of clients accessing the DP to execute a program, and whether you
scheduled the package to run at an assigned time.