The first thing you need
to identify is which of the two products will serve the primary role as
the user interface or experience. One option is to use SharePoint
(either WSS or SPS) as the primary user interface and use MCMS either in
a supporting role or to manage certain areas of the site. There are
three very common implementations when using the two products in this
scenario:
SharePoint Portal
Server is used to implement the Tropical Green intranet, which is
accessible by Tropical Green employees only. Tropical Green production
departments, team project collaboration sites, announcements, and
important documents are stored within areas and WSS sites within the
SharePoint portal. MCMS is used by the Human Resources department to
maintain a very controlled publishing workflow of company policies,
procedures, benefits, and employee announcements. The Human Resources
documents are presented in lists and are linked to from various parts of
the website.
Similar
to the previous scenario, SharePoint Portal Server is used to provide
the Tropical Green intranet, which has dedicated areas for the various
production departments, team project collaboration sites, and so on.
Tropical Green’s product groups also post tips and other helpful
information to SharePoint lists. Tropical Green also uses MCMS to host
its Internet site, which is the primary entry point to the company for
all Tropical Green customers. The Tropical Green MCMS Internet site
pulls tips from the SharePoint lists in the Tropical Green SharePoint
intranet site and displays them for registered customers. In addition,
the event details could be pulled from the Tropical Green SharePoint
intranet and be made available on the Tropical Green MCMS Internet site.
This option would require the purchase of an External Connector
License, which is required when you expose SharePoint content to users
outside your organization (such as the Internet).
MCMS
and SharePoint are used by Tropical Green to provide a complete
intranet solution. SharePoint is primarily used to host smaller team
sites and offer a centralized search engine for the entire intranet
while MCMS is leveraged in content-heavy portions of the intranet.
In the scenarios above,
you’ll notice one common factor: the solutions pull content from one
environment (such as SharePoint or MCMS) for display in another
environment. Note that the content is not duplicated and is read only
(with the exception of the SharePointDocumentLibrary
placeholder, which MCMS Templates use to display content from
SharePoint document libraries); it’s simply pulled in thus reducing data
duplication. Limiting data duplication reduces errors and the costs
associated with managing and updating the information in two different
products. However, the overall performance of the solution will decrease
as it would perform better if it had a copy of the data rather than
pulling it in real time from another product. The three scenarios above,
while rather simple, should give you an idea of some of the
possibilities in sharing content between SharePoint and MCMS.
The MCMS Connector for SharePoint Technologies
In February 2004,
Microsoft released the Connector, which contains a collection of
SharePoint Web Parts, MCMS controls, and placeholders, and a few
command-line utilities developers can use to leverage the strengths of
SharePoint in MCMS and vice versa. The Connector is completely free, is
supported by Microsoft and fully documented, and contains a sample
project (with data) demonstrating the features included in the package.
The first scenario
we’ll look at involves the presentation of MCMS content from within
SharePoint. The Connector provides three ways to view our postings
within MCMS in a SharePoint site using Web Parts.
MCMS Page Listing Web Part:
Displays a list of postings selecting an MCMS channel. The presentation
of the list can be modified using different views.
MCMS Pages in Production Web Part: Displays a list of postings the current user is working on similar to the Production Manager in MCMS.
MCMS Pages Waiting for Approval Web Part: Displays a list of postings that can be approved by the current user similar to the Approval Assistant in MCMS.
After installing the
Connector, these three Web Parts are automatically installed on all
portal sites. If you are going to create a portal after the Connector
has been installed you need to install the three Web Parts, which are
all contained in a single CAB file, manually. Unfortunately the
documentation included with the Connector does not explain how to
install the Web Parts. SharePoint requires you to use a command-line
utility to install Web Parts and perform other administrative functions.
This utility, stsadm.exe, can be found in the directory at C:\Program Files\Common Files\Microsoft Shared\web server extensions\60\BIN\.
Let’s go ahead and install the Connector’s Web Parts using STSADM.EXE, then we will look at each Web Part we have installed.
Installing the MCMS Connector Web Parts
1. | Click Start | Run (or hit Windows + R) and enter cmd in the dialog box to bring up the command-line window.
|
2. | Change directory to the location of the STSADM.EXE utility by entering cd
c:\Program Files\Common Files\Microsoft Shared\web server extensions\ 60\BIN\.
|
3. | Before we install, let’s see what Web Parts are already installed on all portals on our site. We do this by using the enumwppacks option which will display a list of all Web Parts installed on each virtual server. Enter the following command at the prompt: STSADM.exe -o enumwppacks. If you haven’t installed anything into your portal, you should see something like the following:
 |
4. | Now
let’s go ahead and install the Connector Web Parts to all SharePoint
extended virtual servers on our server. You need to find the CAB file
that contains the three Web Parts included with the Connector. If you
installed the Connector in the default installation directory, you’ll
find the CAB file at c:\Program Files\MCMS Connector for SharePoint Technologies\WSS\Bin\CmsWebParts.cab. Type the following into the command console: STSADM.exe -o addwppack -filename "C:\Program Files\MCMS Connector for SharePoint Technologies\WSS\Bin\CmsWebParts.cab". You should see the following response:
 |
5. | Looks like everything was installed successfully. Let’s double-check and see what the enumwppacks option reports now (and also confirm the Web Parts were installed). Enter stsadm.exe -o enumwppacks. You should see the following:
 |
Now that we have the Connector Web Parts installed, let’s take a look at each of them.
MCMS Page Listing Web Part
The MCMS Page Listing
Web Part displays the postings within a specified channel. Once this Web
Part is added to a SharePoint Web Part Page, you specify the MCMS site
root URL and channel path that contains the postings you wish to
display. Users with appropriate permissions to modify the Web Part
settings can also specify the number of postings to display per page,
the sorting order of the postings, and how they wish to display or view
the list.
Let’s add the MCMS Page Listing Web Part to a SharePoint Web Part Page and see what we get.
1. | Navigate to a SharePoint portal in Internet Explorer.
|
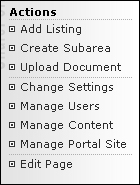
2. | Click the Edit Page link in the vertical left-hand Actions menu:
|
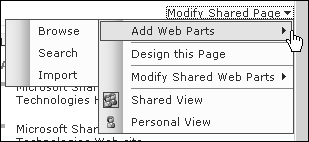
3. | Now that the page is in edit mode, click the Modify Shared Page link in the upper left. Using the dynamic drop-down menu that appears, select Add Web Parts and then Browse.
|
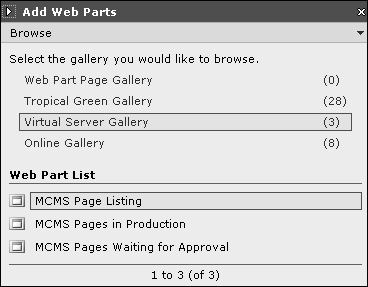
4. | When
the SharePoint Web Part Tool Pane loads on the right-hand side of the
browser, it is set to list all Web Parts in the portal’s Web Part
gallery (in our case, the Tropical Green Gallery). When you install Web
Parts in a SharePoint site (SPS or WSS), they are added to the Virtual
Server Gallery. Since we installed the Web Parts included with the
Connector, we need to select the Virtual Server Gallery by clicking it.
What is the SharePoint Web Part Tool Pane?
The SharePoint Web
Part Tool Pane is a task pane on a SharePoint Web Part Page used to add
Web Parts from Web Part galleries, and to modify custom and common Web
Part properties.
Why are the Web Parts we installed in the Virtual Server Gallery?
When you install
a Web Part, you are installing it to a specific virtual server. Even
when you elect to install it in all sites or in the Global Assembly
Cache, the additions are made to each virtual server to tell the
SharePoint portal (or site(s)) within that virtual server that it can
use the Web Part.
|
5. | You should now see the three Web Parts included in the Connector listed in the Add Web Parts Tool Pane as shown in the previous image. Select the MCMS Page Listing and drag it onto the page, placing it the top zone, as shown in the following image:
 |
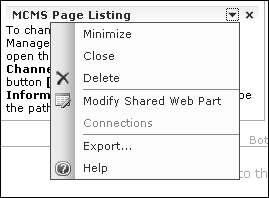
6. | Now
that we have our Web Part on the page, we need to configure it as it
doesn’t yet know what site or channel to enumerate the postings for.
Click the small down arrow in the upper-right corner of the MCMS Page Listing Web Part we just added and select Modify Shared Web Part as shown:
|
7. | The Web Part properties Tool Pane now takes the place of the SharePoint Web Part Tool Pane. Expand the Custom Properties section by clicking the [+] icon to the left of the Custom Properties section heading.
|
8. | We need to tell the Web Part the URL of our MCMS web application. Enter the following for the property MCMS Site Root URL:
http://www.tropicalgreen.net/MCMS/. Click the Apply button at the bottom of the Tool Pane.
|
Microsoft recommends
that you use MCMS as the web application name as it’s the default web
application installed with every MCMS server.
|
|
9. | Now we need to select a channel. Click the ellipsis (...) to the right of the Channel Path text box. A modal dialog window will open with an MCMS channel browser. Navigate to our Plant Catalog channel, select it, and click OK. Click the Apply button at the bottom of the Tool Pane.
|
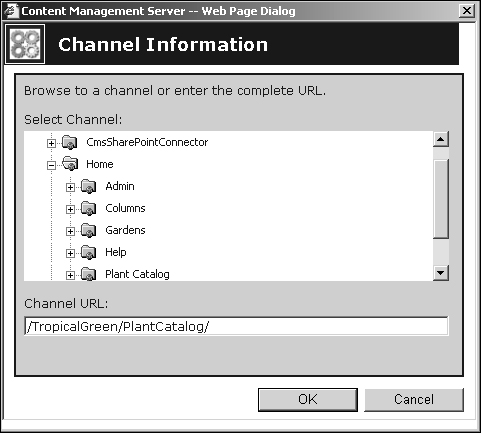
At this point you should see the Web Part display some of our postings. Use the last three custom properties (View, Items Per Page, and Sorting Order)
to customize the display of the posting list. Out of the box, the Web
Part provides three different predefined views to display the list of
postings:
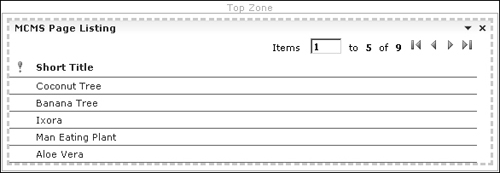
Basic List View:
The posting’s “short title” (which is the name of a placeholder
definition within the template) is displayed, hyperlinked to the actual
posting, with an importance icon. The importance icon appears if the
MCMS posting is marked as important. If the posting does not have a
short title, the display name is used. The following image is the MCMS
Page Listing Web Part configured to display the postings in the PlantCatalog channel from our Tropical Green website with the Basic List View:
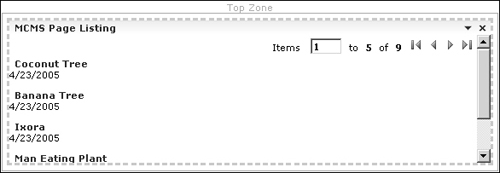
Page Summary List View:
This is the default view for the MCMS Page Listing Web Part. The
postings contained within the specified channel are shown in a summary
form including the short title (or the posting display name if the short
title is not specified) hyperlinked to the posting, a summary image (if
specified in a summary image placeholder within the posting), the
description of the posting, and the last date the posting was modified.
The following image is the MCMS Page Listing Web Part configured to
display the postings in the PlantCatalog channel from our Tropical Green website with the Page Summary List View:
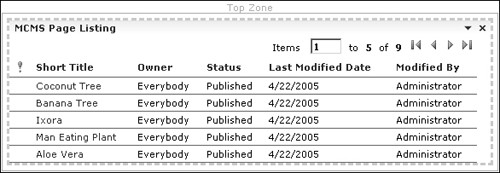
Detailed List View:
The last predefined view included in the MCMS Page Listing Web Part is
the Detailed List View. This view contains the short title (or the
posting display name if the short title is not specified) hyperlinked to
the posting, the posting’s owner and status (indicating the publishing
state), and the person who last modified the posting as well as when it
was modified. The following image is the MCMS Page Listing Web Part
configured to display the postings in the PlantCatalog channel from our Tropical Green website with the Detailed List View:
If
the three out-of-the-box views are not sufficient for your needs, the
MCMS Page Listing Web Part is built to allow for you to create up to
three additional custom views per server. If you need more than three
custom views you’ll need to create your own Web Part as this is a fixed
limitation of the MCMS Page Listing Web Part. Custom views can be
implemented by creating a strongly named assembly that contains a class
that implements the Microsoft.ContentManagement.SharePoint.Dialogs.IPageListing interface. This interface contains a single method, GetHtml(), which accepts a Microsoft.ContentManagement.SharePoint.Dialogs.PageListingsParameters object and a Microsoft.ContentManagement.Publishing.Posting object and returns a single string, which should be HTML. PageListingParameters contains context information from the MCMS Page Listing Web Part and the Posting object is a reference to the current posting.
The way it works is that
the MCMS Page Listing Web Part creates an HTML table with the necessary
paging information, followed by another HTML table that contains a
single table row and table cell for each posting in the specified
channel. For each posting, it calls the GetHtml() method, passing in the PageListingParameters and current Posting,
and places the returned string in the table cell. Unfortunately this
doesn’t provide complete control of the HTML inside the MCMS Page
Listing Web Part, but it does allow you to control how each item in the
list is being formatted and which properties should be displayed.
Once you build your strongly named assembly, you must install it into the Global Assembly Cache (GAC) and modify the Web.config
file in the MCMS web application. Let’s see this in action by building
our own custom view that will display the plant name, description, and
the last time the posting was updated. It’s nothing complex, but it will
demonstrate how easy it is to create a custom view.