Management Points
Similar to the
relationship between a CAP and a Legacy Client, the management point is
an SMS site system that functions as the main exchange point between SMS
Advanced Clients and the SMS site server. Components of SMS advanced
clients such as the Remote Tools and Hardware Inventory Agent are
installed from a management point. Inventory, status, and discovery
information that’s collected on an advanced client is written to a
management point. Advertisement information and other client
instructions are obtained from the management point. When a client
receives an advertisement for a program, it will also include a list of
distribution points at which the client can find the package files.
Unlike a CAP, when the
site server is installed, it doesn’t become a management point by
default. This is a role that you’ll assign to other site systems.
Several factors might influence the placement and number of management
points that you decide to implement. Generally, you choose one server to
be the default management point for that site, and that management
point will support all your Advanced Clients. However, you might choose
to have additional management points for network load balancing or
backup purposes—in case the default server is down or unavailable,
especially if you have large numbers of Advanced Clients that need to be
supported.
When you configure the
management point role, you’ll notice reference to a SQL database. Again,
since typically you’ll have one management point implemented, it will
use the data in the SMS site database. However, if you do need to
implement additional management points, you might choose to off-load
some of the SQL Server resource requirements for the management point
from the SMS site database to a replicated copy of the site database,
perhaps installed on the management point itself.
Management
points are installed through the SMS Administrator Console as a site
system setting. To assign the management point role, follow these steps:
1. | In the SMS Administrator Console, navigate to the Site Settings folder and expand it.
|
2. | Highlight the Site Systems folder to display the list of site systems you have defined.
|
3. | Right-click
the site system you want to assign as a management point and then
choose Properties from the context menu to display the Site Systems
Properties dialog box.
|
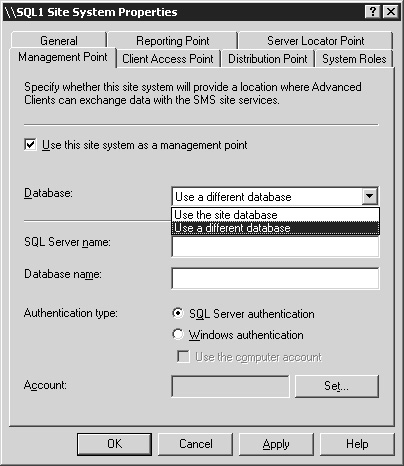
4. | Select the Management Point tab, as shown in Figure 12. Select the Use This Site System As A Management Point check box.

|
5. | From
the Database drop-down list, select the Use The Site Database option if
the management point should access the SMS site database for reading
and writing client data. Select the Use A Different Database option and
supply the requested information if the management point should access a
database other than the SMS site database—for example, if the server is
to be an management point for a secondary site that doesn’t have its
own site database or if you have replicated the SMS site database to
another SQL server for load balancing or failover.
|
6. | Click
OK, then, if prompted, click Yes, to save these settings and begin the
Site Control Manager process that will set up the new management point.
|
If
you want to remove the management point role from the site server,
right-click the site server and just follow the same procedures as you
did to assign an management point role to the site system; however, you
should clear the Use This Site System As A Management Point check box
when you’re in the Management Point tab.
As with other site
systems, when you enable a new management point, you have identified a
change to the site control information for the site. Recall that during that process, after the new
site control file is generated, other components wake up and read the
file to determine whether they need to perform any tasks. As with other
site systems, Site Component Manager is responsible for the setup of a
management point.
The SMS Agent Host
(Ccmexec.exe) is loaded and started and is used to provide change and
configuration management services. Two directories are created on the
new management point. The folder %Systemroot%\System32\CCM is created
and is the location for the agent support files. This folder acts as the
“clearinghouse” for data provided to the client and received from the
client.
Management Point Component Configuration
In addition to
assigning the management point role to a site system, you also have the
option of configuring the default settings for the management point role
function. You can do this through the Management Point Component
configuration properties by completing the following steps:
1. | In the SMS Administrator Console, navigate to the Site Settings folder and expand it.
|
2. | Highlight the Component Configuration folder to display the list of SMS components that you can configure.
|
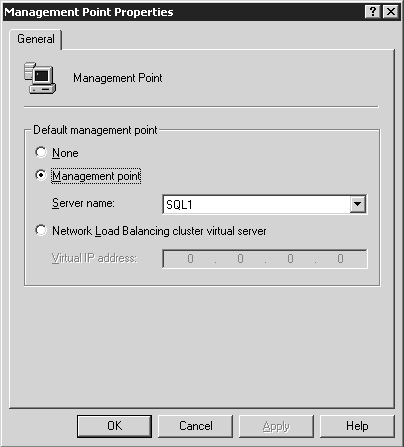
3. | Right-click
the entry Management Point and choose Properties from the context menu
to display the Management Point Properties dialog box, as shown in Figure 13.
If there is to be no default management point, select the option None.
If you want to name a default management point for the site, select the
option Management Point and select the name of the site system that will
function as the default management point. If you’d like the management
point to be a Network Load Balancing (NLB) virtual cluster rather than a
physical server, select the option Network Load Balancing Cluster
Virtual Server and enter the cluster server’s virtual IP address.

|
4. | Click OK to save these settings.
|
The site control information will then be updated to reflect your component configuration choices.
Proxy Management Points
Advanced Clients
located at a secondary site and reporting to a management point at a
parent primary site across a WAN link might have an effect on the
available bandwidth of the WAN link between the secondary site and its
parent primary site. Significant network traffic can be produced when
client status and hardware or software inventory data is sent to the
parent primary site. Because an Advanced Client can be assigned only to a
primary site, network traffic generated by Advanced Client policy
requests also reduces the available bandwidth between the two sites.
Installing a
proxy management point at the secondary site can significantly reduce
the effect on available network bandwidth created by Advanced Clients
located within that site’s roaming boundaries or site boundaries.
Advanced Clients send inventory data, software metering data, and status
data to the proxy management. The proxy management point uses the
site’s sender functionality to transfer the data to the parent primary
site. By using the sender’s bandwidth control functionality, you can
specify when the data is sent to the primary. The proxy management point
also caches some Advanced Client policy information.
Advanced
Clients obtain this Advanced Client policy information from the proxy
management point, rather than from the management point at the primary
site.
Component Server
Any site system that runs
the SMS Executive is considered a component server. As we’ve seen, the
CAP is also considered a component server for this reason. The other
type of component server that you might define in your site would
support the site server by running senders. Senders
are communication routines used by one site server to contact another
site server in a site hierarchy to transfer information. For example, a
child site will send inventory data, discovery data, status messages,
and site control information to its parent through a sender. A parent
site will send package information, advertisements, collections, and
configuration data to its child sites through a sender.
When a sender is installed
on another Windows server, the SMS Executive and all required support
files for that sender are copied to the server and the server becomes a
component server—a site system for that SMS site. The best example of
using a component server effectively in a production environment is when
a Remote Access Service (RAS) server connection is required or is
available as an alternative connection mechanism between two sites. It
would probably not be practical or advisable to install the SMS site
server on the RAS server. The combined resource requirement would no
doubt result in reduced performance. So with RAS on one server and SMS
on another, you could install the RAS server with an SMS RAS sender,
making it a component server for the SMS site. Outside of this scenario,
the network traffic that might be generated between the site server and
the component server (depending on the size and number of packages,
advertisements, and so on) might counterbalance any benefit derived from
having the additional sender capability.
Reporting Points
A reporting point is a
site server that stores the report files used for the Web-based
reporting feature in SMS 2003. Since a reporting point can communicate
only with the local site database, this role can be used only within
primary sites. In a large site hierarchy, you might consider placing
reporting points at each site in hierarchy for access by specific users
within those sites, or higher up in the hierarchy so that information
about several sites can be reported on.
Reporting
points are installed through the SMS Administrator Console as a site
system setting. To assign the reporting point role, follow these steps:
1. | In the SMS Administrator Console, navigate to the Site Settings folder and expand it.
|
2. | Highlight the Site Systems folder to display the list of site systems you have defined.
|
3. | Right-click
the site system you want to assign as a reporting point and then choose
Properties from the context menu to display the Site Systems Properties
dialog box.
|
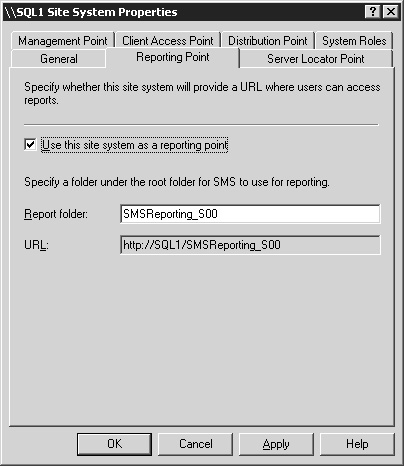
4. | Select the Reporting Point tab, as shown in Figure 14.
Select the Use This Site System As A Reporting Point check box. The
Report Folder text box displays the name of the folder created on this
site system where the report information will be stored. Recall that IIS
must be installed and enabled on the site system to support the
reporting point role. SMS creates the folder under \Inetpub\wwwroot
beneath the site server root. The name of the folder is also used as the
name of the virtual directory, as displayed in IIS. The URL text box
displays the Uniform Resource Locator (URL) used to access reports as
determined by the Report Folder name.

|
5. | Click OK to save these settings and begin the Site Control Manager process that will set up the new Reporting Point.
|
If
you want to remove the reporting point role from the site server,
right-click the site server and just follow the same procedures as you
did to assign the reporting point role to the site system; however, you
should clear the Use This Site System As A Reporting Point check box
when you’re in the Reporting Point tab.
As with other site
systems, when you enable a new reporting point, you have identified a
change to the site control information for the site. Recall that during that process, after the new
site control file is generated, other components wake up and read the
file to determine whether they need to perform any tasks. As with other
site systems, Site Component Manager is responsible for the setup of a
reporting point. The SMS Reporting Point Service is loaded and started,
and the Report Folder is created under the IIS folder structure.
Server Locator Points
A server locator point is
used to implement a client installation point for Legacy or Advanced
Clients when using a logon script to initiate client installation or to
provide autoassignment of Advanced Clients to a site when the Active
Directory schema has not yet been extended. Like the reporting point, a
server locator point communicates directly with the local site database
and is in contact only with the sites beneath it in the SMS site
hierarchy. Consequently, this role can’t be assigned to site systems in a
secondary site. Server locator points support the client installation
process by locating a CAP or management point for the client to connect
to to receive component installation files.
Typically, you
install the server locator point at the central site. If the server
locator point creates too much load at the central SMS site database,
you have the option to use a replicated SQL Server database for that
site. If there are excessive client requests, causing excessive traffic
on a single server locator point, you can set up multiple server locator
points at the central site, but this is not generally recommended.
Server locator
points are installed through the SMS Administrator Console as a site
system setting. To assign the server locator point role, follow these
steps:
1. | In the SMS Administrator Console, navigate to the Site Settings folder and expand it.
|
2. | Highlight the Site Systems folder to display the list of site systems you have defined.
|
3. | Right-click
the site system you want to assign as a server locator point and then
choose Properties from the context menu to display the Site Systems
Properties dialog box.
|
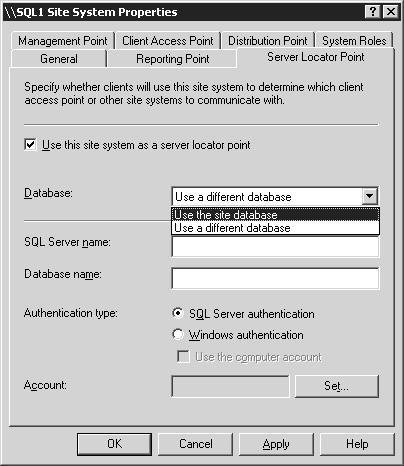
4. | Select the Server Locator Point tab, as shown in Figure 15. Select the Use This Site System As A Server Locator Point check box.

|
5. | From
the Database drop-down list, select the Use The Site Database option if
the server locator point should access the SMS site database for
reading and writing client data. Select the Use A Different Database
option and supply the requested information if the server locator point
should access a database other than the SMS site database—for example,
if you have replicated the SMS site database to another SQL server for
load balancing or failover.
|
6. | Click OK to save these settings and begin the Site Control Manager process that will set up the new server locator point.
|
If you want to
remove the server locator point role from the site server, right-click
the site server and just follow the same procedures as you did to assign
a server locator point role to the site system; however, you should
clear the Use This Site System As A Server Locator Point check box when
you’re in the Server Locator Point tab.
As with other site
systems, when you enable a new server locator point, you have identified
a change to the site control information for the site. Recall that during
that process, after the new site control file is generated, other
components wake up and read the file to determine whether they need to
perform any tasks. As with other site systems, Site Component Manager is
responsible for the setup of a server locator point. The SMS Server
Locator Point service is loaded and started, and a SMS_SLP support
virtual directory is created under the IIS default Web site structure.
This virtual directory points to \Sms\Bin\i386\SMS_SLP.