2. Identifying Batch Files and Their Actions
If you work on a large
system, you know that automation isn't just a nicety; it's a requirement
if you want to stay on top of maintenance actions. However, automation
brings with it all kinds of problems. One of the more critical problems
is identifying which machine produced a particular data file. After all,
if a machine encounters an error, you want to know which machine to
fix. The same concept holds true for other kinds of data. No matter what
data you collect, data without an attached context is worthless. With
this in mind, you can use code as shown in Listing 3 to create a descriptive data file.
Example 3. Creating a Descriptive Data File Header
@ECHO OFF

REM Add identifying information.
@ECHO Computer: %COMPUTERNAME% > Temps.TXT
@ECHO User: %USERNAME% >> Temps.TXT

REM Add the date and time.
Date /T >> Temps.TXT
Time /T >> Temps.TXT
REM Create a header for the data.
@ECHO. >> Temps.TXT
@ECHO Temporary Files: >> Temps.TXT
@ECHO. >> Temps.TXT

REM Locate all of the temporary files on your hard drive.
@ECHO Locating temporary files to delete.
FOR /F %%F IN (DelFiles.TXT) DO Dir %%F /B /S >> Temps.TXT

@ECHO ON
|
This example
uses several techniques to output descriptive data. First, it combines
standard text with environmental variable expansion. Every Windows
machine will include the %COMPUTERNAME% and %USERNAME%
environment variables (or you can define them in the unlikely event
that they don't exist). Notice the first output contains just a single
> redirection symbol, so this first line always erases any existing
file.
Second, the example uses the Date and Time utilities to output the date and the time. Notice the use of the /T
command line switch to prevent these utilities from prompting the user
for the date or time. It's a common error not to include the /T command line switch, so you should watch for the error in your own code.
Third, the example creates a header for the data. Notice the use of the special ECHO.
command to create a blank space in the output. The addition of the
period prevents echo from displaying its status. Because there isn't any
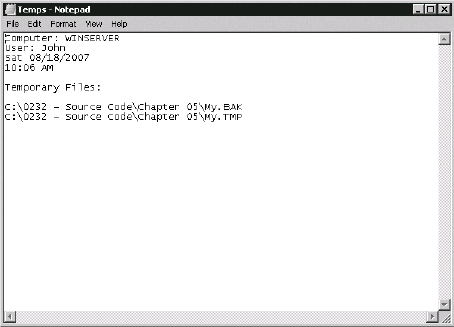
other data to display, the ECHO command simply displays a blank line. The remainder of this example outputs a temporary file listing. Figure 3 shows typical output from this example.

Adding the identifying
information to the data file is fine when you don't want to maintain
backups of previous data and when the data resides on the original
machine. Of course, things change when you want to create a historical
view of the data or store the information in a centralized location. In
this second instance, you need a unique filename for every submission. Listing 4 shows
how to add the information to the filename, rather than the data file.
Example 4. Adding Descriptive Information to a Data File
@ECHO OFF

REM Create a new environment variable with the identifying
REM information for this file. Start with the computer and
REM user name.
SET DataStore=%COMPUTERNAME%
SET DataStore=%DataStore%_%USERNAME%

REM Add the date.
SET DataStore=%DataStore%_%DATE:~4,2%
SET DataStore=%DataStore%_%DATE:~7,2%
SET DataStore=%DataStore%_%DATE:~10,4%

REM Add the time.
SET DataStore=%DataStore%_%TIME:~0,2%
SET DataStore=%DataStore%_%TIME:~3,2%
SET DataStore=%DataStore%_%TIME:~6,2%

REM Add the file extension.
:SetExtension
SET DataStore=%DataStore%.TXT

REM Locate all of the temporary files on your hard drive.
@ECHO Locating temporary files to delete.
@ECHO Saving files to "%DataStore%".
FOR /F %%F IN (DelFiles.TXT) DO Dir %%F /B /S >> "%DataStore%"

@ECHO ON
|
In this example, the batch files build up an environment variable named DataStore
that contains the computer and usernames, along with the date and time.
Obtaining the computer and usernames are simply a matter of using the
existing %COMPUTERNAME% and %USERNAME% environment variables. However, the date and time prove more interesting.
Even though the Set command doesn't show them, Windows dynamically generates several environment variables each time you request them, including %DATE% and %TIME%.
When working at DOS, you had to generate these environment variables
yourself, which is a time-consuming and error-prone process. Unfortunately, these environment variables contain
characters that you can use for a filename including the slash (/) and
colon (:). Consequently, you can't use the variables directly. The
solution is to extract the numbers you need. For example, to extract the
first two numbers of the time, you use %TIME:~0,2%,
where the first number is the starting point in the string and the
second number defines the number of characters to use. Strings in batch
file always rely on a 0-based starting point.
|
When extracting
characters from a string, the system assumes that you want to start on
the left side of the string and move to the right. You can reverse this
process by using a negative number. For example, %TIME:~-2% would extract the last two characters in the TIME environmental variable.
|
|
The %DATE% environment variable requires a little more manipulation than %TIME%.
In this case, the string contains the day of the week, so you must
extract that information from the string as well. Consequently, the
month always appears at position 4, rather than 0.
Now that the batch file
has built a unique filename based on the machine name, username, date,
and time, it adds a file extension of .TXT to it. The result appears in place of the standard filename in the FOR command for this example. Notice that you must enclose the filename with quotes because it could contain a space.
3. Using a Centralized Data Store
Overcoming this problem with scripts is
relatively easy because you have access to standard database objects.
With the proper code, you can simply send the data from a client machine
to a server and never have to worry about it again except for analysis
purposes.
You have options at your
disposal when working with individual commands. For example, many
commands and utilities support the Comma Separated Value (CSV) format.
When working with one of these utilities, you simply specify that you
don't want headers and that the system should use the CSV format.
Unfortunately, these utilities won't address special needs, such as
error reports or a listing of interesting files on a machine (perhaps an
unacceptable or unsupported application, temporary files, viruses,
adware, or spyware). For all of these needs and many more, you must
create the output in a form that lends itself to use with a database.
Fortunately, creating your own CSV output (a data form commonly accepted
by databases) isn't difficult. Listing 5 shows one way to do it with a list of temporary files.
Example 5. Creating Output for a Database
@ECHO OFF

REM Clean up any existing output file.
IF EXIST Output.CSV Del Output.CSV

REM Create a new environment variable to hold the static
REM data for this session.
SET DataEntry="%COMPUTERNAME%"
SET DataEntry=%DataEntry%,"%USERNAME%"
SET DataEntry=%DataEntry%,"%DATE%"
SET DataEntry=%DataEntry%,"%TIME%"

REM Locate all of the temporary files on your hard drive.
@ECHO Locating temporary files to delete.
FOR /F %%F IN (DelFiles.TXT) DO CALL :AddValue %%F
GOTO :Finished

REM Work with the individual directory entries as a set
REM and process them as part of a FOR command.
:AddValue
@ECHO Adding database values for %1.
FOR /F "delims==" %%E IN ('Dir %1 /B /S') DO @ECHO %DataEntry%,"%%E" ≫ Output.CSV
GOTO :EOF

:Finished
@ECHO ON
|
The idea behind
CSV is that you encapsulate the individual data values in quotes and
separate them with commas. This example works as most batch files that
create CSV will work. You begin by creating one or more static data
values that provide a snapshot of this particular session. When you
combine this data with other snapshots, the static information provides
the means for separating the individual data entries.
The example requires two FOR loops in this case. The first FOR command parses the file specifications located in the DelFiles.TXT file and passes them to a secondary routine.
The secondary FOR loop processes the individual file entries returned by the Dir command. Notice the two additions to the FOR command. First, you must provide the "delims==" option so that the FOR loop doesn't cut off the paths at the first space. Second, notice that this FOR
loop doesn't process the data as a file; it uses the command
representation instead. Remember that single quotes are for commands and
double quotes are for strings. The resulting Output.CSV
file contains a pure string representation that you could open in
Notepad if desired. However, the power of this particular routine is
that you can also open it as a database in a database application or
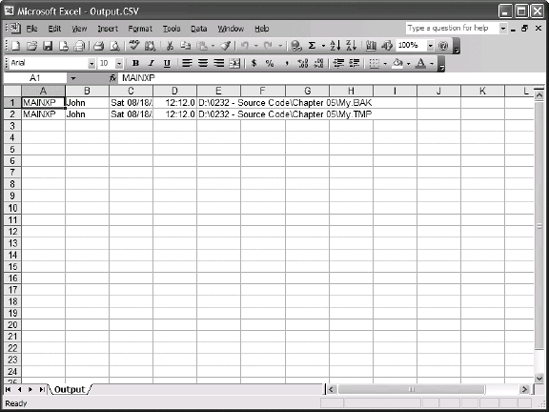
even in Excel. Figure 4 shows typical output presented in Excel.
