Limitations of the MCMS Connector for SharePoint
Unfortunately the Connector only provides you one way to publish SharePoint content in an MCMS site: the SharePointDocumentPlaceholder,
which we just covered. But SharePoint portals can contain much more
content than just document libraries. Some of the most commonly used
content elements in SharePoint are lists. SharePoint ships with many
different types of configured lists such as Issues, Tasks, Links,
Events, and also Custom Lists. These lists are very dynamic, powerful,
and customizable as they can be built from the ground up. One of the
biggest downsides of the Connector is it does not provide a method to
publish SharePoint list data in an MCMS website.
It would be useful to have
an MCMS placeholder control that can display data from a SharePoint
list. Since this isn’t included in the Connector, let’s build our own!
We’ll continue with our previous examples using our Tropical Green MCMS Internet site http://www.tropicalgreen.net/TropicalGreen/ and the Tropical Green SharePoint Portal Server intranet portal http://portal.tropicalgreen.net/.
Let’s say we have an Events Web Part list in our SharePoint portal
intranet that employees maintain for all Tropical Green related events:

How do I add items to my Events list?
To add, edit, or view the items in your portal’s Events list, click Manage Content in the left-hand Actions menu from your portal homepage. On the Documents and Lists page, click the Events link. You may or may not have items listed in your list. To add items, click the New Item link in the list heading, enter the necessary information, and click the Save and Close link in the form heading. Repeat this process as many times as you like.
Now, what we’d like to do
is display all these events on our homepage. We’ll build a custom
placeholder control that will retrieve these events from the SharePoint
list. This custom placeholder control will be added to the existing TropicalGreenControlLib project and added to the Homepage.aspx template.
A Placeholder Control to Display SharePoint List Contents
Since our placeholder
control will retrieve all the items within a list, we need to determine
how we’ll access the actual list in the SharePoint portal. One option
is to use the SharePoint API, but there is a downside to this approach:
our MCMS site and SharePoint portal must reside on the same server
because the SharePoint API will only access the server it’s installed
on, not a remote server. While this may be feasible in a test
environment and some production environments, it’s quite limiting.
Another option is to access the SharePoint list via the Web Services
included with SharePoint. The List Service Web Service contains methods
that return the schema of the list, add, update, and remove items, as
well as retrieve the contents of the list. Each SharePoint site has a
reference to this Web Service so all lists are exposed to external
applications.
Accessing the list via the
Web Service is a better option than accessing it via the API. This
solution can work on a server with both MCMS and SharePoint installed or
if the two products are installed on separate servers.
Our placeholder control, the SharePointEventsPlaceholderControl,
will leverage the SharePoint List Service Web Service to retrieve the
items in the SharePoint Event list. In authoring mode, it will require
the author to enter the Web Service URL of the SharePoint site and the
name of the Events list.
Let’s get started. The
first thing we need to do is create a new class for our placeholder
control and add the necessary references to the project:
1. | Add a new class to the TropicalGreenControlLib project. Name the new class SharePointEventsPlaceholderControl.cs.
|
2. | Right-click the project and select Add Web Reference...
|
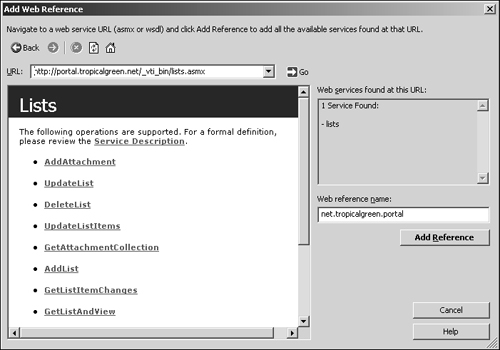
3. | Specify the List Service URL in the URL textbox and click the Go image. In our case, the address of the List Service is http://portal.tropicalgreen.net/_vti_bin/lists.asmx. Once it loads, accept the default Web reference name by clicking the Add Reference button.
|

Now our project is
set up with a reference to the SharePoint List Service Web Service and
contains an empty code file that will contain our placeholder control.
We need to convert our
new class from its empty shell to a custom placeholder control class by
inheriting the base class and overriding the necessary methods. To do
this, we’ll add a few references to some necessary namespaces, inherit
the BasePlaceholderControl class, and
override five methods in the base class (we don’t have to add any
additional references for a custom placeholder control because we’re
using the TropicalGreenControlLib project, which already has all the necessary references as it contains other custom placeholder controls):
using System;
using Microsoft.ContentManagement.Publishing;
							using Microsoft.ContentManagement.Publishing.Extensions.Placeholders;
							using Microsoft.ContentManagement.WebControls;
							using Microsoft.ContentManagement.WebControls.Design;

namespace TropicalGreenControlLib
{
  [SupportedPlaceholderDefinitionType( typeof(XmlPlaceholderDefinition))]
  public class SharePointEventsPlaceholderControl : BasePlaceholderControl
  {
    public SharePointEventsPlaceholderControl()
    {
    }

    protected override void CreateAuthoringChildControls
							(BaseModeContainer authoringContainer)
							{
							}
							protected override void CreatePresentationChildControls
							(BaseModeContainer presentationContainer)
							{
							}
							protected override void LoadPlaceholderContentForAuthoring
							(PlaceholderControlEventArgs e)
							{
							}
							protected override void LoadPlaceholderContentForPresentation
							(PlaceholderControlEventArgs e)
							{
							}
							protected override void SavePlaceholderContent
							(PlaceholderControlSaveEventArgs e)
							{
							}
  }
}
Our empty class now contains
the skeleton of an MCMS custom placeholder control. At this point let’s
consider what inputs we’ll need from our users when the posting is in
authoring mode. The goal of this placeholder control is to retrieve the
content of a SharePoint list. We already have a reference to the
SharePoint List Service Web Service, which we’ll use to retrieve the
list contents, but we need to know the exact address of the Web Service
in case this control is used to access another SharePoint site and not
just our portal. The Web Service contains twelve methods, but we’re only
interested in GetListItems(). This method accepts a few parameters, but the only one we need to concern ourselves with is ListName (we’ll accept the defaults for all the others).
We’ll need to collect the following two values from the user:
This means we’ll need two TextBox controls, one for each input. We’ll also add a LinkButton
that will use the information provided to retrieve the items in the
list and display of the events. Finally, because we want our controls to
be aligned nicely, we’ll use an HTML table to control the layout. To
achieve this add the following highlighted code to the top of our code
file:
using System;
using System.Collections;
							using System.Net;
							using System.Web.UI;
							using System.Web.UI.HtmlControls;
							using System.Web.UI.WebControls;
							using System.Xml;
using Microsoft.ContentManagement.Publishing;
using Microsoft.ContentManagement.Publishing.Extensions.Placeholders;
using Microsoft.ContentManagement.WebControls;
using Microsoft.ContentManagement.WebControls.Design;

namespace TropicalGreenControlLib
{
  [SupportedPlaceholderDefinitionType( typeof(XmlPlaceholderDefinition))]
  public class SharePointEventsPlaceholderControl : BasePlaceholderControl
  {
    // authoring controls
							TextBox txbSharePointUrl;
							TextBox txbListName;
							LiteralControl litEventItemsLiteral;
							HtmlTable tblLayout;

    public SharePointEventsPlaceholderControl()
    {
    }
    . . . code continues . . .
The next thing we need to do
is build the user interface portion of our placeholder control. We’ll
do by creating an HTML table in the CreateAuthoringChildControls() method we are overriding:
protected override void CreateAuthoringChildControls(BaseModeContainer
authoringContainer)
{
  // create our layout table
							tblLayout = new HtmlTable();
							// build row containing the SharePoint URL input prompt
							tblLayout.Rows.Add(BuildAuthoringSharePointSiteTableRow());
							// build row containing the SharePoint Event List name input prompt
							tblLayout.Rows.Add(BuildAuthoringSharePointEventListTableRow());
							// add table to the authoring container
							authoringContainer.Controls.Add(tblLayout);
}
Now we need the
methods that will build these HTML table rows. The first methods we’ll
need are the ones to create the input for the SharePoint site URL and
list name:
private HtmlTableRow BuildAuthoringSharePointSiteTableRow()
{
  HtmlTableRow row;
  HtmlTableCell cell;

  // create sharepoint Web service label & input
  txbSharePointUrl = new TextBox();

  row = new HtmlTableRow();
  cell = new HtmlTableCell();
  cell.Controls.Add(new LiteralControl("SharePoint Portal Site URL:<br>"));
  cell.Controls.Add(txbSharePointUrl);
  row.Cells.Add(cell);

  // return the built row
  return row;
}

private HtmlTableRow BuildAuthoringSharePointEventListTableRow()
{
  HtmlTableRow row;
  HtmlTableCell cell;

  // create SharePoint event list name label & input
  txbListName = new TextBox();

  row = new HtmlTableRow();
  cell = new HtmlTableCell();
  cell.Controls.Add(new LiteralControl("SharePoint Event List Name:<br>"));
  cell.Controls.Add(txbListName);
  row.Cells.Add(cell);

  // return the built row
  return row;
}
Let’s see how our placeholder control looks so far. Build the TropicalGreenControlLib
project. Assuming there were no errors, let’s now add our placeholder
control to the template. Instead of adding it to an existing template,
create a new template file in the TropicalGreen project (under the Templates subdirectory) and name it Events.aspx. Use the Homepage.aspx template as a base for the Events.aspx
page, but remove the content area so that your final Events template
page’s HTML contains the following (note the highlighted portions where
we have added our new placeholder control):
<%@ Page language="c#" Codebehind="Events.aspx.cs" AutoEventWireup="false"
Inherits="TropicalGreen.Templates.Events" %>
<%@ Register TagPrefix="uc1" TagName="DefaultConsole"
Src="../Console/DefaultConsole.ascx" %>
<%@ Register TagPrefix="cc1" Namespace="TropicalGreenControlLib"
Assembly="TropicalGreenControlLib" %>
<%@ Register TagPrefix="uc1" TagName="RightMenu"
Src="../UserControls/RightMenu.ascx" %>
<%@ Register TagPrefix="uc1" TagName="TopMenu"
Src="../UserControls/TopMenu.ascx" %>
<!DOCTYPE HTML PUBLIC "-//W3C//DTD HTML 4.0 Transitional//EN" >
<HTML>
<HEAD>
<title>Events</title>
<meta content="Microsoft Visual Studio .NET 7.1" name="GENERATOR">
<meta content="C#" name="CODE_LANGUAGE">
<meta content="JavaScript" name="vs_defaultClientScript">
<meta content="http://schemas.microsoft.com/intellisense/ie5"
name="vs_targetSchema">
<LINK href="/tropicalgreen/Styles/Styles.css"
type="text/css" rel="stylesheet">
</HEAD>
<body leftMargin="0" topMargin="0">
<form id="Form1" method="post" runat="server">
<table cellSpacing="0" cellPadding="0" width="100%" border="0">
<tr>
<td vAlign="top" width="100%" bgColor="#ffcc00"
colSpan="2">
<IMG src="/tropicalgreen/images/Logo.gif">
</td>
<td vAlign="top" rowSpan="10">
<uc1:DefaultConsole id="DefaultConsole1"
runat="server"></uc1:DefaultConsole>
</td>
</tr>
<tr bgColor="#66cc33">
<td colSpan="2">
<uc1:topmenu id="TopMenu1" runat="server"></uc1:topmenu>
</td>
</tr>
<tr>
<td style="PADDING-RIGHT: 30px; PADDING-LEFT: 30px;
PADDING-BOTTOM: 30px; PADDING-TOP: 10px" vAlign="top">
<p> </p>
<b>Tropical Green Events</b>
<cc1:SharePointEventsPlaceholderControl id="SharePointEvents"
runat="server" PlaceholderToBind="SharePointEventsConfig" />
</td>
<td class="RightMenuBar" vAlign="top"
align="center" width="20%" bgColor="#669900"
height="100%" rowSpan="2">
<uc1:rightmenu id="RightMenu1" runat="server"></uc1:rightmenu>
</td>
</tr>
</table>
</form>
</body>
</HTML>
Once we have the
template file, we need to create a template in the MCMS Template
Explorer so we can create a posting using our Events template. Create a
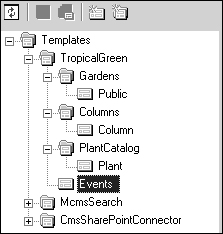
new template called Events and put it under the TropicalGreen gallery.

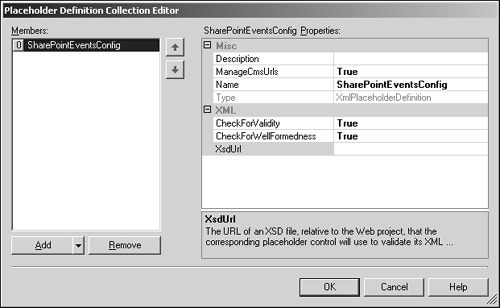
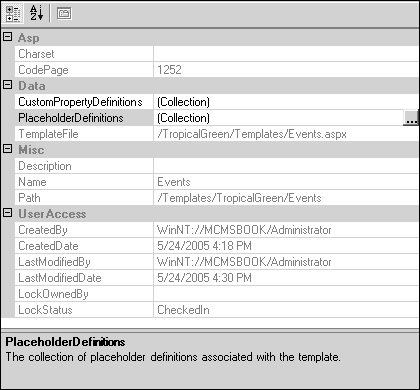
Then, create a single placeholder definition, of type XmlPlaceholder, and name it SharePointEventsConfig.

Finally, select our new Events.aspx as the template file for this new template.

Check in the template and build the TropicalGreen
project. The last thing we need to do is create a new posting using the
new Events template. While it won’t do much, it will help us see our
control come to life as we build each piece of the placeholder control.
Create the new posting by browsing to the root of the Tropical Green
site, switch into edit mode, create a new posting using the Events
template, and save it with the name and display name of “Events”. Once
the posting has been saved, go ahead and approve it.