Parent and child sites are defined by their
relationship within an SMS site hierarchy. A parent site
is any site with at least one child site defined; the parent site has
the ability to administer any child sites below it in the SMS hierarchy.
A child site is any SMS site that has a parent defined.
An SMS primary site has three main distinguishing characteristics:
A primary site is an SMS site that has access to a Microsoft SQL Server database.
A
primary site can be administered through the SMS Administrator Console
as well as by any SMS primary sites above it in the site hierarchy. A
primary site can also administer any child sites below it in the site
hierarchy.
A primary site can be a child of other primary sites, and it can have child sites of its own.
The requirement that a
primary site has access to a SQL Server database might translate into
an additional investment in hardware and software for each SMS site,
site server, or both. On the other hand, because a primary site can be
both a parent and a child site, it’s relatively easy to restructure your
site hierarchy if all your sites are primary sites.
An SMS secondary site is also distinguished by three main characteristics:
A secondary site doesn’t have access to a SQL Server database.
A
secondary site is always a child of a primary site and is administered
solely through its parent or through another primary site above it in
the SMS site hierarchy.
A secondary site can’t have child sites of its own.
Because a secondary site
doesn’t require access to a SQL Server database, it might not command
the same investment in hardware and software as a primary site. However,
a secondary site can be administered only through its parent site or
through another primary site above it in the site hierarchy. If an SMS
administrator on the same local subnet as the secondary site wants to
administer the site, that SMS administrator will first need to connect
to the site database for the secondary site’s parent site. If the SQL
database for the parent site is accessed across a WAN link, response
might be slow or inefficient. On the other hand, if no local SMS
administrator is available, a remote SMS administrator can rather easily
manage the secondary site in the same manner.
Caution
To switch primary and secondary site roles, you must first uninstall and then reinstall SMS. |
A central site
is an SMS primary site that resides at the top of the SMS hierarchy.
Database information rolls from child to parent and is collected
ultimately at the central site’s SMS database. A central site can
administer any site below it in the SMS hierarchy and can send
information down to its child sites.
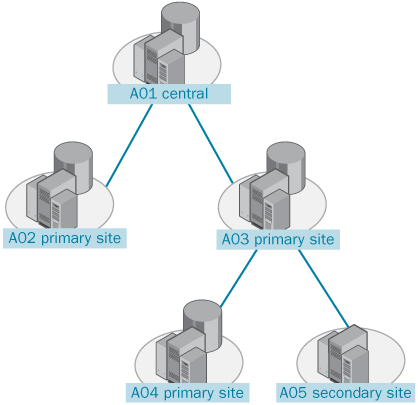
Figure 1
shows a typical SMS site hierarchy model. In this site hierarchy, site
A01 is the central site. All information rolls up to this site. Sites
A02, A03, and A04 are primary sites, as they have access to a SQL
database for SMS. Site A05 is a child site to site A03; it’s also a
secondary site, as it doesn’t have access to a SQL database for SMS.
Child
sites send inventory data, discovery data, site control data, and
status messages to their immediate parent sites. A child site never
sends information directly to its “grandparent” site. Parent sites, in
turn, send information about collections, package definitions,
advertisements, and site control files to their child sites.
Because child sites
send inventory data to their parent sites, database storage space
becomes a greater concern at the parent sites at each successive layer
up in the hierarchy. In the hierarchy shown in Figure 4-1,
site A04 reports its inventory data to site A03. Site A03’s database
needs to be large enough to accommodate its own information plus the
information coming from site A04. Similarly, site A03 reports its
inventory data to site A01. Since site A01 is also the central site, it
receives information from all sites below it in the hierarchy. Site
A01’s database therefore needs to be large enough to accommodate its own
information plus that of all sites below it in the hierarchy.
Tip
Try
to keep your site hierarchy as flat as possible. A flatter hierarchy
will require information to flow through fewer layers (sites) before
reaching the central site. Child site information will be reported to
the central site more quickly and efficiently. In addition, the simpler
the hierarchy, the less concern you’ll have about database space
requirements at parent sites at each level of the hierarchy. |
Installing a Secondary Site
You can initiate an SMS
2003 secondary site installation through the SMS Administrator console.
However, you can also install it directly from the SMS 2003 CD. The
setup program gives you the option of installing a secondary site. You
might choose this option if you need to install the secondary site but
don’t yet have a WAN connection available to the primary site, or if the
existing WAN connection is “network traffic challenged” and you want to
avoid the additional traffic involved in performing the installation
from the primary site server. When you install the secondary site from the parent site, all SMS components are installed on the secondary site server.
Installing the Secondary Site from Its Parent Primary Site
Follow these steps to install an SMS 2003 secondary site server from a primary site:
1. | In
the SMS Administrator Console, navigate to the site entry folder (this
should fall directly below the Site Hierarchy folder), right-click it,
choose New from the context menu, and then choose Secondary Site. The
Welcome To The Create Secondary Site Wizard page appears, as shown in Figure 2.
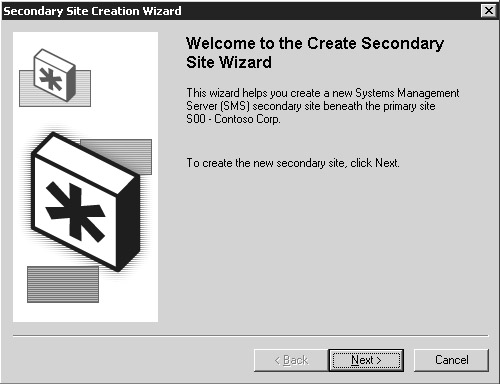
|
2. | Click Next to display the Site Identity page, as shown in Figure 3. Enter a three-character site code, a descriptive name for the site, and optionally a descriptive comment.
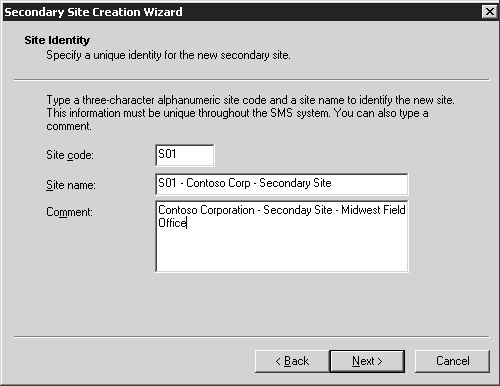
|
3. | Click Next to display the Site Server page, as shown in Figure 4.
Enter the name of the domain in which the secondary site server is
located, the site server name, the processor platform (Intel X86 and
compatible is your only choice here), and the NTFS installation
directory (be sure that you reference an NTFS directory).
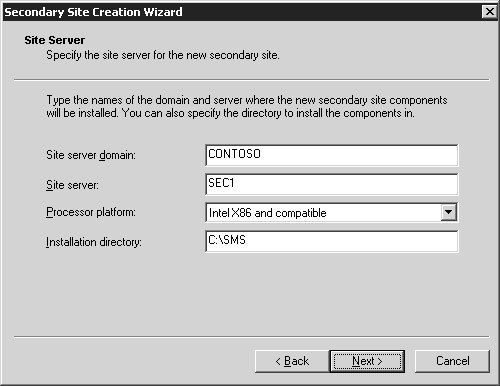
Note Be
sure to enter the server name correctly. The Secondary Site
installation process doesn’t verify that the server actually exists. |
|
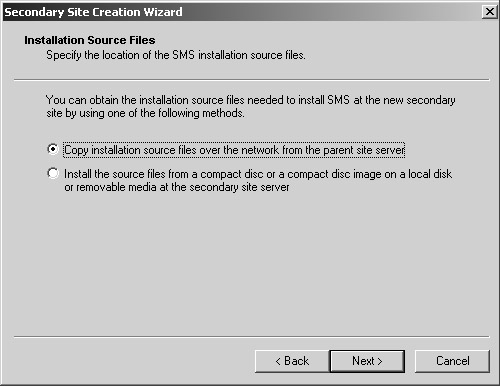
4. | Click Next to display the Installation Source Files page, as shown in Figure 5.
This page lets you specify where the source files for installing the
secondary site reside. If you select the Copy Installation Source Files
Over the Network From The Parent Site Server option, Setup will obtain
the installation files from the primary site server and copy them across
the network to the target secondary site. This option will, of course,
generate a fair amount of network traffic. If you select the Install The
Source Files From A Compact Disc... option, Setup will look for the
installation files on the on the local (secondary site) server. This
option assumes, of course, that you have inserted the SMS CD into the CD
drive on the target secondary site server, have copied the SMS source
files to a local drive on the target server, or mapped a drive to a
shared folder that contains the SMS source files.
|
5. | Click Next to display the SMS Security Information page, as shown in Figure 6.
If you intend the site to run in standard mode security, select that
option and enter the name of the SMS Service account (which you have
already created) that the secondary site server will use and confirm the
password. If you intend the site to run in advanced security mode,
select that option. Then click Next.

Caution The
SMS Service account you specify during the installation of the SMS 2003
secondary site must already have been created for the target server. Be sure to make
the account a member of the Domain Admins global group in the secondary
site’s Microsoft Windows domain, if not in the same domain. Also be sure
that the account is a member of the local Administrators group on the
secondary site server itself—either explicitly or by virtue of its being
a member of the Domain Admins global group—and that it has the Log On
As A Service user right on the secondary site server. If any of these
prerequisites is missing, the installation process will fail—miserably! |
|
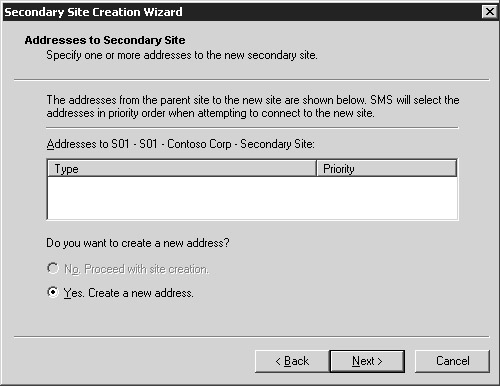
6. | Click Next to display the Addresses To Secondary Site page, as shown in Figure 7.
If you have already created one or more addresses to the target
secondary site—for example, using the Standard Sender (through LAN or
WAN connections) or the Asynchronous RAS Sender (through dial-up)—these
will be listed in the Addresses To list. If you haven’t already created
an address to the secondary site or if you want to create a new address,
select the Yes Create A New Address option and go on to step 7.
Otherwise, select the No Proceed With Site Creation option to use the
existing address and proceed to step 9. If there is no existing address
to select, you must create a new address.
|
7. | If you chose Yes in the preceding step, clicking Next takes you to the New Address To Secondary Site page, as shown in Figure 8. Here you
must select a sender address type, confirm the secondary site server
name, and, if you’re installing the site to run in standard security
mode, identify the name of the account on the secondary site server that
you want the primary site to use when connecting to the secondary site.
This account will generally be the SMS Service account, but it can be
any account that has at least Change access to the SMS_Site share. Once
again, this account must have been created before you begin the
secondary site installation. If you’re installing the site to run in
advanced security mode, the account referenced will be the Local System
account as shown in Figure 4-8 and you won’t be able to reference any other account.

Note When
you create an address using Setup, you’ll have only the options
Standard Sender Address and Asynchronous RAS Sender Address in the
Address Type drop-down list. If you choose to use a RAS sender, the RAS
service must be installed on the server you’ll use for the secondary
site server or on another server accessible to the proposed secondary
site server. If you need any other sender type, you must create the
address through the SMS Administrator Console before beginning the
secondary site installation process. |
|
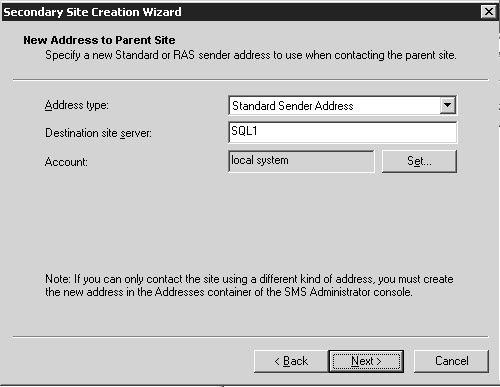
8. | Click Next to display the New Address To Parent Site page, as shown in Figure 9.
Specify a sender address type, confirm the primary site server name,
and, if you’re installing the site to run in standard security mode,
identify the name of the account on the primary site server that
you want the secondary site to use when connecting to the primary site.
This account will generally be the SMS Service account, but it can be
any account that has at least Change access to the SMS_Site share on the
primary site server. Once again, this account must have been created
before you begin the secondary site installation. If you’re installing
the site to run in advanced security mode, the account referenced will
be the Local System account as shown in Figure 4-9 and you won’t be able to reference any other account.
|
9. | Click
Next to display the Completing The Create Secondary Site Wizard page.
Review your selections in the New Secondary Site Characteristics
section, and then click Finish to begin the installation process. You
can also click Back to return to previous pages to make changes. |
