The Secondary Site Installation Process Flow
The process of
installing a secondary site from the SMS CD is relatively
straightforward. Setup simply creates the subdirectory structure, loads
services and components as necessary, and connects to the parent site to
complete the parent-child relationship. This process is similar to the
primary site server installation. However, installing a secondary site
from a primary site server involves SMS primary site server components,
network traffic, and installation routines installed and run on the
secondary site server. This section provides a basic overview of that
process.
When
you initiate the installation of a secondary site through the SMS
Administrator Console, you are in effect changing the primary site’s
properties. Hierarchy Manager queries the sites table and site control
file in the SMS site database. From this information, it determines that
a secondary site installation process needs to be initiated and
generates a request to do so in the Scheduler’s inbox
(SMS\Inboxes\Schedule.box). The Scheduler, in turn, creates the package
and instruction files that support the installation and that need to be
sent to the secondary site server and creates a send request file for
the sender that will connect to the secondary site server. The sender
will be the same connection mechanism you chose when you initiated the
setup process.
The sender connects
to and copies the package and instruction files to the secondary site
server and loads a bootstrap service that creates the SMS folder
structure, starts the setup process, and loads and starts the SMS Site
Component Manager. Site Component Manager completes the installation and
configuration of SMS components, loads and starts the SMS Executive
service, and generates a new site control file. Finally, the connection
back to the parent site is configured, and the SMS Replication Manager
sends the new secondary server site control information back to the
parent site through the Scheduler and sender at the secondary site.
You can follow the flow
of this process by monitoring the status messages and log files (if
enabled) on the primary site server for Hierarchy Manager, Site Control
Manager, Discovery Data Manager, the Scheduler, and the appropriate
sender, such as the SMS Standard Sender.
Differences Between Primary and Secondary Sites
The SMS 2003 secondary site server is installed much like the SMS 2003 primary site server. Setup builds the SMS and CAP_sitecode
directory structures (where sitecode represents the three-character
site code of the secondary site), including the component support files
and inboxes, and installs the secondary site server as an SMS client.
Setup installs the secondary site as a site system with the client
access point (CAP) and distribution point roles by default and doesn’t
enable any discovery or installation methods or client agents until the
SMS administrator does so through the SMS Administrator Console. The SMS
Executive, SMS Site Component Manager, and SMS Site Backup components
are loaded, the SMS Executive and SMS Site Component Manager are
started, and the SMS, Network Access Layer (NAL), and SMS service keys
are added to the Windows server registry. The same shares are created on
the secondary site server as on the primary site server.
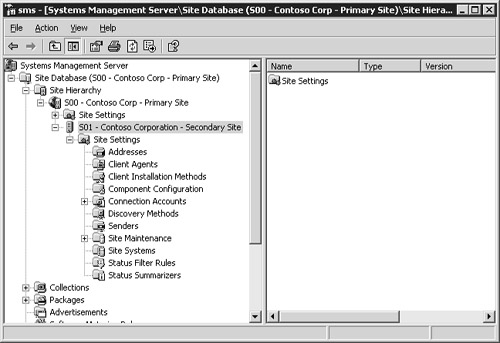
However, the secondary site server is fully administered through a parent site, as shown in Figure 18.
Thus, no Systems Management Server program group is created, and no SMS
Administrator Console is installed by default. The SMS SQL Monitor
service isn’t installed, nor are any references to SQL Server or SQL
Server triggers placed in the Windows server registry. Also missing from
the SMS directory structure are folders or files, or both, that
reference SMS components and options that aren’t applicable to the
secondary site, such as the product compliance database.

Because the secondary
site is administered through its parent site, site property changes
will take place across the network, generating some network traffic.
This network traffic generally includes writing the change to the site
control file on the secondary site server or writing a file to a
component inbox on the secondary site server. The secondary site server
will experience performance similar to the primary site server, and you
should plan your hardware investment for a secondary site server in much
the same way as you would for a primary site server. Since you don’t
have the added overhead of SQL Server database access, the resource
requirements for the secondary site server won’t be as high as for a
primary site server. Nevertheless, you’ll sell yourself, your
organization, and the secondary site short if you don’t include the same
planning and testing strategies when implementing the secondary site as
you do when implementing a primary site.
When viewing the
site properties of the secondary site through the parent site’s SMS
Administrator Console, you’ll notice that any site tasks related to the
presence of a database will be missing. For example, let’s consider the
folder Site Settings\Site Maintenance. For a primary site, you can
schedule SQL commands and enable and configure a variety of database
tasks, such as backing up the database
and setting aging intervals for discovery data and inventory records.
For a secondary site, you can schedule only a site backup.
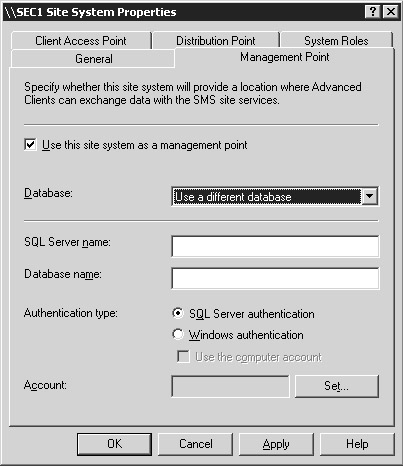
Additionally, the
only other site system role supported by a secondary site besides the
default CAP and distribution point roles is management point (in this
scenario, called a proxy management point). As you can see in Figure 19, if you assign this role, you must specify whether to use the parent site’s database or some database on another server.

Uninstalling a Secondary Site
Although there might
be several reasons for wanting to remove a secondary site, one main
consideration must be kept in mind—the relationship between the
secondary site and its parent. Since the secondary site can’t exist
without a parent site, it’s more closely related to its parent than two
primary sites would be in a parent-child relationship. For example, if
you want to move the secondary site from one parent to another, you must
completely uninstall the secondary site first and then reinstall it for
the new parent.
The process for uninstalling a secondary site is similar to that for uninstalling a primary site.
You can initiate an uninstall by running setup from the SMS 2003 source
CD, navigating to the Setup Options page, and selecting Remove SMS. You
can also initiate the uninstall process through the SMS Administrator
Console. Start the SMS Administrator Console for the parent site of the
secondary site that you want to remove. Right-click the secondary site
entry in the console and select Delete from the action menu. This starts
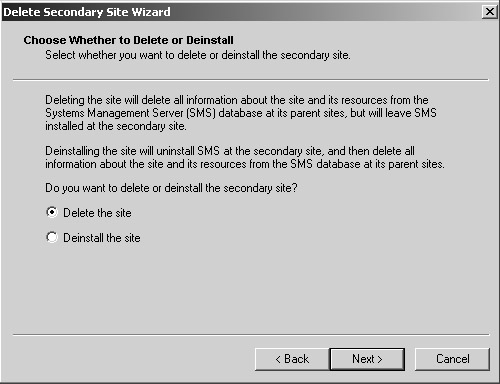
the Delete
Secondary Site Wizard. When you click Next, the setup process displays
the Choose Whether To Delete Or Deinstall page, as shown in Figure 20.

With SMS 2003, you
have the option to completely remove the secondary site installation
(the Deinstall option on this page) or to simply remove all references
to the secondary site from its parent while leaving the server
installation intact (the Delete option). You would use the Delete option
if, for example, the secondary site server is no longer functioning or
no longer exists. In that case the Deinstall option wouldn’t work
because the secondary site server wouldn’t be able to respond to
commands to uninstall. Only error messages would be generated at the
parent, and the deinstall would fail from the parent’s point of view.
However, the Delete option bypasses the uninstall portion of the process
and simply removes the reference of the secondary site from the parent
site. Of course, you might still need to do some cleanup on the
secondary site server.
When the removal process
is complete and you refresh the parent site console, the secondary site
entry will no longer be present.