As hardware components simultaneously increase in
speed and capacity while falling in price, one of the consequences is a
tendency to spend less time analyzing the precise performance
requirements of a database application. Today's off-the-shelf/commodity
database servers from the major system vendors are both powerful and
flexible enough for almost all database implementations. Given that,
regardless of the available power, one of the fundamental truths of any
computing system is that there will always be a bottleneck somewhere
(and in most cases, particularly for SQL Server systems, the bottleneck
is usually in the disk subsystem), making disk configuration an
important DBA skill.
Multicore CPUs and
higher-capacity (and cheaper) memory chips have made CPU and memory
configuration reasonably straightforward. Disk configuration, on the
other hand, is more involved, and for a disk-intensive server
application such as SQL Server, correctly configuring disk storage
components is critical in ensuring ongoing performance and stability.
As well as being the most
complicated hardware bottleneck to fix once in production, incorrectly
configured disks and poor data placement are arguably the most common
cause of SQL Server performance problems.
1. Creating and aligning partitions
Preparing disks
for use by SQL Server involves configuring RAID arrays, creating
partitions, and formatting volumes. We'll examine each of these tasks
shortly, but first let's cover some of the terms used when discussing
the anatomy of a disk drive:
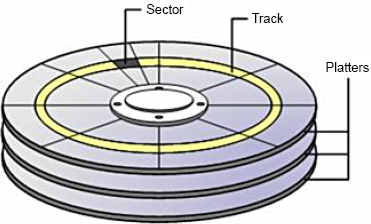
Each physical disk is made up of multiple magnetized platters, which are stacked on top of each other, with each platter storing data on both sides (top and bottom).
A track
is a ring of data storage on a disk platter. Tracks are numbered
beginning with zero, starting from the outermost to the innermost ring.
Each track consists of multiple sectors,
which cut the track into portions similar to a pie slice. Sectors
typically have a fixed size of 512 bytes, and represent the smallest
accessible unit of data on the disk.
Earlier
disks had a fixed amount of sectors per track. Considering the smaller
length of tracks toward the center of the disk platters, sectors on the
outer tracks were padded with blank space to keep the sectors per track
at a fixed ratio. Modern disks use various techniques to utilize the blank space on the outer tracks to increase disk capacity.
Disk heads,
positioned above and below each platter, move in and out from the
center of the disk. This motion, together with the spinning of the disk
platters on their central axes, allows the disk heads to access the
entire surface of each disk platter.
An allocation unit
is the smallest file allocation size used by Windows. The default
allocation unit size is 4K, which equates to eight sectors. Smaller
allocation units reduce the amount of wasted space for small files but
increase fragmentation. Larger allocation units are useful for larger
files and reducing fragmentation.
Figure 1 illustrates some of these terms.

RAID array stripe size
We use RAID levels such as RAID 0 and RAID 10, both
of which stripe data across multiple disks. Striping works by dividing
data to be written to disk into chunks and spreading the chunks over the
separate disks in the RAID array. When the data is read, the RAID
controller reads the individual chunks from the required disks and
reconstructs the data into the original format.
The RAID stripe size, not
to be confused with the allocation unit size, determines the size of
each chunk of data. Setting the stripe size too small will create
additional work for the RAID controller in splitting and rejoining
requested data. The best RAID stripe size is a contentious issue, and there's no single best answer.
Storage vendors,
particularly for their enterprise SAN solutions, typically optimize the
stripe size based on their expert knowledge of their systems. In almost
all cases, the best option is to leave the existing default stripe size
in place. Changes should be verified with the storage vendor and undergo
thorough tests to measure the performance impact before making the
change to a production system.
Once the RAID array is
built, the next task is to create one or more partitions on the array
that prepares the disk for use by Windows. As you'll see shortly, disk
partitions should be built using the diskpart.exe tool, which provides a method to offset, or align, the partition.
Track-aligned partitions with DiskPart
The first part of each disk partition is called the master boot record
(MBR). The MBR is 63 sectors in length, meaning the data portion of the
partition will start on the 64th sector. Assuming 64 sectors per track,
the first allocation unit on the disk will start on the first track and
complete on the next track. Subsequent allocation units will be split
across tracks in a similar manner.
The most efficient
disk layout is where allocation units are evenly divisible into the
tracks—for example, eight 4K allocation units per 32K track. When a
partition isn't track-aligned, allocation units start and finish on
different tracks, leading to more disk activity than would be required
in a track-aligned partition. For RAID arrays, similar alignment
problems exist with the stripes, increasing disk activity and reducing
cache efficiency. Some estimates suggest up to a 30 percent performance
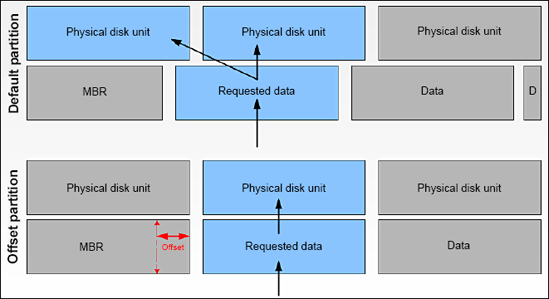
penalty—a significant amount, particularly for disk-bound systems. Figure 2 illustrates the before- and aftereffects of offsetting a partition.

The task, then, is to
offset the partition's starting position beyond the MBR. Starting in
Windows Server 2008, all partitions are track-aligned by default. In
Windows Server 2003 and earlier, partitions are track-aligned on
creation using the diskpart.exe tool or diskpar.exe prior to Windows
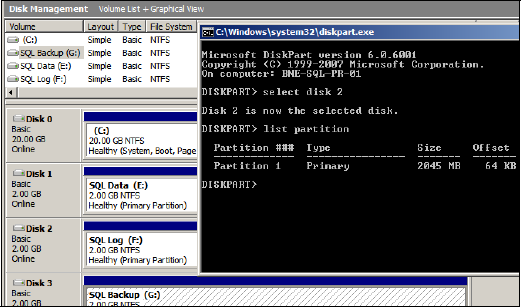
Server 2003 Service Pack 1. As shown in figure 3, the DiskPart tool can also be used to inspect an existing partition's offset.

A common offset used for SQL Server partitions is 64K, or 128 sectors. Using DiskPart, you achieve this by using the Create Partition command with an align=64
option. Windows Server 2008 (and Vista) automatically use a 1024K
offset, a value chosen to work with almost all storage systems. If
unaligned partitions are used by these operating systems—for example,
after an upgrade from Windows Server 2003—then the partition overhead
remains until the partition is rebuilt.
As with the RAID stripe
size, check the offset value with the storage vendor, and verify any
changes from their recommended value with an appropriate performance
test.
Allocation unit size
The final task in
preparing a disk for use by SQL Server is to format the partition using
the Windows Disk Management tool. By default, partitions are formatted
using a 4K allocation unit size.
As discussed earlier,
the smaller the allocation unit size, the less disk space is wasted for
small files. For example, a 1K file created on a volume with a 4K
allocation unit will waste 3K, as 4K is the minimum allocation unit
size.
In contrast, large files
benefit from a larger allocation unit. In fragmented disks with a small
allocation unit size, a single large file will occupy many allocation
units, which are probably spread over many different parts of the disk.
If you use a larger allocation unit, a file will have a better chance of
being located in consecutive disk sectors, making the read and writes
to this file more efficient.
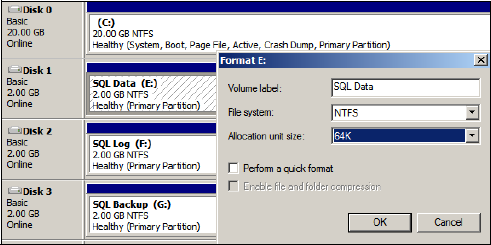
SQL Server allocates space within a database using extents, which are collections of eight 8K pages, making a total extent size of 64K. As you can see in figure 4,
the recommended allocation unit size for a SQL Server volume is 64K,
matching the extent size. Allocation unit sizes less than 8K (the
default is 4K) aren't recommended, as this leads to split I/O, where
parts of a single page are stored on separate allocation
units—potentially on different parts of the disk—which leads to a
reduction in disk performance.
Note that NTFS
partitions created using allocation units of greater than 4K can't be
compressed using NTFS compression. Such compression isn't recommended
for SQL Server volumes, so this shouldn't be a determining factor. In
later chapters, we'll examine various forms of native compression
introduced in SQL Server 2008.
Let's turn our attention from the format of disks to the manner in which they're connected to the server: disk controller cards.
