Wizards in Dynamics AX like everywhere else are used
to help a user to perform a specific task. Some examples of standard
Dynamics AX wizards are Report wizard, Project wizard, Number sequence wizard, and so on.
Normally, a wizard is
presented to a user as a form with a series of steps. While running the
wizard all user input is stored in temporary memory until the user
presses the Finish button on the last wizard page.
In this recipe, we will create a new Ledger account wizard. First, we will use the standard Dynamics AX Wizard Wizard to create a framework and then we will add some additional user input controls manually.
How to do it...
1. Open Tools | Development tools | Wizards | Wizard Wizard.
2. Click Next on the first page:

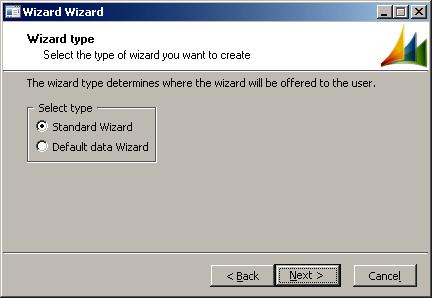
3. Select Standard Wizard and click Next:
4. Specify LedgerTable as a name and click Next:

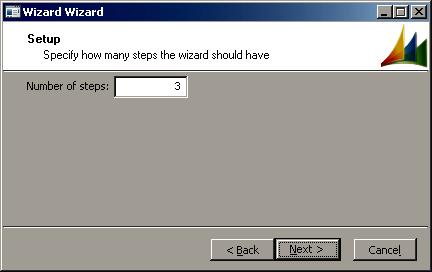
5. Accept the default number of steps and click Next:
6. Click Finish to complete the wizard:

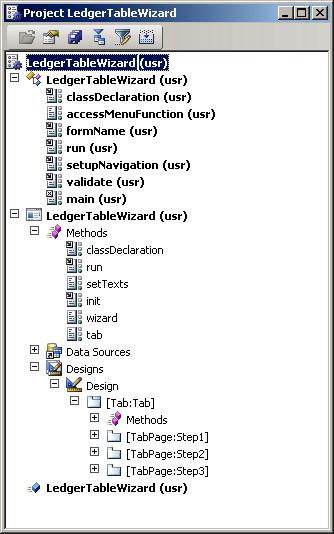
7. The wizard should have created an AOT development project with three objects:
8. Modify the LedgerTableWizard class by adding the following line to its class declaration:
9. Create the following methods in the same class:
AccountNum parmAccount(
AccountNum _account = ledgerTable.AccountNum)

{;
ledgerTable.AccountNum = _account;
return ledgerTable.AccountNum;
}
AccountName parmName(
AccountName _name = ledgerTable.AccountName)

{;
ledgerTable.AccountName = _name;
return ledgerTable.AccountName;
}
LedgerAccountType parmType(
LedgerAccountType _type = ledgerTable.AccountPlType)

{;
ledgerTable.AccountPlType = _type;
return ledgerTable.AccountPlType;
}
void setNext()

{;
this.nextEnabled(
ledgerTable.AccountNum && ledgerTable.AccountName);
}
10. Add the following line to the existing setupNavigation() method in the same class:
this.nextEnabled(false, 2);
11. Replace validate() of the same class with the following code:
boolean validate()

{;
if (!ledgerTable.validateWrite())
{
return false;
}
return true;
}
12. Replace run() of the same class with the following code:
void run()

{;
ledgerTable.insert();
info(strfmt(
"Ledger account '%1' was successfully created",
ledgerTable.AccountNum));
}
13. In the LedgerTableWizard form create three edit methods with the following code:
edit AccountNum editAccount(
boolean _set,
AccountNum _account)

{;
if (_set)
{
sysWizard.parmAccount(_account);
sysWizard.setNext();
}
return sysWizard.parmAccount();
}
edit AccountName editName(
boolean _set,
AccountName _name)

{;
if (_set)
{
sysWizard.parmName(_name);
sysWizard.setNext();
}
return sysWizard.parmName();
}
edit LedgerAccountType editType(
boolean _set,
LedgerAccountType _type)

{;
if (_set)
{
sysWizard.parmType(_type);
}
wizardswizardscreating, stepsreturn sysWizard.parmType();
}
14. Change the form's design property:
|
Property
|
Value
|
|---|
|
Caption
|
Ledger account wizard
|
15. Modify the properties of the Step1 tab page:
|
Property
|
Value
|
|---|
|
Caption
|
Welcome
|
16. Create a new StaticText control in this tab page with the following properties:
|
Property
|
Value
|
|---|
|
Name
|
WelcomeTxt
|
|
Text
|
This wizard helps you to create a new ledger account.
|
17. Modify the properties of the Step2 tab page:
|
Property
|
Value
|
|---|
|
Caption
|
Account setup
|
|
HelpText
|
Specify account number, name, and type.
|
18. Create a new StringEdit control in this tab page with the following properties:
|
Property
|
Value
|
|---|
|
Name
|
Account
|
|
DataMethod
|
editAccount
|
19. Create another StringEdit control in this tab page with the following properties:
|
Property
|
Value
|
|---|
|
Name
|
Name
|
|
DataMethod
|
editName
|
20. Create a new ComboBox control in this tab page with the following properties:
|
Property
|
Value
|
|---|
|
Name
|
Type
|
|
DataMethod
|
editType
|
21. Modify the properties of the Step3 tab page:
|
Property
|
Value
|
|---|
|
Caption
|
Finish
|
22. Create a new StaticText control in this tab page with the following properties:
|
Property
|
Value
|
|---|
|
Name
|
FinishTxt
|
|
Text
|
This wizard is now ready to create new ledger account.
|
23. Now the form should look like following in AOT:

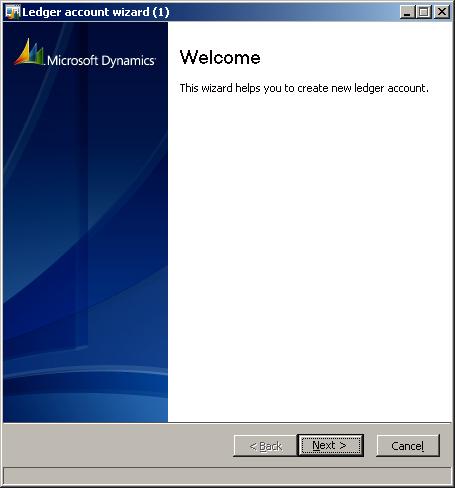
24. To test the newly created wizard, run the LedgerTableWizard menu item. The wizard should appear. On the first page click Next:
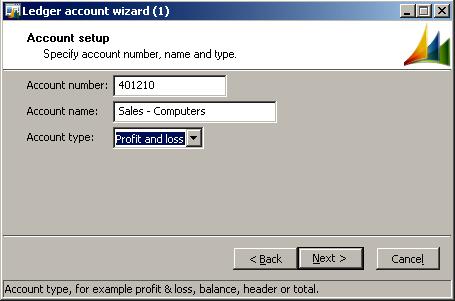
25. On the second page, specify Account number, Account Name, and Account type:
26. On the last page, click Finish to complete the wizard:

27. The Infolog should display a message that a new account was created successfully:

How it works...
The Wizard Wizard creates three AOT objects for us:
1. The LedgerTableWizard class, which contains all the logic required to run a wizard.
2. The LedgerTableWizard form, which is the wizard layout.
3. And finally, the LedgerTableWizard Display menu item, which is used to start a wizard and could be added to a user menu.
In the LedgerTableWizard class, we declare the ledgerTable variable and create three parameter methods parmAccount(), parmName(), and parmType() for setting and retrieving account number, name, and type values from ledgerTable respectively.
All user input controls
are placed on the second page. Here, we have to make sure that the user
cannot pass this step without filling out the required information. For
this purpose, we create setNext(), which controls the status of the Next button on the form. It calls nextEnabled() from the parent class to enable or disable the button. We pass the logical expression ledgerTable.AccountNum && ledgerTable.AccountName as an argument to ensure that Next
is not enabled until the user specifies both account number and name.
We do not have to worry about account type because it is set to Profit & loss by default and cannot be changed to empty.
Normally, setNext() should have a switch
statement for performing different validations for different wizard
steps, but it is not relevant here because we have only one step to
validate.
setupNavigation() is used for defining initial button states. We use this method to disable the Next
button on the second page by default. Note that, its second argument is
a tab page number and although for demonstration purposes it is an
integer, normally it should be defined as a macro.
All final validations has to go into validate(). This method is called right after user clicks Finish at the end of wizard and before main code is executed. Here we call validateWrite() on ledgerTable object to check if this object can accept user specified values.
Once the validation is done, the system executes all the code specified in run(). In our example, here we call insert() on the ledgerTable table and show an information message that a new account was successfully created.
On the LedgerTableWizard form, we create three edit
methods and corresponding input controls on the second tab page for
account number, name, and type respectively. Each edit method accepts a
user input value, passes it to the sysWizard object, and calls setNext() to determine the status of the Next button.
The rest of the modifications are layout changes. We set the wizard caption and add some descriptive text on all wizard pages.
