Some of the Dynamics AX controls like trees or lists
in most cases, to represent the data in a richer way, have small icon
images in front of the text. Icons could represent a type, status,
availability, or any other property of the current item in the control.
Images are binary data and
their processing might be time consuming. The Dynamics AX application
provides a way of handling images to increase application performance.
Normally, on those forms with lists or trees all required images are
preloaded during form initialization. This reduces image loading time
when the image is actually displayed to the user.
For this purpose, Dynamics AX contains a set of ImageListAppl derivative classes, which holds a specific set of images required in specific circumstances. For example, the ImageListAppl_Proj class in the Project
module preloads project-related images representing project and
transaction types during project tree initialization. So virtually no
time is consumed for displaying the images later, when the user starts
browsing the project tree control.
In this recipe, we will create our own image list class for image preloading. As a base we will use the list created in the There's more… section for the Building selected/available lists recipe. We will add icons to both lists depending on the item type.
How to do it...
1. In AOT, create a new class named ImageListAppl_InventItem with the following code:
public class ImageListAppl_InventItem extends ImageListAppl

{
}
protected void build()

{;
super();
this.add(#ImageItem);
this.add(#ImageService);
this.add(#ImageBOM);
}
2. In AOT, find the SysListPanelRelationTableCallback class and modify its newForm():
static SysListPanelRelationTableCallback newForm(
FormRun formRun,
int parentId,
str captionLeft,
str captionRight,
int imageId,
tableId relationTable,
fieldId relationField,
fieldId relationRangeField,
tableId dataTable,
fieldId dataField,
container dataContainerFieldIds,
fieldId dataRangeField = 0,
AnyType dataRangeValue = '',
identifiername validateMethod = '',
identifiername leftMethod = '',
identifiername rightMethod = '',
int itemsNeeded = 0,
ImageListAppl imageListAppl = null)

{
SysListPanelRelationTableCallback sysListPanel =
SysListPanelRelationTableCallback::construct();
;
sysListPanel.parmFormRun(formRun);
sysListPanel.parmParentId(parentId);
sysListPanel.parmCaptionLeft(captionLeft);
sysListPanel.parmCaptionRight(captionRight);
sysListPanel.parmImageId(imageId);
sysListPanel.parmRelationTable(relationTable);
sysListPanel.parmRelationField(relationField);
sysListPanel.parmRelationRangeField(relationRangeField);
sysListPanel.parmDataTable(dataTable);
sysListPanel.parmDataField(dataField);
sysListPanel.parmDataContainerFieldIds(
dataContainerFieldIds);
sysListPanel.parmDataRangeField(dataRangeField);
sysListPanel.parmDataRangeValue(dataRangeValue);
sysListPanel.parmValidateMethod(validateMethod);
sysListPanel.parmLeftMethod(leftMethod);
sysListPanel.parmRightMethod(rightMethod);
sysListPanel.parmItemsNeeded(itemsNeeded);
sysListPanel.parmImageList(imageListAppl);
sysListPanel.build();
return sysListPanel;
}
3. In AOT, fine the InventBuyerGroup form and replace its methods with the following code:
void init()

{
container columns;
ImageListAppl_InventItem imageListAppl;
;
columns = [0, 0, 0];
imageListAppl = new ImageListAppl_InventItem(
Imagelist::smallIconWidth(),
Imagelist::smallIconHeight());
sysListPanel = SysListPanelRelationTableCallback::newForm(
element,
control::Items,
"Selected",
"Available",
0,
tablenum(InventBuyerGroupList),
fieldnum(InventBuyerGroupList, ItemId),
fieldnum(InventBuyerGroupList, GroupId),
tablenum(InventTable),
fieldnum(InventTable, ItemId),
columns,
0,
"",
"",
identifierstr(selectedItems),
identifierstr(availableItems),
0,
imageListAppl);
super();
sysListPanel.init();
images, preloadingimages, preloadingimage list class, creating}
container selectedItems()

{
container ret;
container data;
InventTable inventTable;
InventBuyerGroupList groupList;
;
while select groupList
join firstonly inventTable
where inventTable.ItemId == groupList.ItemId
{
data = [inventTable.ItemId,
inventTable.inventItemType().imageRessNo(),
inventTable.ItemId,
inventTable.ItemName,
inventTable.salesPcsPrice()];
ret = conins(ret, conlen(ret)+1, data);
}
return ret;
}
container availableItems()

{
container ret;
container data;
InventTable inventTable;
InventBuyerGroupList groupList;
;
while select inventTable
notexists join firstonly groupList
where groupList.ItemId == inventTable.ItemId
{
data = [inventTable.ItemId,
inventTable.inventItemType().imageRessNo(),
inventTable.ItemId,
inventTable.ItemName,
inventTable.salesPcsPrice()];
ret = conins(ret, conlen(ret)+1, data);
}
return ret;
}
4. To test the results, open Inventory management | Setup | Inventory | Buyer groups, go to the Items tab page and notice that items, services, and bills of material in each section now have different icons:
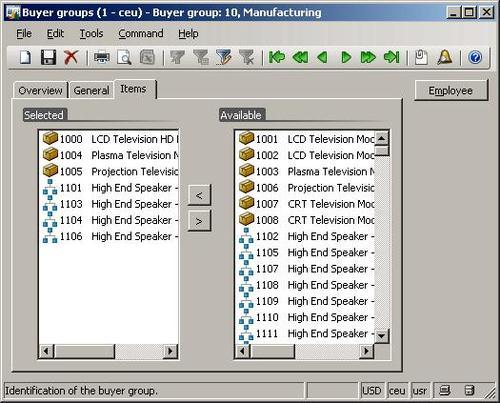
How it works...
The first task in this
recipe is to create a class that handles the required set of images. We
only need three different images one for each inventory item type: item,
service, and BOM. I have to mention that there are several standard ImageListAppl classes like ImageListAppl_Prod or ImageListAppl_BOMRouteTree
that already include the mentioned image resources along with other
images. But those classes are used in other scenarios and for
demonstration and it is more beneficial to create a new class.
Image resources are
also already present in the system and so we do not have to do anything
about this. We only need to include the relevant resources using add() in the build of the new ImageListAppl_InventItem class. The ResAppl macro could be explored if more images are required or custom macros could be created to include custom images.
The second step is to slightly modify the SysListPanelRelationTableCallback class to make sure its newForm() accepts ImageListAppl as an argument and passes it to the class using the parmImageList()
method. A new method could have been created here but I do not like the
idea of copying that much code, especially when our changes are very
small and do not affect class usage as the parameter is set to null by default.
The final step is to modify the form. First, we create a new imageListAppl object based on our class and pass it to the modified newForm() as a last argument. At this stage sysListPanel "knows" about the images we are going to use when displaying the lists. Then we modify the form's selectedItems() and availableItems()
to include image resource numbers in the returned data. Here, we use
standard functionality to identify the resource associated with the item
type.
Now upon displaying the lists, sysListPanel reads preloaded image data from our class.
There's more...
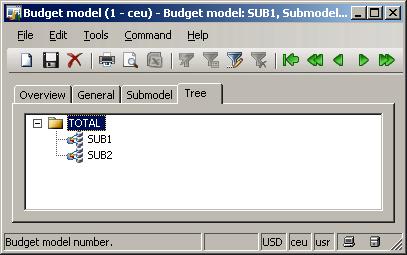
First in AOT, we create a new class called ImageListAppl_LedgerBudget with the following code:
class ImageListAppl_LedgerBudget extends ImageListAppl

{
}
protected void build()

{;
super();
this.add(#ImageFolder);
this.add(#ImageLedgerBudget);
}
The class extends ImageListAppl
and is responsible for preloading the images to be used on the tree. We
will use only two different images a— folder icon for parent
ledger budget models and a budget icon for submodels.
ImageListAppl imageListAppl;
Add the following code to buildTree() right after the variable declaration section:
imageListAppl = new ImageListAppl_LedgerBudget();
tree.setImagelist(imageListAppl.imageList());
This code creates the instance of ImageListAppl_LedgerBudget and passes it to the tree control.
Replace createNode() with the following code:
TreeItemIdx createNode(
TreeItemIdx _parentIdx,
BudgetModelId _modelId,
RecId _recId)

{
TreeItemIdx itemIdx;
BudgetModel modelSub;
ImageRes imageRes;
#ResAppl
;
if (_parentIdx == FormTreeAdd::Root)
{
imageRes = imageListAppl.image(#ImageFolder);
}
else
{
imageRes = imageListAppl.image(#ImageLedgerBudget);
}
itemIdx = SysFormTreeControl::addTreeItem(
tree,
_modelId,
_parentIdx,
_recId,
imageRes,
true);
if (model == _modelId)
{
tree.select(itemIdx);
}
while select modelSub
where modelSub.ModelId == _modelId &&
modelSub.Type == HeadingSub::SubModel
{
this.createNode(
itemIdx,
modelSub.SubModelId,
modelSub.RecId);
}
return itemIdx;
}
At the top of this
method, we check whether the current node is a parent node. If yes, we
set its image as the folder icon, otherwise— the budget icon.
The rest of the code is the same.
To test the tree, open General ledger | Setup | Budget | Budget model, go to the Tree tab page and notice how the tree has changed: