7. Implementing Moderated Transport
The moderated transport feature introduced by Exchange Server 2010 enables you
to specify that all email messages sent to specific recipients are approved by
moderators. You can configure any type of recipient as a moderated recipient,
and an Exchange Server 2010 Hub Transport server ensures that all messages sent
to those recipients go through an approval process.
Note that Exchange Server 2007 and earlier Hub Transport servers do not
understand moderated transport and that if a moderated distribution group is
expanded on an Exchange Server 2007, the message is sent to all recipients and
bypasses the moderation process.
Typically,
moderated transport is used to control messages sent to large distribution
groups. Depending on organizational requirements, messages sent to specific
mailboxes or partner contacts may also require moderation. You use moderated
recipients to accomplish these tasks.
Moderated transport makes use of the Exchange Server 2010 approval framework.
Exchange uses the approval framework for making decisions about email messages.
The approval framework uses a special mailbox called the arbitration
mailbox for each workflow. This mailbox stores the original
message and the decision state during the approval process.
The following components are included in the moderated transport
application:
Categorizer
The transport categorizer initiates the approval process. When it
detects a moderated recipient while processing a message, the
categorizer reroutes the message to the arbitration mailbox.
Information Assistant
The Information Assistant process monitors the arbitration mailbox
and resubmits approved messages to the submission queue for delivery
to intended recipients. Otherwise, it deletes rejected messages.
This component is also responsible for sending rejection
notifications to the sender and cleaning the arbitration mailbox by
deleting any stale or orphaned messages. For example, if a moderator
deletes an approval request rather than making a decision, the
Information Assistant removes the message that is waiting for
approval in the arbitration mailbox.
Store driver
The store driver processes messages that the categorizer marks for
moderation by storing the original message in the arbitration
mailbox, sending approval requests to the moderators, and marking
the moderator decision on the message stored in the arbitration
mailbox. If the Information Assistant submits a previously approved
message, the store driver reconfigures the message so that it is
identical to the original message submitted by the sender.
Arbitration mailbox
The arbitration mailbox stores the original message that is
awaiting approval. During setup, one arbitration mailbox is created
for moderated transport by default and is used for all moderated
recipients. If appropriate, you can add additional arbitration
mailboxes for load-balancing purposes. If you use multiple
arbitration mailboxes, you need to specify which mailbox is used for
each moderated recipient.
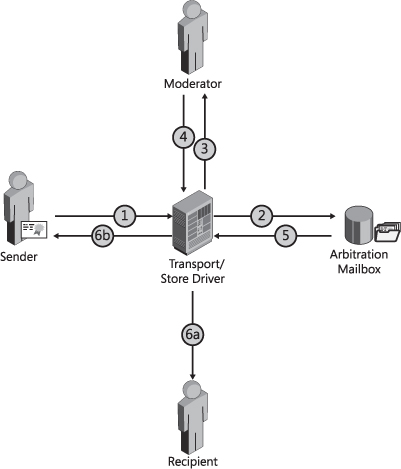
When a user sends a message to a recipient and moderation is enabled, the
message follows the path to its destination, as described by the following
procedure (illustrated in Figure 12):
The sender creates a message that is sent to the moderated
recipient.
The categorizer intercepts the message and marks it for moderation. It
then reroutes it to the arbitration mailbox.
The store driver stores the message
in the arbitration mailbox and sends an approval request to the
moderator.
The moderator accepts or rejects the message.
The store driver marks the moderator’s decision on the original
message in the arbitration mailbox.
The Information Assistant reads the approval status on the message
stored in the arbitration mailbox. It then processes the message
depending on the moderator’s decision:
If the moderator approves the message, the Information
Assistant resubmits it to the submission queue. The message is
delivered to the recipient (process 6a in Figure 12).
If the moderator rejects the message, the Information
Assistant deletes it from the arbitration mailbox and notifies
the sender that the message was rejected (process 6b in Figure 12).
7.1. Configuring a Moderated Recipient
When you configure a recipient for moderation, all messages sent to that
recipient are subject to approval by the designated moderator or moderators.
You typically moderate email messages sent to a distribution group, although
you can moderate email sent to an individual user. You can use either the
EMC or the EMS to configure a moderated distribution group (or a moderated
user). To use the EMC to configure the global distribution group
FirstDistributionGroup as a moderated distribution group and identify Don
Hall as the moderator, carry out the following procedure (note that the
mail-enabled distribution group FirstDistributionGroup must exist for this
procedure to work):
On the EMC Console pane, click Recipient Configuration.
Click the distribution group FirstDistributionGroup on the Result
pane and then click Properties on the Actions pane.
Click the Mail Flow Settings tab in the FirstDistributionGroup
Properties dialog box. This tab is shown in Figure 13.
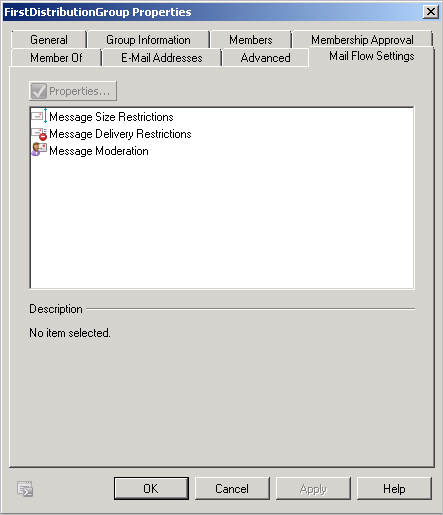
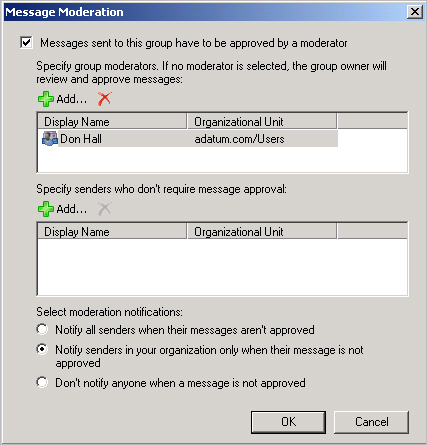
Click Message Moderation and then click Properties.
In the Message Moderation dialog box, select the Messages Sent To
This Group Have To Be Approved By A Moderator check box.
In the Specify Group Moderators section, click Add.
In the Select Recipient dialog box, select Don Hall and then click
OK.
Select the Notify Senders In Your Organization Only When Their
Message Is Not Approved option. The Message Moderation dialog box
should look similar to Figure 14.
Click OK to close the Message Moderation dialog box.
Click OK to close the FirstDistributionGroup Properties dialog
box.
This
example shows how to configure a distribution group for moderation, but the
same steps can be followed to configure any recipient for moderation.
You can also use the EMS to configure a moderated distribution group or
user. The following EMS command enables moderation for the distribution
group SecondDistributionGroup (which must exist or else the command returns
an error), designates Kim Akers as the moderator, permits the members of the
distribution group ThirdDistributionGroup (which must also exist) to bypass
moderation, and notifies internal senders if their message to the
distribution group is rejected but does not send any notifications to
senders external to the organization:
Set-DistributionGroup SecondDistributionGroup -ModerationEnabled $true -ModeratedBy
"Kim Akers" -ByPassModerationFromSendersOrMembers ThirdDistributionGroup
-SendModerationNotifications Internal
This command completes without output. Note that because no arbitration
mailbox is specified, the default arbitration mailbox is used.
You can configure any recipient for moderation. For example, to configure
a moderated mailbox user, you would enter a command with a similar syntax
except that you would use the Set-Mailbox cmdlet
instead of the Set-DistributionGroup cmdlet.
7.2. Creating and Deploying an Additional Arbitration Mailbox
You can, if required for load
balancing, create an additional arbitration mailbox by entering an EMS
command based on the New-Mailbox cmdlet and using the
Arbitration parameter. It is possible to configure an existing mailbox as an
additional arbitration mailbox by using the Set-Mailbox
EMS cmdlet with the same parameter, but this could lead to confusion, and it
is typically preferable to create an additional arbitration mailbox from
scratch.
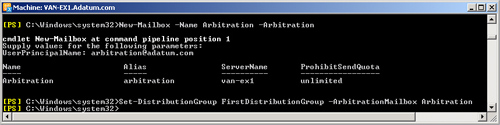
The following EMS command creates an arbitration mailbox named
Arbitration. You need to provide other information, such as the user
principal name, when prompted:
New-Mailbox -Name Arbitration -Arbitration
When you have created an additional arbitration mailbox, you can assign it
to a moderated recipient by using the ArbitrationMailbox parameter. For
example, the following command assigns the arbitration mailbox Arbitration
to the FirstDistributionGroup moderated recipient:
Set-DistributionGroup FirstDistributionGroup -ArbitrationMailbox Arbitration
Figure 15 shows the EMS
commands to create and deploy the additional arbitration mailbox named
Arbitration.
Note:
Distinguish between the Arbitration and ArbitrationMailbox parameters.
The Arbitration parameter defines a new or reconfigured mailbox as an
additional arbitration mailbox. The ArbitrationMailbox parameter
specifies which arbitration mailbox is used when moderating email
messages to a specific recipient. If the ArbitrationMailbox parameter is
not included in the command, the default arbitration mailbox is
used.
7.3. Moderated and Nonmoderated Recipients
If a message is sent to a group of recipients that includes both moderated
and nonmoderated recipients, a separate approval process occurs for each
moderated recipient.
Suppose, for example, the user Don Hall sends a message to five
recipients, one of which is a moderated distribution group. The categorizer
splits this message into two. The first message is delivered immediately to
the four nonmoderated recipients, and the second message is submitted to the
approval process for the moderated distribution group. If a message
is intended for more than one moderated recipient, a separate copy is
created for each moderated recipient and submitted to the approval
process.
A moderated distribution group can contain other moderated recipients. In
this case, a separate approval process occurs for each moderated recipient
in the distribution group after the message to the distribution group is
approved. You can enable the automatic approval of the distribution group
members after the message to the moderated distribution group is approved by
setting the BypassNestedModerationEnabled parameter of the moderated
distribution group to $true. In this case, you enter an EMS command similar
to the following:
Set-DistributionGroup -Identity Research -BypassNestedModerationEnabled $true
7.4. Bypassing Moderation
Messages from moderators are delivered to the moderated recipient
immediately and bypass the approval process. A moderator has the authority
to determine what messages are appropriate for a moderated recipient.
Owners of distribution groups and dynamic distribution groups are not, by
default, trusted senders, and messages from these senders are subject to the
approval process. A distribution group owner can be responsible for managing
the distribution group membership but may not be able to moderate messages
sent to it.
For example, the Technical Support Department may be the owners of a
distribution group called Marketing, but only specific people in the
Marketing Department may have moderator rights for this distribution group.
To bypass moderation for owners, you must either designate them as
moderators or add them to the list of senders explicitly allowed to send
messages to the moderated recipients.
