1. Problem
You have developed a BizTalk
solution and wish to deploy the solution for testing in your development
environment directly from Visual Studio, rather than using other
deployment methods.
2. Solution
Since BizTalk projects
compile into .NET assemblies, the deployment process in Visual Studio is
similar to deploying other .NET projects. You must first sign the
BizTalk assembly before you can add the assembly to the GAC. Then, set
up the BizTalk project properties, and finally, deploy the project. The
following steps outline the procedure.
There
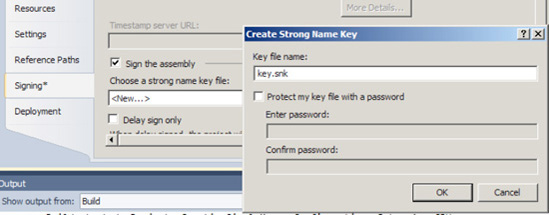
are several ways to sign a BizTalk assembly. The easiest is to
right-click the project in Visual Studio and click the Signing tab.
Click the "Sign the assembly" option, and create a new strong name key
(see Figure 1).

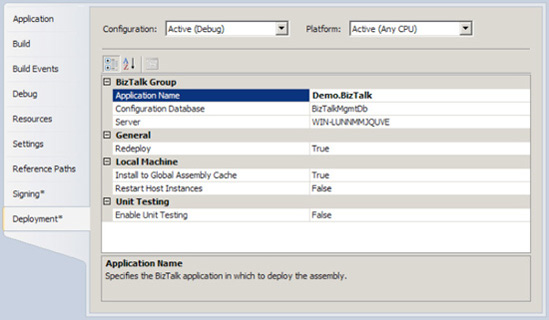
Next, click the Deployment tab.
Enter
an application name for the project (this usually matches a BizTalk
application that has already been created). Set other properties as
desired (see Table 1). Figure 2 shows a project configured for deployment. Click OK to close the dialog box.
NOTE
The application name is not
required, but it is a best practice to give all projects an application
name to facilitate management of the project. If none is specified, the
default BizTalk application will be deployed to.

Right-click the project or solution, and select Deploy.
Bind and start the artifacts.
Once you have bound an
orchestration, the binding will be remembered the next time you deploy
your project. In addition, if you have multiple projects within the
solution, deploying from the solution will deploy all the projects
within the solution.
3. How It Works
Deploying directly from
Visual Studio is an alternative to exporting and importing BizTalk
applications through the BizTalk Administration Console.
Within Visual Studio, several deployment properties are available, as described in Table 1.
Table 1. Visual Studio Deployment Properties
| Property | Description |
|---|
| Server | Defines
the BizTalk deployment server. The local server name is the default
setting for this property. If the project is shared across multiple
development machines, set this value to localhost. |
| Configuration Database | Defines
the name of the BizTalk configuration database. By default, and unless
it was changed, the configuration database name will be BizTalkMgmtDb. |
| Application Name | Defines
the application that will house this BizTalk project. Although leaving
this property blank will cause the solution to deploy to the default
application, it is a best practice to provide a value for this property. |
| Redeploy | Defines
whether the deployment process will automatically delete the old
deployed assembly before deploying the current assembly. This option is
very useful, but should be used only within a development environment. |
| Install to Global Assembly Cache | Controls whether the assembly will be deployed to the GAC as part of the deployment process. |
| Restart Host Instances | Controls whether to restart the in-process host instance. By default, this property is False. Due to artifact caching during development, it is a best practice to change this setting to True to force the removal of artifacts from the cache. If this property is False, you may notice inconsistent behavior in your solutions, particularly during repeated deployments. |