Logo
programming4us
programming4us
programming4us
programming4us
Home
programming4us
XP
programming4us
Windows Vista
programming4us
Windows 7
programming4us
Windows Azure
programming4us
Windows Server
programming4us
Windows Phone
 
Windows Server

BizTalk 2010 Recipes : Deployment - Manually Deploying Updates

- Free product key for windows 10
- Free Product Key for Microsoft office 365
- Malwarebytes Premium 3.7.1 Serial Keys (LifeTime) 2019
5/5/2011 6:39:39 PM

1. Problem

You have a complex solution deployed with many orchestrations and other components. You want to deploy an update to one orchestration.

2. Solution

Deploying BizTalk solutions using an MSI file is great for the initial deployment but is of limited value once a solution is running in production and an update needs to be deployed. Manual deployment give the administrator 100% control over what is being deployed where, and chances for errors from incorrectly created MSIs are reduced to zero.

Manual deployment can best be summed up as follows:

  1. Unenlist any orchestrations that will be redeployed. This can be done from the BizTalk Administration Console. If any orchestrations have running instances in memory, two options are available: 1) wait until these instances have completed before doing the update, or 2) terminate these instances (terminating instances can be done from the BizTalk Group Hub reports and administrative functionality).

  2. Removed any maps and schemas that will be re-deployed. This can be done from the BizTalk Administration Console by right-clicking the maps/schemas (see Figure 1).
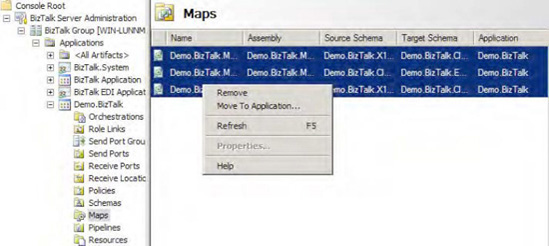
    Figure 1. Removing maps manually
  3. Once all objects that will be redeployed have been removed, right-click the BizTalk application you are applying the updates to, and select Add→BizTalk Assemblies.

  4. In the Add Resources dialogue box that opens, add the assemblies that you wish to redeploy, as shown in Figure 2.
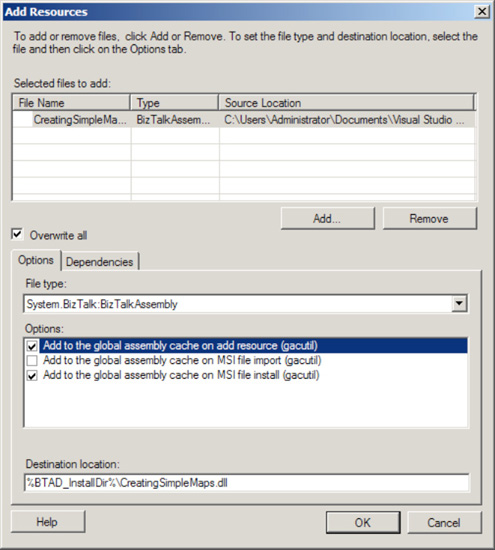
    Figure 2. Deploying BizTalk assemblies manually
  5. Click the "Overwrite all" check box to ensure that this overwrites the previous version of the assemblies. This will have to be done for every assembly in the list, so make sure to click each of them separately and click this "Overwrite all" option.

  6. Make sure that the assemblies are added to the global assembly cache. This generally means clicking the first and third check boxes in the "Options" area of the dialogue box.

  7. Click OK to deploy the BizTalk assemblies.

3. How It Works

Doing manual deployments will become one of the most common techniques you use once a solution has been successfully deployed to production. In fact, using the MSI deployment may not even be something you want to use at any point; manual deployments can be so much easier and less stressful, since you have complete control over everything.

When you are developing a project, make sure you think through the initial deployment and how updates will be deployed. Having an intelligent path to updating your solution prior to actual deployment is a great habit to have and one that will ease your development and deployment tasks.

Other -----------------
- Exchange Server 2010 : Configuring Federated Sharing (part 2) - Assigning the Federated Sharing Role
- Exchange Server 2010 : Configuring Federated Sharing (part 1) - Implementing Federated Sharing
- Exchange Server 2010 : Role Based Access Control
- BizTalk 2010 Recipes : Deployment - Importing Applications
- BizTalk 2010 Recipes : Deployment - Exporting Applications
- SharePoint 2010 PerformancePoint Services : Securing a PerformancePoint Installation - Authentication Troubleshooting
- SharePoint 2010 PerformancePoint Services : Securing a PerformancePoint Installation - Per-User Identity
- BizTalk 2010 Recipes : Adapters - Creating Ports Through C Sharp Applications
- BizTalk 2010 Recipes : Adapters - Configuring SOAP Sends and Receives
- Windows Server 2008 R2 : Windows Media Services - Using Other Windows Media Encoder Options
 
 
Top 10
- Microsoft Visio 2013 : Adding Structure to Your Diagrams - Finding containers and lists in Visio (part 2) - Wireframes,Legends
- Microsoft Visio 2013 : Adding Structure to Your Diagrams - Finding containers and lists in Visio (part 1) - Swimlanes
- Microsoft Visio 2013 : Adding Structure to Your Diagrams - Formatting and sizing lists
- Microsoft Visio 2013 : Adding Structure to Your Diagrams - Adding shapes to lists
- Microsoft Visio 2013 : Adding Structure to Your Diagrams - Sizing containers
- Microsoft Access 2010 : Control Properties and Why to Use Them (part 3) - The Other Properties of a Control
- Microsoft Access 2010 : Control Properties and Why to Use Them (part 2) - The Data Properties of a Control
- Microsoft Access 2010 : Control Properties and Why to Use Them (part 1) - The Format Properties of a Control
- Microsoft Access 2010 : Form Properties and Why Should You Use Them - Working with the Properties Window
- Microsoft Visio 2013 : Using the Organization Chart Wizard with new data
 
programming4us
Windows Vista
programming4us
Windows 7
programming4us
Windows Azure
programming4us
Windows Server