Configuring an IP Block List Provider Using the Exchange Management Console
The IP Block List Providers
filter is configured in the same manner as the IP Allow List Providers
filter; however, two different options are available in the IP Block
List Providers properties that are not available when configuring an IP
Allow List Provider.
The first difference can be
found in the Add IP Block List Providers window when adding an IP Block
List Providers on the Providers tab. A custom message can be specified
or the default can be used for the Determine Error Message Returned when
a Sender Is Blocked by a Provider option in the Return Status Codes
section. To configure a custom error message, click the Error Messages
button at the bottom of the window and select Custom Error Message in
the IP Block List Providers Error Message window.
Note
A maximum of 240 characters can be entered into the Custom Error Message field.
The second difference
between the IP Allow List Providers and IP Block List Providers filters
is the ability to add exceptions. Exceptions to the IP Block List
Provider’s database can be configured on the Exceptions tab of the IP
Block List Providers Properties window. On the Exceptions tab, you can
add email addresses of recipients that should not be blocked in the Do
Not Block Messages Sent to the Following E-Mail Addresses, Regardless of
Provider Feedback field. Messages sent to addresses in this list will
not be blocked if they trigger a match in the IP Block List Providers’
database.
Note
You must first obtain
the necessary DNS zone(s) or IP address(es) to query from the provider
hosting the IP Block List being added.
Configuring IP Block and Allow Lists Using the Exchange Management Shell
Connection filtering can
also be configured through the Exchange Management Shell. Each shell
command has its own parameters you can set based on the action(s)
performed by the command. There are four commands: Get, Add, Remove, and Set. Each command works with one or more IP Block and Allow List components.
The Get- command is used to retrieve the configuration of a component. For example, entering Get-IPBlockListConfig displays the IP Block List Configuration on the local system.
The Add- command
can be used to add an IP Block or Allow List entry or list provider and
to assign an expiration time to the entry. The following example adds
an IP range to the block list with an expiration date and time (24-hour
format):
Add-IPBlockListEntry -IPRange 192.168.1.1/16 -ExpirationTime "12/15/2007 11:30:00"
The Remove- command
can be used to remove an IP Block or Allow List entry, list provider,
or list entry. The following example removes a list provider using the
name:
Remove-IPAllowListProvider -Identity Spamhaus
Note
Only static list entries can be removed using this command.
The Set-
command allows an administrator to enable or disable the agent or modify
the configuration of an IP Block or Allow List or list provider’s
configuration. The following example enables the Connection Filtering
Agent on email distributed internally:
Set-IPBlockListConfig -InternalMailEnabled $true
Test-IPBlockListProvider -Identity Spamhaus -Server EDGE2
Note
The status of an IP Allow or Block List Provider can be tested using the Test-IPAllowListProvider or Test-IPBlockListProvider commands, respectively.
You can test the configuration of a Block or Allow List Provider using the Test-BlockListProvider and Test-AllowListProvider Exchange Server shell commands, respectively.
Configuring Sender Filtering
Sender filtering
allows an administrator to block email messages received from specific
email addresses, domains, subdomains, and email messages that do not
specify a sender. Email that is routed through Receive Connectors is
processed by the Sender Filtering Agent. These messages are received
from the Internet and travel inbound to the Edge Transport server for
delivery to the recipient. Sender filtering, for example, can be a very
useful tool when someone in an organization is being harassed by an
external person or ex-employee, receiving consistent nondeliverable
receipts (NDRs) or strange messages from the same source because of a
virus or spam.
Note
Changes described in this
section are applied only to the local system. This is important if you
have more than one Edge Transport server in your environment.
The Sender Filtering
Agent is enabled by default and can be configured using the Exchange
Management Console or Exchange Management Shell.
To disable the
Sender Filtering Agent using the Exchange Management Console,
right-click the agent icon in the action pane and select Disable. To
disable the Sender Filtering Agent using the Exchange Management Shell,
run the set-SenderFilterConfig command with the -Enabled $false parameter—for example, set-SenderFilterConfig -Enabled $false.
The General tab of the
Agent Properties window displays a brief description of the agent and
its capabilities, its current status, and the last time the agent’s
settings were modified.
To add email
addresses to the Sender Filtering list, double-click the Sender
Filtering Agent in the action pane and select the Blocked Senders tab.
From here, you can add, edit, or delete entries in the list. Checking
the box at the bottom of the window enables the Block Messages that
don’t have sender information option. If an email address isn’t
specified in the message received, it will be blocked. This is a fairly
common trick used in spammed messages.
Click Add in the Add Blocked Senders window to do the following:
1. | Add an individual email address to block.
|
2. | Add a domain and subdomains (if applicable) to block.
|
Note
Limited
wildcard usage is supported in these fields, specifically the asterisk
(*). For example, you can add *@companyabc.com to the Individual E-Mail
Address to Block field; however, it accomplishes the same result as
adding companyabc.com to the Domain field. It is recommended to add the
full email address to block.
The Action tab allows
you to specify whether to reject or stamp messages with Block Sender and
continue processing them if the address matches an entry in the list.
If messages are rejected because of a match in the Sender Filtering
Agent, they can be responded to with a “554 5.1.0 Sender Denied” SMTP
session error message and the session will also be closed. Stamping the
message updates the metadata to indicate the sender was on the block
list. This is taken into account by the content filter when it tabulates
an SCL. The Sender Reputation filter agent uses the SCL rating when
developing a sender reputation level.
Using the Exchange Management Shell to Add Blocked Senders
Sender filtering can
also be configured through the Exchange Management Shell. Each shell
command has its own parameters you can set based on the action(s)
performed by the command. There are two commands: Get and Set.
The Get- command is used to retrieve the configuration of the Sender Filtering Agent. For example, entering Get-SenderFilterConfig displays the Sender Filtering configuration on the local system.
The Set-
command allows an administrator to enable or disable the agent and
modify the configuration of the agent. The following example enables the
Sender Filtering Agent and rejects messages from blank senders on
external SMTP connections:
Set-SenderFilterConfig -Enabled $true -Action Reject
-BlankSenderBlockingEnabled $true -ExternalMailEnabled $true -Enabled $true
Configuring Recipient Filtering
Recipient filtering
allows an administrator to block email delivery from the Internet to a
specific email address. Email that is routed through Receive Connectors
is processed by the Recipient Filtering Agent. In addition, recipient
filtering can prevent delivery of email messages to nonexistent accounts
in Active Directory. This is extremely effective in stopping spam and
virus-laden email to abused or commonly named email accounts (for
example, [email protected] or [email protected]).
Note
A maximum of 800 email addresses can be placed in this list.
The
Recipient Filtering Agent is enabled by default and can be configured
using the Exchange Management Console or Exchange Management Shell.
Note
Changes described in this
section are applied only to the local system. This is important if you
have more than one Edge Transport server in your environment.
To disable the
Recipient Filtering Agent using the Exchange Management Console,
right-click the agent icon in the action pane and select Disable. To
disable the Recipient Filtering Agent using the Exchange Management
Shell, run the set-RecipientFilterConfig command with the -Enabled $false parameter.
Example: set-RecipientFilterConfig -Enabled $false
The General tab of the
Agent Properties window displays a brief description of the agent and
its capabilities, its current status, and the last time the agent’s
settings were modified.
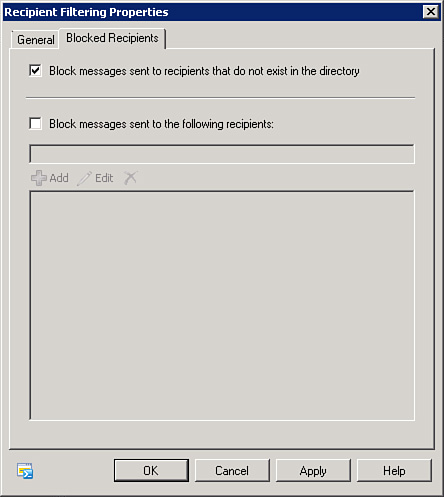
To add email
addresses to the Recipient Filtering list, double-click the recipient
Filtering Agent in the action pane and select the Blocked Recipients
tab, as shown in Figure 1.
From here, you can add, edit, or delete entries in the list. You can
also enable the Block Messages Sent to Recipients That Do Not Exist in
the Directory field. Enabling this feature prevents delivery of email
messages to nonexistent accounts in Active Directory.
Note
For
the Block Messages Sent to Recipients That Do Not Exist in the
Directory feature to work, you must first configure the EdgeSync process
and Active Directory Lightweight Directory Services (AD LDS) for
recipient lookup.
Tip
Using the Block
Messages Sent to Recipients That Do Not Exist in the Directory option
can significantly help reduce the amount of email sent to commonly
targeted addresses like [email protected], [email protected], and [email protected].
This also reduces the
spammer’s ability to identify which email addresses are valid when no
response or a response other than “nonexistent user” is returned in a
nondelivery report (NDR).
Using the Exchange Management Shell to Add Blocked Recipients
Recipient filtering
can also be configured through the Exchange Management Shell. Each shell
command has its own parameters you can set based on the action(s)
performed by the command. There are two commands: Get and Set.
The Get- command is used to retrieve the configuration of the Sender Filtering Agent. For example, entering Get-RecipientFilterConfig displays the Recipient Filtering configuration on the local system.
The Set-
command allows an administrator to enable or disable the agent or
modify the configuration of the agent. The following example enables the
Recipient Filtering Agent and rejects messages to nonexistent
recipients on external SMTP connections:
Set-RecipientFilterConfig -Enabled $true -ExternalMailEnabled $true -
RecipientValidationEnabled $true
