Although
the installation of all the Active Directory components, prerequisites,
operating system components, updates, and hotfixes might seem to have
taken forever, we are now finally ready to kick off the Exchange Server
2010 Installation.
Installing Exchange Server 2010 from the GUI Interface
Utilizing the Exchange
Server 2010 Installation Wizard is the simplest way of deploying an
Exchange server. The GUI interface is extremely intuitive and makes the
installation a snap. To install Exchange Server using the Installation
Wizard, perform the following tasks:
1. | Log
on with your domain administrator account. From your Exchange Server
2010 installation media, run the Exchange Installation Wizard
(d:\setup.exe, for example).
| 2. | Select
Step 4: Choose Exchange Language Option. Select either Install All
Languages from the Language Bundle or Install Only Languages from the
DVD.
If
you select Install All Languages from the Language Bundle, another
screen will appear giving you the option to either download the latest
language pack bundle from the Internet or connect to a specific network
path for the language files. When the language files have been
installed, click Finish to return to the Exchange Server 2010
installation wizard.
| 3. | Select Step 5: Install Microsoft Exchange.
| 4. | From the Introduction screen, click Next to continue.
| 5. | From the License Agreement screen, select I Accept the Terms in the License Agreement and click Next to continue.
| 6. | On
the Error Reporting screen, select whether you want to report
installation errors to Microsoft. The default is No. Click Next to
continue.
| 7. | On
the Installation Type screen, if you are installing specific roles,
select Custom Exchange Server Installation. In our test environment, we
are installing the Hub Transport, Client Access, and Mailbox server
roles (as well as the Exchange Management Tools), so we select Typical
Exchange Server Installation. Additionally, if you are not installing
the Exchange Server application to the default location, click Browse to
select the installation directory. When ready, click Next to continue.
| 8. | On
the Client Settings screen, if you have clients running either Outlook
2003 (or earlier) or Entourage, select Yes. Otherwise, select No.
Selecting Yes creates a public folder database during the installation
to support these clients. If No is selected, a public folder database
can be created manually any time after the installation completes. When
ready, click Next to continue.
| 9. | The Configure Client Access Server External Domain screen is a new addition to the Exchange Installation Wizard (see Figure 7.11).
If your client access server will be Internet facing, you can place a
check in the box and enter the domain name that you will use (for
example, mailservices.domain.com). If your client access server is NOT
going to be Internet facing, leave this box unchecked. Click Next to
continue.

| 10. | On
the Customer Experience Improvement Program screen, elect whether you
want to join the Exchange Customer Experience Improvement Program. Make
your selection and click Next to continue.
| 11. | On
the Readiness Checks screen, wait while the Install Wizard goes through
the prerequisites for each of the selected roles. There may be hotfixes
required for the roles being installed—if so, they will be identified
as errors in the Readiness Check. Take the recommended actions to
resolve them. When all readiness checks show as Completed, click Install
to continue.
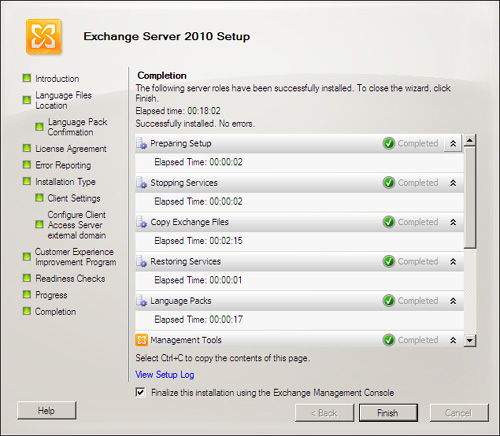
| 12. | On
the Completion screen, review the results of the installation. Ideally,
you should see Successfully Installed. No Errors, as shown in Figure 2. When ready, uncheck the option to Finalize This Installation Using the Exchange Management Console and click Finish.
| 13. | When you return to the Exchange Sever 2010 Installation Wizard, click Step 5: Get Critical Updates for Microsoft Exchange.
| 14. | Install any available updates for Exchange Server and reboot the server if necessary.
|
Installing Exchange Server 2010 from the Command Prompt
In several
situations (such as the deployment of an Exchange server in a remote
location), administrators would prefer to install Exchange Server 2010
from the command prompt.
To do so, perform the following steps:
1. | From an administrator-enabled command prompt, change to the drive and directory that contains your installation media.
| 2. | Run the following command:
Setup.com /mode:<setup mode> /roles:<roles to install> [/OptionalParameters]
For our purposes, we will simply run the following command:
Setup.com /mode:install /roles:H,C,M
|
The optional
parameters cover all of the various configuration possibilities,
including the organization name, target directory, source directory,
default database name, and others.
All optional parameters can be viewed from the command line by typing:
|
