1. | From the Central Administration site, click Application Management.
|
2. | Click Manage Service Applications.
|
3. | Locate the User Profile service application and click the title of the application.
|
4. | When the Manage Profile Service page opens, click the link for Manage User Properties.
|
5. | When
the Manage User Properties page opens, scroll down to the section
header Contact Information and locate the Mobile Phone entry. Note that
it is not mapped to an Active Directory field, since the field in the
Mapped Attribute column is empty. Hover over the Mobile Phone item and
access the drop-down menu and click Edit.
|
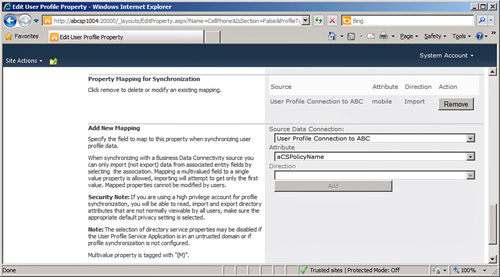
6. | Scroll
down to the Add New Mapping section. Click the Attribute drop-down menu
and locate and then click the entry titled Mobile. Verify that the
Direction field is set to Import; then click the Add button. This
attribute will now appear in the section immediately above the Add New
Mapping section titled Property Mapping for Synchronization, as shown in
Figure 1.

|
7. | Click OK to save the changes and return to the Manage User Properties page.
|
8. | Return
to the User Profile service application by clicking Application
Management in the Quick Launch, and then by clicking Manage Service
Applications and then clicking the title of the User Profile service
application.
|
9. | Click Start Profile Synchronization.
|
10. | Make sure that the Start Incremental option is selected and click OK.
|
11. | Once
the synchronization has completed, the information should be added to
the user’s profile. Validate that the information has been added by
clicking Manage User Profiles in the People section of the Manage
Profile Service page.
|
12. | Enter
a username that had the mobile field populated (per the prerequisites
to this exercise) in the Find profiles field and click Find. Click the
username when it is found in the Account Name column, access the
drop-down menu for the name, and click Edit My Profile.
|
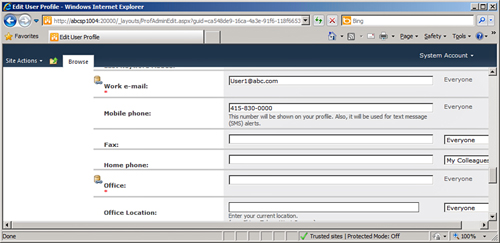
13. | Scroll down to the Mobile Phone field, and it will show the Mobile number from Active Directory, as shown in Figure 2.

|
14. | To
validate that the data shows up on the actual My Site page, access the
SharePoint 2010 top-level site using one of the users who has the Mobile
field populated in AD (as specified in the prerequisites section prior
to these steps), click the drop-down menu under the username (User1 in
this example), and click My Site.
|
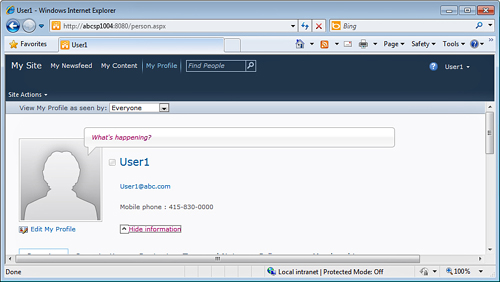
15. | When
the user’s My Site opens, click My Profile from the links available on
the upper-left portion of the screen. Click the More Information link to
the right of the placeholder for the photo, and the Mobile Phone
information should display, as shown in Figure 3.

|