OWA is one of the most
commonly secured services that ISA servers protect. This stems from the
critical need to provide remote email services while at the same time
securing that access. The success of ISA deployments in this fashion
gives tribute to the tight integration Microsoft built between its ISA
product and Exchange Server product.
An ISA server used to
secure an OWA implementation can be deployed in multiple scenarios, such
as an edge firewall, an inline firewall, or a dedicated reverse-proxy
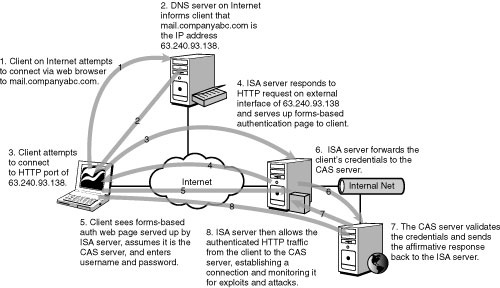
server. In all these scenarios, ISA secures OWA traffic by “pretending”
to be the CAS server itself, scanning the traffic that is destined for
the CAS for exploits, and then repackaging that traffic and sending it
on, such as that illustrated in Figure 1.

ISA performs this type of OWA securing through an
Exchange Web Client Access rule, which automatically sets up and
configures a listener on the ISA server. A listener is an ISA component
that listens to specifically defined IP traffic, and processes that
traffic for the requesting client as if it were the actual server
itself. For example, an OWA listener on an ISA server would respond to
OWA requests made to it by scanning them for exploits and then
repackaging them and forwarding them on to the OWA server itself. Using
listeners, the client cannot tell the difference between the ISA server
and the OWA server.
ISA Server is also one of
the few products that has the capability to secure web traffic with SSL
encryption from end to end. It does this by using the OWA server’s own
certificate to reencrypt the traffic before sending it on its way. This
also allows for the “black box” of SSL traffic to be examined for
exploits and viruses at the application layer, and then be reencypted to
reduce the chance of unauthorized viewing of OWA traffic. Without the
capability to scan this SSL traffic, exploits bound for an OWA server
could simply hide themselves in the encrypted traffic and pass right
through traditional firewalls.
Exporting and
Importing the OWA Certificate to the ISA Server
For ISA to be able to
decrypt the SSL traffic bound for the Exchange CAS server, ISA needs to
have a copy of the SSL certificate used on the CAS server. This
certificate is used by ISA to decode the SSL packets, inspect them, and
then reencrypt them and send them on to the CAS server. For this
certificate to be installed on the ISA server, it must first be exported
from the CAS Server from IIS Manager. By opening up the certificate and
then right-clicking and choosing to Export the certificate, it can be
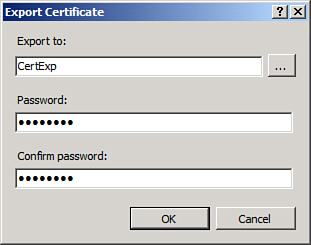
exported to a .pfx file. Be sure to
select to export the private key, as shown in Figure 2.

Caution
It is important
to securely transmit this .pfx
file to the ISA server and to maintain high security over its location.
The certificate’s security could be compromised if it were to fall into
the wrong hands.
After the .pfx file has been exported from the CAS server,
it can then be imported to the ISA server via the following procedure:
1. | From the ISA server, open the MMC console (Start, Run, mmc.exe,
OK).
|
2. | Click
File, Add/Remove Snap-in.
|
3. | Click Add.
|
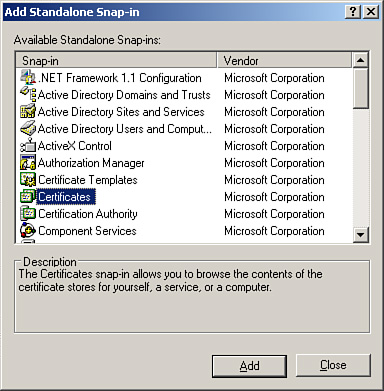
4. | From the list shown in Figure 3, choose the
Certificates snap-in and then click Add.

|
5. | Choose
Computer Account from the list when asked what certificates the snap-in
will manage, and click Next to continue.
|
6. | From the subsequent list in the Select Computer dialog
box, choose Local Computer: (the computer this console is running on),
and click Finish.
|
7. | Click
Close and then click OK.
|
After the custom MMC
console has been created, the certificate that was exported from the CAS
server can be imported directly from the console via the following
procedure:
1. | From the MMC Console root, navigate to Certificates
(Local Computer), Personal.
|
2. | Right-click the Personal folder, and choose All Tasks,
Import.
|
3. | When the
wizard begins, click Next past the Welcome Screen to continue.
|
4. | Browse for and locate the .pfx file that was
exported from the CAS server. The location can also be typed into the
File Name field. Click Next.
|
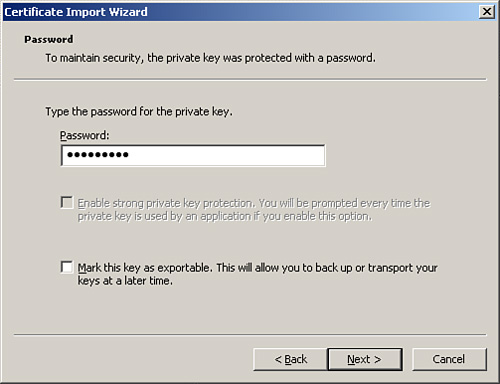
5. | Enter the password that was created when the certificate
was exported, as illustrated in Figure 4. Do not check to
mark the key as exportable. Click Next to continue.

|
6. | Choose
Automatically Select the Certificate Store Based on the Type of
Certificate, and click Next to continue.
|
7. | Click Finish to complete the import.
|
After it is in the
certificate store of the ISA server, the OWA SSL certificate can be used
as part of publishing rules. Note that any Exchange Server 2010 SSL
certificate that uses Subject Alternative Names (SAN) as part of the
certificate requires at least ISA Server 2006 Service Pack 1 to use the
SAN names in Web Publishing rules.
Note
If a
rule that makes use of a specific SSL certificate is exported from an
ISA server, either for backup purposes or to transfer it to another ISA
server, the certificate must also be saved and imported to the
destination server, or that particular rule will be broken.