Some
administrators want to restrict the use of My Site sites because they
may want to pilot the use of these sites with a limited number of users,
in the short term, or permanently exclude certain groups of users for a
variety of business reasons. Self-Service Site Creation needs to be activated for the site collection
that houses the My Site host.
Assuming that is enabled, the
most straightforward way to control access is for a user who has site
collection privileges to the My Sites Host site collection to access his
My Site and then access Site Settings and modify user permissions.
Follow these steps to modify the My Site settings and remove NT
Authority\Authenticated Users from access to the My Site site collection
and then add specific groups who will be able to then create and access
their My Site sites:
1. | For
the farm in question, access the portal home page using an account that
has site collection administrator privileges for the site collection
that houses My Site for the portal. If in doubt, access the account’s My
Site page, and if the account doesn’t have access to Site Settings
page, this account isn’t a site collection admin.
| 2. | Once
logged in with the appropriate account, click the link to My Site from
the drop-down menu by the username; in this example, the user is User1.
| 3. | Once
My Site loads, click Site Actions menu, and select Site Settings, and
the familiar management page will load. Click Site Permissions.
| 4. | This
page will show the permission levels assigned to different groups,
which will vary based on the configuration of the My Site host; in this
example, this will include Members, Owners, Visitors, the NT
Authority\Authenticated Users group, and other individuals or groups.
| 5. | Check
the box next to NT Authority\Authenticated Users and click Remove User
Permissions on the Ribbon, and click OK at the confirmation that pops
up.
| 6. | Then
click the Grant Permissions button on the Ribbon and add individual
users or AD groups that should have permissions to create and use My
Site accounts. These users and groups can be added to an existing group
or given direct permissions. Read permissions are the minimum
requirement because Self-Service Site Creation is enabled, allowing the
account to create its own site collection to which the creator will have
sufficient permissions for normal usage.
| 7. | To
restore My Site access, the NT Authority\Authenticated Users group can
be added by clicking Grant Permissions and providing the group Read.
However, a general best practice is to instead add the domainname\domain
users group, which is a true AD security group and generally considered
to be more secure, and grant it read permissions.
|
Another method is to create a
user policy for the web application. This will affect access to the
entire web application, so this should not be used to restrict access to
My Site sites if they are housed on the same web application that
houses the intranet or portal site collection! So, the assumption here
is that a separate web application was created for My Site and the user
policy will stop certain users from accessing that web application.
Follow these steps to create a policy denying access to a My Site
dedicated web application:
1. | Access the Central Administrator site, click Application Management, and then click Manage Web Applications.
| 2. | Select the My Site web application and click the User Policy button from the Web Applications tab on the Ribbon.
| 3. | Click Add Users.
| 4. | Keep All Zones selected. Click Next.
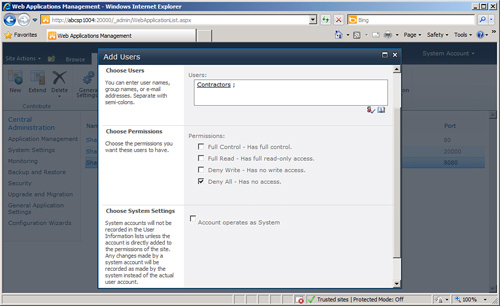
| 5. | From the Add Users window, add the username or AD group name to the Choose Users field, as shown in Figure 1,
and click the Check Names button, or use the Browse button to add the
users or groups. In this example, the AD group Contractors will be
denied all access to the web application housing My Site to ensure they
don’t access any personal sites. Click OK.

| 6. | Then
log on to SharePoint using the account that is a member of the group
that the policy applies to and try to access My Site. In this example,
the user Contractor1, who is a member of the Contractors group, gets an “Access Denied” message when trying to access her My Site.
|
Tip
Web application
policies “win” over site collection policies, and web application deny
policies win over web application allow policies. For example, in the
previous exercise, a policy was created for the My Site Host web
application that denies all access to members of the Contractors group.
If a site collection administrator gives direct permissions to the
Contractors group to the My Site Host site collection, any member of the
group will still get an “Access Denied” error. This is useful to know
when troubleshooting these types of errors.
|