4. Autodiscover
The Autodiscover
service provides clients running Outlook 2007, Outlook 2010, and mobile
phones running Windows Mobile 6.1 or later with user profile
configuration settings. To use Autodiscover, it is necessary to either
provide the user’s email address and password or have the user’s domain
credentials. For example, when Autodiscover is configured correctly, Kim
Akers can log on to a new PC in the Contoso domain that has Office 2010
installed, open Outlook, and instantly interact with her Exchange
mailbox as Outlook is automatically configured through Autodiscover.
You can use the Test-OutLookWebServices
cmdlet from the EMS to verify that the Autodiscover service settings
are working properly for Outlook 2007 and 2010 clients. For example, to
check that Autodiscover is functioning properly on server CAS01, use the
following command:
Test-OutlookWebServices -ClientAccessServer CAS01
Note:
UNDERSTANDING AUTODISCOVER
To learn more about Autodiscover, consult the following reference on TechNet: http://technet.microsoft.com/en-us/library/bb124251.aspx.
5. ActiveSync
ActiveSync allows users to
sync their Windows Mobile devices with their Exchange mailboxes.
ActiveSync is optimized to work across high-latency, low-bandwidth
networks, such as those likely to be encountered across a mobile phone
data connection. Exchange ActiveSync is enabled automatically when you
install the Client Access server role.
You can configure
ActiveSync settings either by editing the ActiveSync virtual directory
or by configuring ActiveSync mailbox policies. You can edit the
properties of the ActiveSync virtual directory from within the EMC by
navigating to the Server Configuration\Client Access node, selecting
Exchange ActiveSync on the lower-middle page, right-clicking on the
Client Access server that you want to modify, and then clicking on
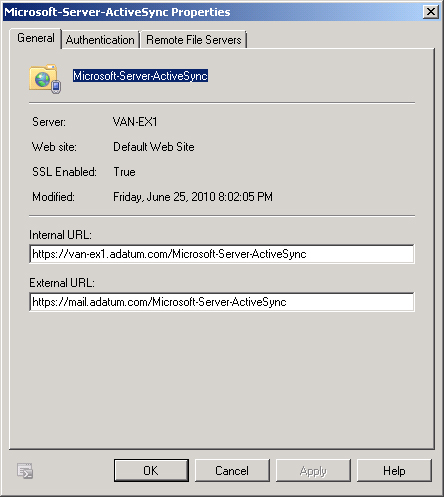
Properties. This will bring up the Microsoft-Server-ActiveSync
Properties dialog box, as shown in Figure 7.
Through this dialog box, you can modify the following ActiveSync properties:
Internal URL The URL that ActiveSync devices on the internal network use to access the Client Access server.
External URL The URL that ActiveSync devices on the Internet use to access the Client Access server.
Basic Authentication Whether basic authentication is enabled
Ignore Client Certificates Client identification certificates are ignored during authentication.
Accept Client Certificates Client identification certificates, issued by a CA trusted by the Client Access server, are accepted for authentication.
Require Client Certificates Client identification certificates, issued by a CA trusted by the Client Access server, are required for authentication.
Remote File Servers Block List A list of servers that ActiveSync devices cannot access.
Remote File Servers Allow List
A list of servers that ActiveSync devices can access. If a server is on
both the block list and the allow list, the block list takes
precedence.
Remote File Servers Unknown Servers
Whether the ActiveSync device should be granted access to or blocked
from a server that is on neither the allow list nor the block list.
Internal Domain Suffix Which domain suffixes should be treated as being internal.
You can also configure these properties using the Set-ActiveSyncVirtualDirectory cmdlet. The Test-ActiveSyncConnectivity
cmdlet allows you to test that ActiveSync is functioning properly. It
does this by simulating a full synchronization against a specific
mailbox. For example, to test ActiveSync connectivity for the mailbox
Kim_Akers on Client Access server CAS01, issue the following command:
Test-ActiveSyncConnectivity -ClientAccessServer CAS01 -URL http://adatum.com/mail
-MailboxCredential "Kim_Akers"
Note:
UNDERSTANDING ACTIVESYNC
To learn more about ActiveSync, consult the following reference on TechNet: http://technet.microsoft.com/en-us/library/aa998357.aspx.
5.1. ActiveSync device policies
ActiveSync Mailbox
Policies allow administrators to specify settings that apply to mobile
devices, such as whether a device requires a password, encryption, and
what the mobile phone should do if a user enters incorrect password
several times in succession. To create a new ActiveSync Mailbox Policy,
perform the following general steps:
Select the Organization Configuration\Client Access node within the EMC.
In the Actions pane, click on New Exchange ActiveSync Mailbox Policy.
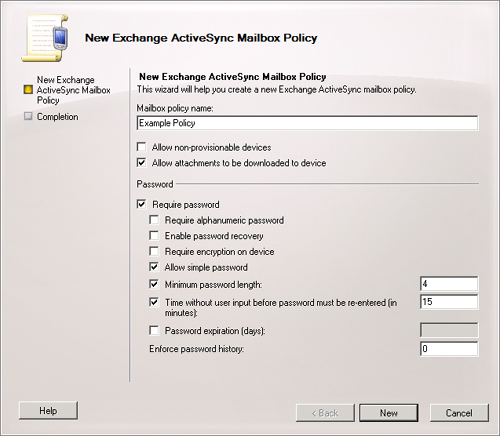
On the New Exchange ActiveSync Mailbox Policy Wizard, shown in Figure 8, enter a policy name and configure the following settings:
Allow nonprovisionable devices: Allow devices that do not support all policies to sync with Exchange.
Allow attachments to be downloaded to device: Allow devices to retrieve attachments.
Require password:
When you require a password, you can also configure password settings,
such as whether an alphanumeric password is required, if password
recovery is allowed; whether data stored on the device must be
encrypted; whether simple passwords are allowed; minimum password
length; idle time before a password is required again; whether password
history is enforced; and the length of time before the password must be
changed.
Once you create the policy, you can configure additional settings by
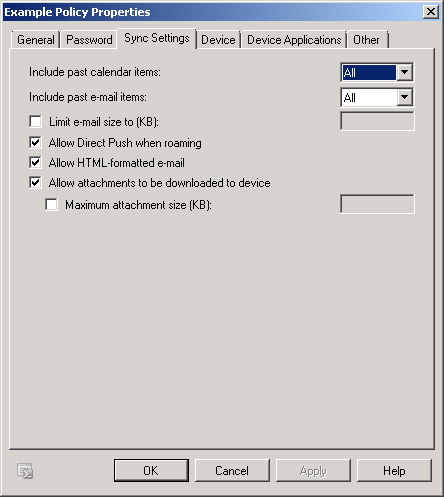
editing the policy properties through the EMC or by using the Set-ActiveSyncMailboxPolicy cmdlet from the EMS. Editing the policy gives you access to the Sync Settings tab, shown in Figure 9.
These settings allow you to specify which calendar and email items can
be synced, whether Direct Push is enabled, whether HTML-formatted email
can be sent to the device, and whether there is a limit on the size of
attachments that can be sent to the device.
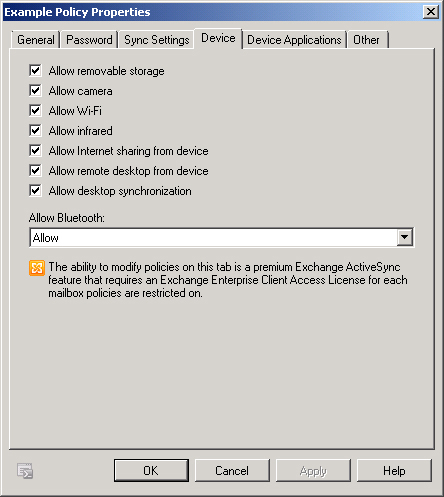
On the Device tab, shown in Figure 10,
you can specify what features on the device are allowed on the device.
You can use this policy to allow removable storage, camera, Wi-Fi,
infrared, Internet sharing (also known as tethering), remote desktop,
desktop synchronization, and Bluetooth. When these features are disabled
on mobile phones running compatible versions of Windows Mobile, users
are unable to access them. For example, you could disable cameras on
phones that have cameras through ActiveSync Mailbox policy if you worked
in a sensitive environment where you did not want users taking
photographs. These policies are enforced only when the associated
mailbox has an Enterprise Client Access License (CAL).
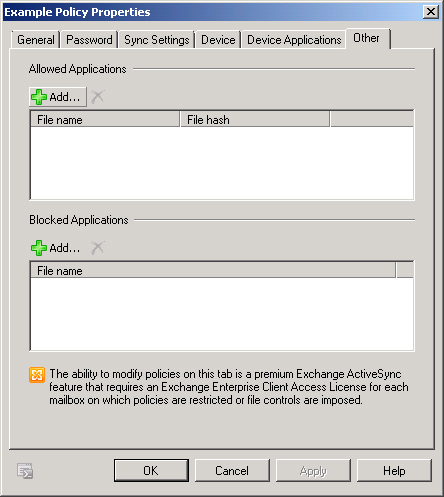
The Device Applications tab
allows you to specify whether the device can run a browser, consumer
mail, unsigned applications, and unsigned installation packages. The
Other tab, shown in Figure 11,
gives you the option of allowing or blocking specific applications on
the device. These features are also available only if the associated
mailbox has an Enterprise CAL.
You
can manage mobile devices, including performing a remote wipe of the
device, from the EMS. When you choose to remote-wipe a device, it resets
the device to its factory default, deleting all configuration settings
and personal data. There are four EMS cmdlets that you can use to manage
mobile devices:
Get-ActiveSyncDevice This cmdlet can be used to list all the mobile phones that have been paired with mailboxes in the organization.
Get-ActiveSyncDeviceStatistics This cmdlet can be used to provide information about devices that are paired to specific mailbox.
Clear-ActiveSyncDevice This cmdlet can be used to wipe a mobile device.
Remove-ActiveSyncDevice This cmdlet is used to sever the relationship between a specific mailbox and a mobile device.
When OWA policies are
configured appropriately, it is also possible for users to perform a
remote wipe on a mobile device from OWA.
Note:
CONFIGURING ACTIVESYNC MAILBOX POLICIES
To learn more about configuring ActiveSync mailbox policies, consult the following link on http://technet.microsoft.com/en-us/library/bb123484.aspx.
Note:
Remember that Client Access servers do not have the POP3 and IMAP4 services enabled by default.