Creating an Outlook Web
App Publishing Rule
After the OWA SSL has been
installed onto the ISA server, the actual ISA mail publishing rule can
be generated to secure OWA via the following procedure:
Note
The procedure
outlined here illustrates an ISA OWA publishing rule that uses
forms-based authentication (FBA) for the site, which allows for a
landing page to be generated on the ISA server to preauthenticate user
connections to Exchange Server. This FBA page can only be set on ISA,
and must be turned off on the Exchange server to work properly. Also
note that ISA Server 2006 does not currently have a web publishing
definition for Exchange Server 2010; you must use the Exchange Server
2007 definition, which works for Exchange Server 2010. Depending on the
timing of the newer version of ISA, TMG, it might be wise to upgrade if
securing Exchange Server 2010.
1. | From the ISA Management Console, click once on the
Firewall Policy node from the console tree.
| 2. | On the Tasks tab of the tasks pane, click the Publish
Exchange Web Client Access link.
| 3. | Enter a descriptive name for the publishing rule, such
as Outlook Web App, and click Next to continue.
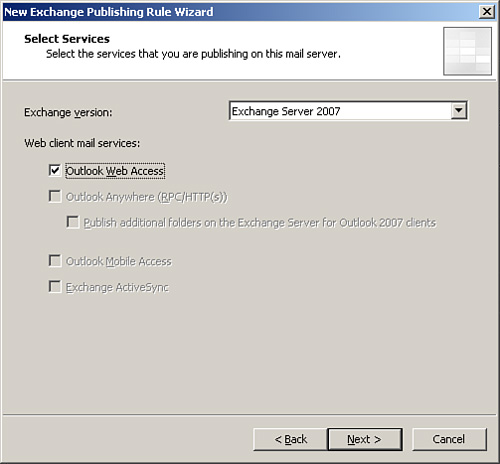
| 4. | From the dialog box shown in Figure 5, choose the
version of Exchange Server that will be secured. Because Exchange Server
2010 is not an option with the current release of ISA Server, you must
select Exchange Server 2007 and then click the Outlook Web App check
box. The other check boxes automatically dim. Click Next to continue.
| 5. | The
subsequent dialog box allows an administrator to choose whether a single
CAS server will be published, or whether a farm of load-balanced CAS
servers will be published. In this scenario, a single CAS server will be
used. Click Next to continue.
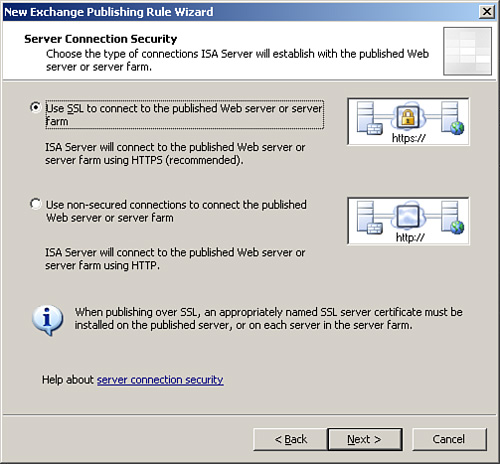
| 6. | In the next dialog box, shown in Figure 6, the Use SSL to
Connect to the Published Web Server or Server Farm option is
illustrated. It is highly recommended to use SSL, and this scenario
illustrates that concept. Click Next to continue.
| 7. | On the
Internal Publishing Details dialog box, enter the site name that
internal users use to access the CAS server. It is recommended that the
fully qualified domain name (FQDN), such as mail.companyabc.com, be
entered, and that it is different from the physical name of the server
itself. Examine the options to connect to an IP address or computer
name; this gives additional flexibility to the rule. Click Next to
continue.
| 8. | In
the subsequent dialog box, enter to accept requests for “This domain
name (type below):” and enter the FQDN of the server, such as
mail.companyabc.com. Click Next to continue.
| 9. | Under Web Listener, click New.
| 10. | At the start of the Web Listener Wizard, enter a
descriptive name for the listener, such as Exchange HTTP/HTTPS Listener,
and click Next to continue.
| 11. | A prompt appears for you to choose between SSL and
non-SSL. This prompt refers to the traffic between the client and ISA,
which should always be SSL whenever possible. Click Next to continue.
| 12. | Under Web Listener IP
Addresses, select the External Network and leave it at All IP Addresses.
Click Next to continue.
| 13. | Under Listener SSL Certificates, click Select
Certificate.
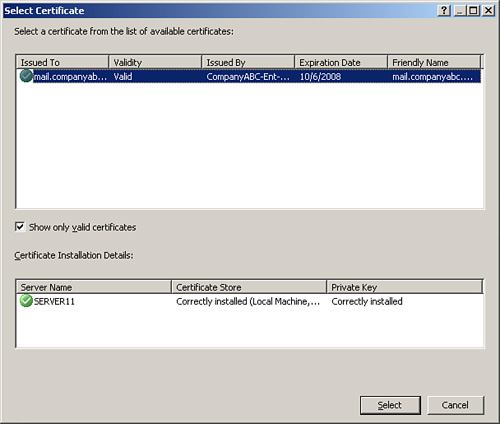
| 14. | Select
the previously installed certificate, as shown in Figure 7, and click the
Select button.
| 15. | Click
Next to continue.
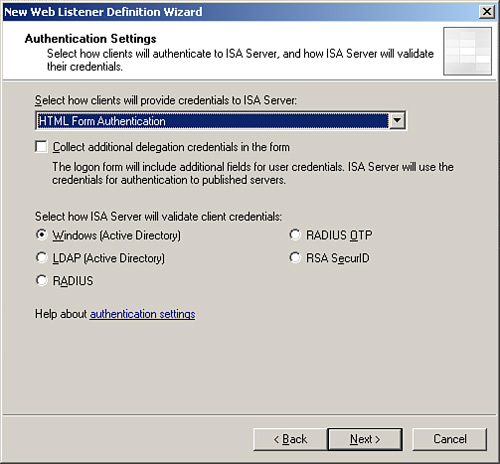
| 16. | For the
type of authentication, choose HTML Form Authentication, as shown in Figure 8.
Leave the Windows (Active Directory) option selected, and click Next.
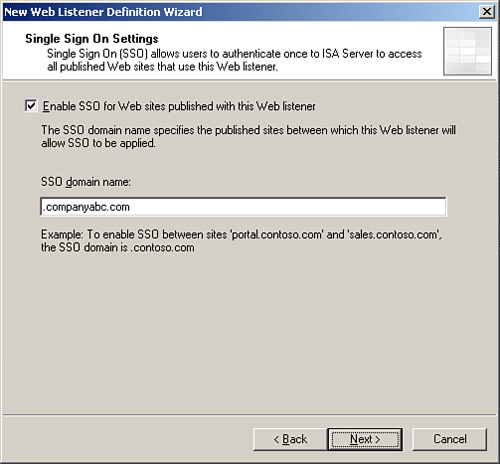
| 17. | The
Single Sign On Settings dialog box is powerful; it allows all
authentication traffic through a single listener to be processed only
once. After the user has authenticated, he can access any other service,
be it a SharePoint site, web server, or other web-based service that
uses the same domain name for credentials. In this example, enter .companyabc.com
into the SSO domain name, as shown in Figure 9. Click Next to
continue.
| 18. | Click
Finish to end the Listener Wizard.
| 19. | Click Next after the new listener is displayed in the
Web Listener dialog box.
| 20. | Under Authentication Delegation, choose Basic from the
drop-down menu. Basic is used because SSL is the transport mechanism
chosen. Click Next to continue.
| 21. | Under User Sets, leave All Authenticated Users
selected. In stricter scenarios, only specific Active Directory (AD)
groups can be granted rights to OWA using this setting. In this case,
the default is fine. Click Next to continue.
| 22. | Click Finish to end the wizard.
| 23. | Click Apply in the details pane, and then click OK
when finished to commit the changes.
|
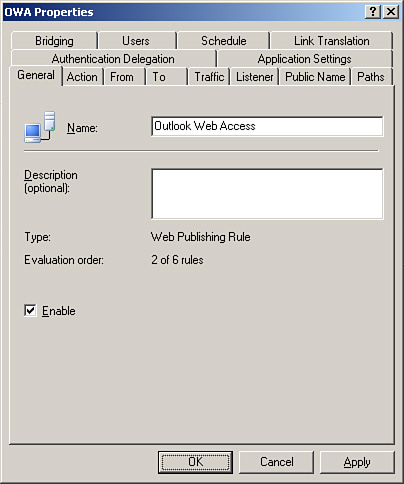
The rule will now
appear in the details pane of the ISA server. Double-clicking on the
rule brings up the settings, as shown in Figure 10. Tabs can be used to navigate around the different rule
settings. The rule itself can be configured with additional settings
based on the configuration desired. For example, the following rule
information is used to configure our basic forms-based authentication
web publishing rule for OWA:
General tab— For Name, choose Outlook Web App. Also make sure
the Enabled option is checked. Action tab— For Action to take,
choose Allow. Also make sure that the option Log Requests Matching This
Rule is checked. From tab— Choose
the option This Rule Applies to Traffic from These Sources and select
Anywhere as the setting. To tab— For the
option This Rule Applies to This Published Site, enter (for this
example) mail.companyabc.com. Make
sure the option Forward the Original Host Header Instead of the Actual
One (which is specified in the Internal site name field) is checked. For
the option Specify How the Firewall Proxies Requests to the Published
Server, choose Requests Appear to Come from the ISA server. Traffic tab— For the option This Rule Applies to Traffic of
the Following Protocols, choose HTTP and HTTPS. Also make sure the
option Require 128-bit Encryption for HTTPS Traffic is checked. Listener tab— For
Listener properties-Networks, choose External, Port(HTTP)=80,
Port(HTTPS)=443, Certificate=mail.companyabc.com, Authentication methods=FBA with AD, and Always
Authenticate-No, Domain for Authentication should be COMPANYABC. Listener tab, Properties
button— For the Networks tab, select
External, All IP addresses. For the Connections tab–Enabled HTTP
Connections on Port 80, set to Enable SSL Connections on Port 443. For
HTTP to HTTPS Redirection select Redirect Authenticated Traffic from
HTTP to HTTPS. For the Forms tab choose Allow Users to Change Their
Passwords. Set the Remind Users That Their Password Will Expire in This Number of Days to 15. For the SSO tab, choose
Enable Single Sign On. And for the SSO Domains, enter companyabc.com in this example. Public Name tab—
For This Rule Applies to: Requests for the Following Web Sites, enter mail.companyabc.com
in this example. Paths tab— For
external paths, choose All Are Set to <same as internal>. For
internal paths, enter /public/*, /OWA/*, /Exchweb/*,
/Exchange/*, /, /autodiscover/*. Authentication Delegation
tab— For Method Used by ISA Server to
Authenticate to the Published Web Server, choose Basic Authentication. Application Settings tab— For Use Customized HTML Forms Instead of the
Default, make sure it is checked. For Type the Custom HTML Form Set
Directory, choose Exchange. For Logon type, select As Selected by User.
And for Exchange Publishing Attachment Blocking, make sure Public
Computers is checked. Bridging tab— For Redirect Requests to SSL
Port, enter 443. Users tab— For
This Rule Applies to Requests from the Following User Sets, choose All
Authenticated Users. Schedule tab— For Schedule, select Always. Link Translation tab— For Apply Link Translation to This Rule, make
sure the option is checked.
Different rules require
different settings, but the settings outlined in this example are some
of the more common and secure ones used to set up this scenario.
Note
Exchange ActiveSync,
Outlook Anywhere, and Exchange Web Services require their own rules to
be set up. The process is very similar, with the only major difference
being that a different option is chosen.
|