3.14.1.
Problem
You have a mapping need that
requires the repeated use of complex functionality.
3.14.2. Solution
Rather than writing the same
inline code (C#, XSLT, and so on) and pasting it in multiple shapes, or
using a combination of multiple existing functoids, you can develop your
own custom functoid.
As an example, we'll
describe the process to develop, deploy, and use a custom functoid that
replaces the ampersand (&), greater than (>), and less than
(<) symbols with their HTML/XML equivalents. The functoid will have
one input parameter and one output parameter, representing the string on
which to run the replacement. This functoid would be used primarily
with XML that may be returned from an external source, such as a .NET
assembly, where the XML may not have been validated and contains
characters that must be escaped.
Use the following steps to
create, deploy, and use a custom functoid. Refer to the sample solution SampleCustomFunctoid.sln
included with this book.
Create
a new Class Library .NET project. Functoids can be coded in any .NET
language. This example is implemented in C#.
Add a reference to the Microsoft.BizTalk.BaseFunctoids.dll
assembly located in the %\Program Files\Microsoft BizTalk Server
2010\Developer Tools directory.
Create a resource file (resx) to store the functoid configuration parameters.
The name of the file and the parameters should match what is shown in Listing 1.
NOTE
Adding a bitmap (or
any file) to a resource file may require using a third-party
application. You can download such applications freely from the
Internet.
Code the functoid. The
functoid code should match that shown in Listing 1. This is a complete C# class library and will
compile into a deployable functoid.
Example 1. Custom Functoid Class Library
using System;
using Microsoft.BizTalk.BaseFunctoids;
using System.Reflection;

namespace SampleCustomFunctoid
{
    /// <summary>
    /// See sample solution (SampleCustomFunctoid.sln)
    /// which accompanies this recipe
/// </summary>
[Serializable]
public class EncodeFunctoid : BaseFunctoid
{
public EncodeFunctoid() : base()
{
//Custom functoids should begin with 6000 or higher
this.ID = 6667;
// resource assembly reference
SetupResourceAssembly
("SampleCustomFunctoid.SampleCustomFunctoidResource",
Assembly.GetExecutingAssembly());
//Set the properties for this functoid
SetName("SAMPLECUSTOMFUNCTOID_NAME");
SetTooltip("SAMPLECUSTOMFUNCTOID_TOOLTIP");
SetDescription("SAMPLECUSTOMFUNCTOID_DESCRIPTION");
SetBitmap("SAMPLECUSTOMFUNCTOID_BITMAP");
// one parameter in, one parameter out
this.SetMinParams(1);
this.SetMaxParams(1);
//Function code below
SetExternalFunctionName(GetType().Assembly.FullName,
"SampleCustomFunctoid.EncodeFunctoid", "EncodeChars");
//Category in Toolbox where this functoid will appear
this.Category = FunctoidCategory.String;
//output of functoid can go to all nodes indicated
this.OutputConnectionType = ConnectionType.All;
// add one of the following lines of code for every input
// parameter. All lines would be identical.
AddInputConnectionType(ConnectionType.All);
}
// Actual function which does the replacement of symbols
public string EncodeChars(String strInputValue)
{
strInputValue = strInputValue.Replace("&","&");
strInputValue = strInputValue.Replace("<","<");
strInputValue = strInputValue.Replace(">",">");
return strInputValue;
}
}
}
|
Add a strong name key, and build the
project.
Place a copy of the assembly
in the following directory: %\Program
Files\Microsoft BizTalk Server 2010\Developer Tools\Mapper Extensions.
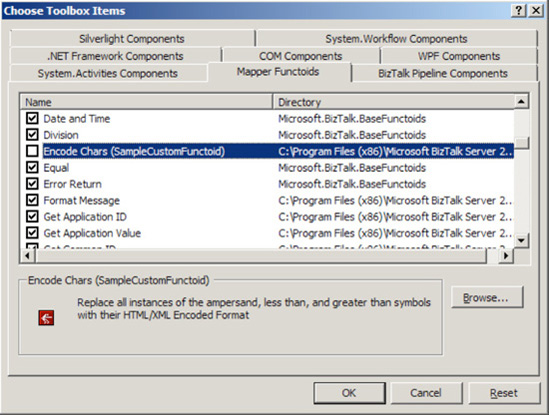
To add the
functoid to the toolbox, on the window toolbar, click Tools =>
Choose Toolbox Items. In the Choose Toolbox dialog box, click the Mapper
Functoids tab. Click the Browse button, and select the functoid DLL
from step 5, as shown in Figure 1. Then click OK.
Add the functoid to
the Global Assembly Cache (GAC).
NOTE
Functoids can be tested in
maps without deploying to the GAC.

This completes the steps for
creating a custom functoid. You can now add the functoid to a BizTalk
map and test it. When a map is ready for deployment, the functoid will
need to be copied to the Mapper Extensions folder (see step 6) and the GAC on the production
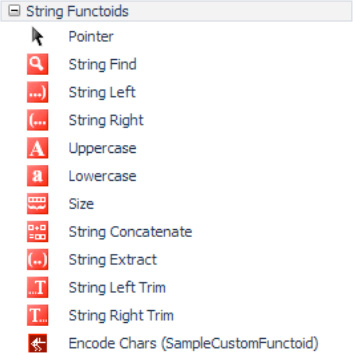
server. Figure 2 shows the new functoid with custom bitmap in
the toolbox in Visual Studio.

3. How It Works
One of the biggest
benefits to using custom functoids is that you have full access to the
.NET libraries. Inline code within maps gives only limited access to
libraries, and coding is often primitive. Custom functoids are created
as .NET class libraries, and they have all of the related coding
benefits.
The example shown in this
recipe is very simple. Custom functoids do not have to be limited to the
two functions shown in the code. For example, assume that you need a
functoid that does some sort of interaction with a database. You may
need to include an Init()
function and a deconstructor to terminate a connection, all of which can
be included in the class library.
Additionally, you may
need multiple input parameters for your functoid. Additional parameters
can be added very easily. See Listing 2 for an example of a functoid with
three input parameters.
Example 2. Multiple Input
Parameters for a Custom Functoid
SEE CODE FROM Listing 3-20.

            // three parameters in, one parameter out
            this.SetMinParams(3);
            this.SetMaxParams(3);

            ...

            // add one of the following lines of code for every input
// parameter. All lines would be identical.
            AddInputConnectionType(ConnectionType.All); // input parameter 1
            AddInputConnectionType(ConnectionType.All); // input parameter 2
            AddInputConnectionType(ConnectionType.All); // input parameter 3

        }

        // Actual function which does the replacement of symbols
        public string EncodeChars(String strInputValue, strReplace1, strReplace2)
        {
            strInputValue = strInputValue.Replace("&",strReplace1);
            strInputValue = strInputValue.Replace("<",strReplace2);

            return strInputValue;
        }
|