This section builds on the basic concepts
presented in that section and gives an example of creating managed
metadata and how it can be used to make centrally managed metadata
available to multiple site collections.
Managed Metadata Service is a
service application managed and accessed from the Central
Administration site. For testing purposes, it is generally a good idea
to create a new service application, by completing the following steps.
The first step is to set a content type, then create the service
application, and then define the term sets.
1. | Access a
site collection that will be used as the content type syndication hub
and access site settings from the top-level site. Click Site Collection
Features.
| 2. | Locate the
content type syndication hub and click Activate.
| 3. | Next, access the Central Administrator site and click
Manage Service Applications under the Application Management section.
| 4. | Click the New drop-down menu on the Ribbon and select
Managed Metadata Service.
| 5. | Give a title to the service application (for example, Test Managed Metadata Service App).
| 6. | Scroll down and verify that the SQL server name is
correct and provide a name for the database that will be created (for
example, TestManagedMetadataServiceApp).
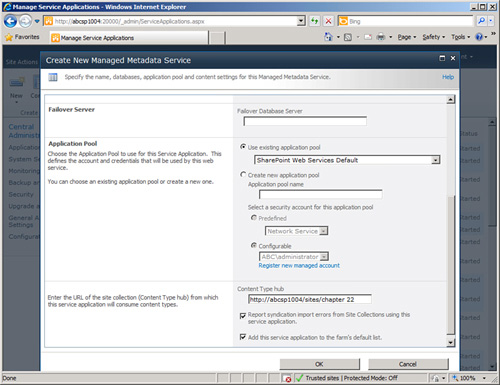
| 7. | In the Application Pool section, click Use Existing
Application Pool, and select SharePoint Web Services Default.
| 8. | In the Content Type Hub field, enter the URL for the
site collection that was activated in step 2, as shown in Figure 1.
| 9. | Leave the
other settings at their defaults and click OK. The service application
will be created along with the database, and it will then be shown on
the ServiceApplications.aspx page.
| 10. | Click the top line of the new service application so
that the line is selected (do not click the active hyperlink), and then
click the Properties button on the Ribbon. This page lists the settings
that were just entered. Click Cancel to return to the
ServiceApplications.aspx page.
| 11. | Now click the actual link to the service application
(Test Managed Metadata Service App, in this example); the Term Store
Management Tool page will open.
| 12. | Click the top-level node in the left Taxonomy Term
Store area and then select New Group from the drop-down menu on the
right side of the top-level node.
| 13. | A new node will appear. Click the new node, give it a
title such as Company ABC Terms,
and press Return.
Note
Enterprise keywords
can also be added to the Managed Metadata Service application, as shown
in Figure
2. After added, these words or phrases
that can then be used by tagging tools in SharePoint 2010 site
collections. Enterprise keywords are part of a single, nonhierarchical
term set called the keyword set.
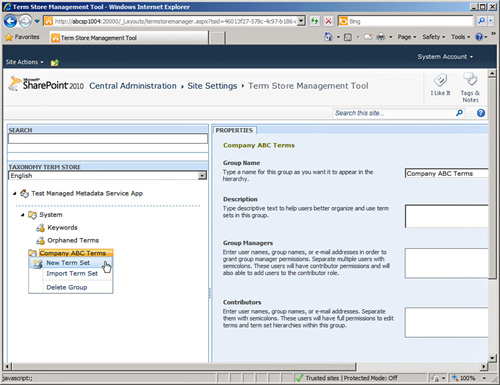
| 14. | Click New
Term Set from the drop-down menu on the new node (Company ABC Terms in
this example), as shown in Figure 2. Title this node
Client Codes and press
Return.
| 15. | Next
access the drop-down menu for Client Codes node and click Create Term.
| 16. | Title the term Company
DEF Codes and press Return.
| 17. | Click the node for Company DEF, and access the
drop-down menu for it and click Create Term.
| 18. | Title the term below as Company
DEF USA, which would correspond to a division of Company
DEF with offices in the United States, and then press Enter.
Tip
When creating a term, the
option exists to provide other labels to the term, which are also
called synonyms. For example, when the term Company DEF USA is defined, a
synonym might be DEFCo New York, which is another way to refer to
Company DEF USA branch. Another might be DEFCo LA (if there is also an
office in Los Angeles). The farm administrator did not want to create
individual terms underneath the Company DEF USA term because that is
“too granular,” and for the organization’s requirements, having end
users differentiate between the different international branches of
Company DEF is sufficient.
| 19. | Repeat
step 17 to create additional nodes under Company DEF, as shown in Figure 3.
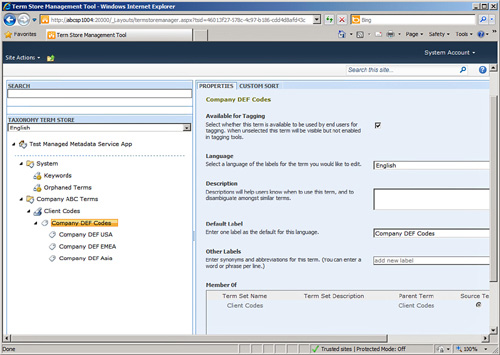
| 20. | Click the
node Company DEF Codes, and the right pane should show additional
settings for the term. Uncheck the box next to Available for Tagging
because this is an organizational term rather than a term the
administrator wants end users to use as metadata. Click Save to save the
changes to the term.
| 21. | Click the node Client Codes and review the settings in
the right pane. Note that there are fields for Description, Owner,
Contact, Stakeholders, a choice to leave the term set Open or Closed,
and a check box to allow the term set to be used for tagging or not.
|
These terms will now be
available to use from SharePoint lists and libraries. As briefly
reviewed earlier, a number of configuration options are available for
each term. In the following section, this managed metadata will be
accessed from a list to show the power of the tool.
Note
A term
is a word or a phrase that can be associated with an item in SharePoint
Server 2010. A term set is a collection of related terms. Local term sets are
created within the context of a site collection. For example, if you add
a column to a list in a document library, and create a new term set to
bind the column to, the new term set is local to the site collection
that contains the document library. Global term sets are created outside
the context of a site collection.
Adding Managed Metadata
in a List
After the managed metadata
term set has been created, as demonstrated in the previous section, it
can be used in lists and libraries, as shown in the following steps:
1. | Access a
site collection and create a new list using the Discussion Board List
template. Title the list ManagedMetadataTestDiscussion
and click Create.
| 2. | From the list, click List Settings from the List tab.
| 3. | Click Create Column in the Columns section.
| 4. | Title the column Client
Codes and check the circle next to Managed Metadata.
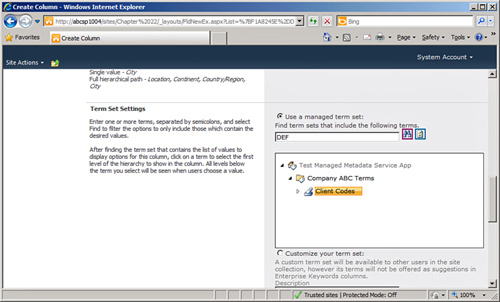
| 5. | Scroll down to the Term Set Settings section and enter
the text DEF in the field
under Find Term Sets that Include the Following Terms and click the
binoculars button. As shown in Figure 4, the term set
created in the previous section should be returned.
| 6. | Click the
Client Codes node in the results from the search. This will be the
“anchor point” for the options that are shown to users of this list.
Leave the other settings at their defaults. Click OK to save the
settings. Note in the Columns section of the listedit.aspx page that
this column is listed as managed metadata in the Type column.
| 7. | Return to the AllItems.aspx view by clicking the list
name in the breadcrumb and click Add New Discussion.
| 8. | Provide a title for the discussion item (for example, Company DEF not paying bills!),
and then scroll down to the Client Codes field and click the Browse for a
Valid Choice icon to the right of the field.
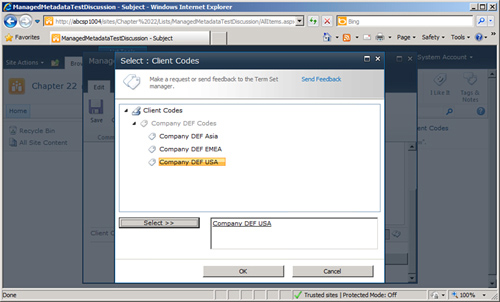
| 9. | The Select: Client Codes window will open. Drill down
under Company DEF codes and select Company DEF USA, as shown in Figure 5.
Then click the Select button to select the term. Click OK.
| 10. | Click
Save to save the list item and return to the AllItems.aspx page.
|
|