Logo
programming4us
programming4us
programming4us
programming4us
Home
programming4us
XP
programming4us
Windows Vista
programming4us
Windows 7
programming4us
Windows Azure
programming4us
Windows Server
programming4us
Windows Phone
 
Windows Server

Managing Windows Server 2008 R2 Disks (part 3) - Creating a Fault-Tolerant Volume Using Diskpart.exe

- Free product key for windows 10
- Free Product Key for Microsoft office 365
- Malwarebytes Premium 3.7.1 Serial Keys (LifeTime) 2019
3/31/2011 5:00:42 PM

Creating a Fault-Tolerant Volume Using Diskpart.exe

This section provides step-by-step instructions for creating the same RAID-5 volume as in the preceding section using diskpart.exe. For reference, these steps will be used to converts disks 2 through 7 to dynamic disks, create a RAID-5 volume using the entire disk, add a volume label, format the drive as NTFS, and assign a drive letter to the volume. As a prerequisite, each of the disks needs to already be initialized using Disk Manager. To create a fault-tolerant RAID-5 volume using diskpart.exe, perform the following steps:

1.
Log on to the Windows Server 2008 R2 system with an account with administrator privileges.

2.
Click Start, click All Programs, click Administrative Tools, and select Server Manager.

3.
In the tree pane, double-click the Storage node, and select Disk Management.

4.
In the tasks pane, verify that each of the disks that will be part of the fault-tolerant volume is initialized and listed as dynamic.

5.
Any disk that is listed as unknown and offline, right-click the disk, and select Online. Repeat for each disk that will be part of the volume.

6.
Any disk that is listed as not initialized, right-click the disk, and select Initialize Disk. Repeat for each disk that will be part of the volume.

7.
Close Disk Manager.

8.
Click Start, All Programs, Accessories, and double-click the Command Prompt shortcut. Each of the remaining steps will be typed in the command prompt window.

9.
Type diskpart.exe and press Enter.

10.
Type List Disk and press Enter. Note which disks are listed as online and dynamic. As an example, Figure 4 shows that disks 0, 1, 2, 3, 4, and 5 are online and dynamic and disks 6 and 7 are online and basic. The online or offline status is listed in the Status column and a dynamic disk is shown in the Dyn column with a * symbol.
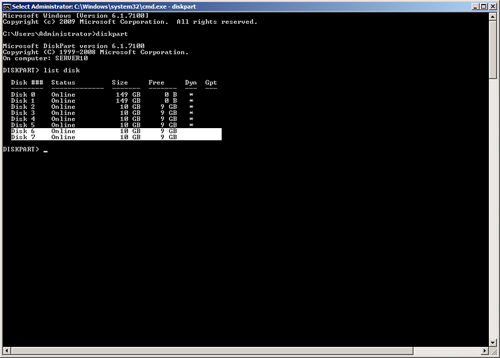
Figure 4. Listing disk status using diskpart.exe.

11.
Based on the disk configuration detailed in Figure 28.4, disk 6 and disk 7 need to be converted to dynamic disks.

12.
In the Command Prompt window, type select disk 6 and press Enter.

13.
In the Command Prompt window, type convert dynamic and press Enter.

14.
In the Command Prompt window, type select disk 7 and press Enter.

15.
In the Command Prompt window, type convert dynamic and press Enter. Leave diskpart.exe running in the Command Prompt window.

16.
Now that all of the disks are initialized, online, and dynamic, we can create the RAID-5 volume.

17.
In the Command Prompt window, type Select disk 2 and press Enter.

18.
In the Command Prompt window, type Create volume RAID disk 2,3,4,5,6,7 and press Enter.

19.
Now that the RAID-5 volume is created, we will format it, but the volume will need to be identified. In the Command Prompt window, type List volume and press Enter.

20.
The new volume should be listed as a RAID-5 volume. In Figure 5, the new volume is listed as volume 2.
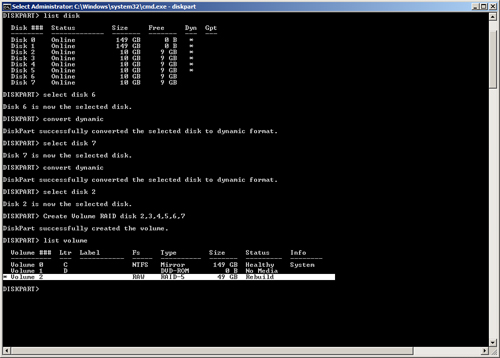
Figure 5. Identifying the new RAID-5 volume using diskpart.exe.

21.
In the Command Prompt window, type Select volume 2 and press Enter.

22.
In the Command Prompt window, type Format FS=NTFS label=New_RAID5_Volume, and press Enter to format the volume. This will perform a full format of the volume.

23.
When the format completes, the window details if the format completed successfully. If the format completed successfully, once the volume is formatted, type Assign Letter=F and press Enter to assign the new volume the letter F.

24.
When the drive letter is assigned, in the Command Prompt window, type Exit, and press Enter to close diskpart.exe.

25.
In the Command Prompt window, type Exit, and press Enter to close the Command Prompt window.

The new RAID-5 volume should now be accessible from the operating system.

Other -----------------
- SharePoint 2010 PerformancePoint Services : Examining Excel Services Reports
- SharePoint 2010 PerformancePoint Services : Examining Analytic Grid Reports
- SharePoint 2010 PerformancePoint Services : Examining Analytic Chart Reports
- Windows Server 2003 : Planning a Secure Baseline Installation - Identifying Client and Server Default Security Settings
- Windows Server 2003 : Planning a Secure Baseline Installation - Planning a Security Framework
- Windows Server 2003 : Planning a Secure Baseline Installation - Selecting Computers and Operating Systems
- BizTalk 2010 Recipes : Messaging and Pipelines - Configuring Port Maps
- BizTalk 2010 Recipes : Messaging and Pipelines - Configuring Send Ports
- BizTalk 2010 Recipes : Messaging and Pipelines - Configuring Receive Ports and Locations
- Windows Server 2008 Server Core : Managing Active Directory with the DSQuery Utility (part 3)
 
 
Top 10
- Microsoft Visio 2013 : Adding Structure to Your Diagrams - Finding containers and lists in Visio (part 2) - Wireframes,Legends
- Microsoft Visio 2013 : Adding Structure to Your Diagrams - Finding containers and lists in Visio (part 1) - Swimlanes
- Microsoft Visio 2013 : Adding Structure to Your Diagrams - Formatting and sizing lists
- Microsoft Visio 2013 : Adding Structure to Your Diagrams - Adding shapes to lists
- Microsoft Visio 2013 : Adding Structure to Your Diagrams - Sizing containers
- Microsoft Access 2010 : Control Properties and Why to Use Them (part 3) - The Other Properties of a Control
- Microsoft Access 2010 : Control Properties and Why to Use Them (part 2) - The Data Properties of a Control
- Microsoft Access 2010 : Control Properties and Why to Use Them (part 1) - The Format Properties of a Control
- Microsoft Access 2010 : Form Properties and Why Should You Use Them - Working with the Properties Window
- Microsoft Visio 2013 : Using the Organization Chart Wizard with new data
 
programming4us
Windows Vista
programming4us
Windows 7
programming4us
Windows Azure
programming4us
Windows Server