Disks in Windows Server 2008 R2 can be managed using a
few different tools included with the operating system. Most
disk-related tasks can be performed using the Disk Management console,
the Share and Storage Management console, or the diskpart.exe command-line utility, but to manage a new disk just added to Windows, the Disk Management console must be used.
The Disk Management MMC Snap-In
The Disk Management console, or
snap-in, can be used to initialize and configure new disks; import
previously configured disks; convert basic disks to dynamic disks;
create, extend, and shrink disk volumes; format disk volumes; enable
shadow copies; and many more disk-related tasks. Disk Management can
also be used to create and attach or mount VHD files to the host
operating system for quick volume access and data management. This
snap-in is included as part of the Computer Management console and the
Server Manager console, but it can also be added to a separate Microsoft
Management Console window. The Disk Management console can be used to
manage disks on remote machines as well as local disks.
Diskpart.exe Command-Line Utility
Diskpart.exe
is a command-line utility that administrators can use to manage Windows
disks. Most disk tasks that can be performed using the Disk Management
console can also be performed using this command-line utility except for
initializing new disks. When issues are encountered with a Windows
Server 2008 R2 that won’t boot, diskpart.exe
might be the only option available when booting into the recovery
environment, so administrators should be well versed and comfortable
with this tool.
Adding a New Disk to Windows
When a disk is added to a
Windows Server 2008 R2 system, the only tool that can be used to get the
disk configured is the Disk Management snap-in. Windows Server 2008 R2
is able to detect most disks without a reboot. This, of course, depends
on the disk type and the disk controller type. For example, if a new
disk is added to a system with a RAID-compatible disk controller, it
will not be detected or available to Windows until the new disk is
configured using the RAID controller configuration utility. When a new
disk is ready to be added into the Windows Server 2008 R2 operating
system, perform the following steps:
1. | Log on to the Windows Server 2008 R2 system with an account with administrator privileges.
|
2. | Click Start, click All Programs, click Administrative Tools, and select Server Manager.
|
3. | In the tree pane, double-click the Storage node, and select Disk Management.
Note
In many cases, when a new disk
is added to Windows, it is automatically detected and an Initialize
Disk pop-up Window opens; please close this window.
|
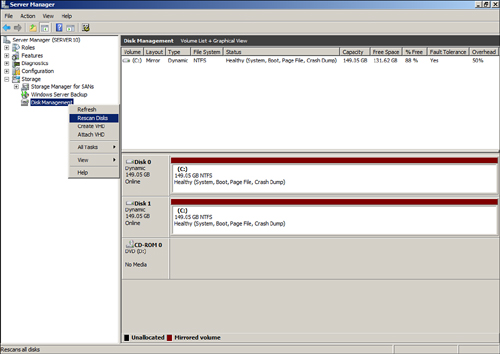
4. | Right-click Disk Management and select Rescan Disks, as shown in Figure 1.

|
5. | After
the disk scan completes, scroll down in the tasks pane to locate the
new disk that was just added. Right-click the disk and select Online.
|
6. | The new disk will be listed as Unknown and Not Initialized. Right-click the disk and select Initialize Disk.
|
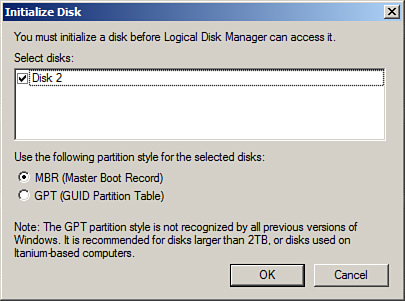
7. | When
the Initialize Disk window opens, check the disk or disks to
initialize, and select the option button to create either an MBR or GPT
type disk, as shown in Figure 2.

|
8. | After
the disk initialization completes, the disk will be listed as a basic
disk. Repeat the online and initialize task for any additional disks
that were added to the Windows Server 2008 R2 system.
|
At this point, the disk is ready to have a volume defined, formatted, and added to Windows.
Converting Basic Disks to Dynamic Disks
In many cases, if disk fault
tolerance is desired in a server configuration, the disks need to be
converted from the default basic disk configuration to a dynamic disk
configuration. After the disks are set to Dynamic, the fault-tolerance
configuration can be applied. To convert basic disks to dynamic disks,
perform the following steps:
1. | To convert a disk to a dynamic disk, right-click the basic disk to be converted, and select Convert to Dynamic Disk.
Caution
After a disk is converted
to a dynamic disk, it cannot be changed back to a basic disk without
removing all the volumes and losing the data.
|
2. | When
the Convert to Dynamic Disk window opens, select the disk to convert by
checking the box next to the desired disk and clicking OK to convert
the disk. |