One of the primary reasons that
organizations put time and effort into creating taxonomies and enforcing
their use is to help knowledge workers quickly and precisely locate the
documents they are looking for.
Metadata navigation is a
powerful tool available in SharePoint Server 2010 Standard or
Enterprise, and involves the configuration of hierarchy fields, key
filters, and the management of column indices to facilitate browsing for
specific types of content within a document library and creating
filters to limit the results.
The terminology is a bit
confusing, so the best way to understand how it works is to experiment
with it. The following example walks through the process of creating a
new document library, enabling content types, adding a content type to a
document library, and then configuring the metadata navigation
settings:
1. | Create a
new document library by accessing the Site Actions drop-down menu and
clicking New Document Library. Tile the library Metadata Navigation Library.
|
2. | After the document library is created, click Library
Settings from the Library tab on the Ribbon.
|
3. | Next click Advanced Settings in the General Settings
section. Click Yes under Allow Management of Content Types. Click OK to
save this setting and return to the Document Library Settings page.
|
4. | Scroll down to the Content Types section and click Add
from Existing Site Content Types.
|
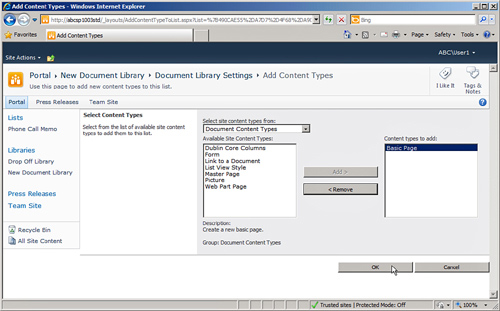
5. | From the Add Content Types page, as shown in Figure 1,
change the content types to Document Content Types in the Select Site
Content Types From drop-down menu. Select Basic Page and click the Add
button. Click OK to add this content type and return to the Document
Library Settings page.

|
6. | Click the
Metadata Navigation Settings link in the General Settings section.
|
7. | Content Type should be highlighted in the Available
Hierarchy Fields area, so click the Add button to add it to selected
hierarchy fields.
Note
Other fields can be
selected in the Available Hierarchy Fields section. Besides Content
Type, Single-Value Choice Field and Managed Metadata Field can also be
selected.
|
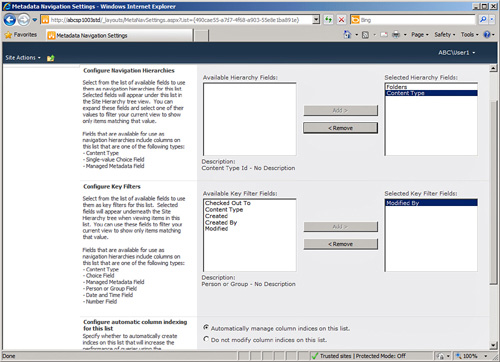
8. | In the
Configure Key Filters section, in the Available Key Filter fields, click
Modified By, and then click the Add button. The screen should now match
Figure 2.

Note
A variety of fields can be
used as key filters. These include Content Type, Choice field, Managed
Metadata field, Person or Group field, Date and Time field, and Number
field.
|
9. | Leave
Automatically Manage Column Indices on This List checked. Click OK to
save the changes and return to the Document Library Settings page.
Note
Leaving Automatically Manage
Column Indices on This List selected will improve the performance of
queries when the Navigation Hierarchy and Key Filter tools are used.
There are a maximum of 20 columns that can be indexed in a list or
library, so on rare occasions, the administrator might need to decide
which 20 are indexed.
|
10. | Click the
name of the document library in the breadcrumb to return to the library
itself. The library should now have the hierarchy fields in the Quick
Launch area on the left, and below it the key filter fields. Test these
tools by creating several folders and uploading several documents to the
library and assigning them to the Document and Basic Page content types
during the upload process.
|
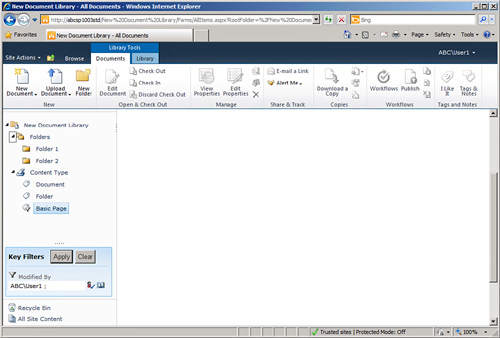
Figure 3 shows the navigation hierarchy after several
folders have been created, and where the user has clicked the Basic
Page content type, as well as the key filter section where the user has
entered ABC\User1 and the filtering criteria for the Modified By field
of metadata. This very intuitive navigation tool enables users to
quickly navigate to folders and subfolders and to see only certain
content types or other fields, such as managed metadata fields.
