At this point, you essentially have all the necessary
information to start building applications that rely on the ASDK-based
adapters. Nonetheless, as with any serious technology, which the ASDK no
doubt is, there are areas and features which can become the source of
headaches or make your work less productive if used indiscriminately.
And, as with any serious technology, there are tools to help you
effectively resolve potential problems.
In this section, we will discuss the following topics, applicable to all ASDK-based adapters:
Generating the schemas
When you have finished
the walkthrough, you will likely come to the conclusion that generating
the schemas is probably the most important step to whether your
experience with the adapters will be fast and smooth, or whether you
will have to spend a considerable amount of time troubleshooting your
application. If this was your verdict, you were absolutely right. Here,
we would like to provide you with a few tips and suggestions, which may
improve your productivity and help to avoid potential issues:
If you are not happy with the names of the schema files generated by the Consume Adapter Service plugin, feel free to change them to your liking or to the naming conventions adopted by your organization.
As
you likely know, BizTalk schemas are compiled into .Net classes. You
are free to change the name and the namespace of the .NET class to be
generated. Just click the schema file in the Solution explorer and make a
change in the Properties window. Doing so, you will make referencing the types defined in the XSD files easier and more visual.
Feel
free to distinguish or promote schema fields as needed. Nonetheless, be
aware that if for whatever reason you need to re-regenerate the
schemas, your promotions will be lost.
In
the vast majority of cases, you won't have a need to change the
namespace and root node name for the schemas generated by the Consume
Adapter Service plugin. As you know, these two elements constitute the
document type, the cornerstone of the messaging engine subscription
mechanism. If you still have a very compelling reason to change the
type, the change has to be accompanied by a custom pipeline component.
For the inbound scenarios, the pipeline component has to convert the
document produced by the adapter to match your custom document type.
Otherwise, the messaging engine will throw the infamous "subscription
not found" exception. For the outbound scenarios, your custom pipeline
component has to convert your custom document to match the type expected
by the adapter that is the type generated for you by the Consume
Adapter Service plugin. Otherwise the message will be rejected by the
adapter.
You have
to be extra cautious if you are planning to use the ASDK adapters with
more than one application in the same BizTalk group. If you generated
the schemas for the same operation in different Visual Studio projects,
you will end up with a situation where the same message type will be
presented twice in the BizTalk management database. The consequence of
this configuration is that the messaging engine will throw exceptions
reporting its inability to resolve the message type or find a
subscription because multiple schemas matched the message type.
To avoid such a situation, we recommend putting the schemas generated by the Consume Adapter Service add-in
into a separate Visual Studio BizTalk project which you will reference
from your other Visual Studio BizTalk projects. Upon deployment, you
will need to add assembly with the schemas to a separate BizTalk
application named for example YourOrganization.Common, and then reference this application from the other BizTalk applications in the group.
An
alternative option is to to configure XMLReceive or XMLTransmit
pipeline with fully qualified schema name set in the DocumentSpecNames
property.
Working with the Consume Adapter Service Wizard, you likely noticed the Generate Unique Schema Types checkbox at the bottom of the Consume Adapter Service Wizard and are wondering whether this might be a simpler solution to the problem we just discussed.
Unfortunately,
this checkbox deals with a fundamentally similar, but ultimately
different issue. Consider the scenario where you want to generate a
schema for the operation called for example LOBOperationA. The schema for LOBOperationA uses a parameter of complex type CT1. Assume you closed the Consume Adapter Service Wizard, and sometime later re-opened it to generate schema for LOBOperationB, which uses the same complex type CT1. After you generate the schema for the LOBOperationB and compile the project, you will get an error message reporting that the same type CT1 is defined twice in different XSD files. To address such situation you can do the following:
Whenever
possible, generate the schemas for all operations you are planning to
use in a single run to the Consume Adapter Service addin. The addin is
able to recognize the situation and place the definition of the shared
types in a single, separate XSD file referenced by the main XSD files
using the Import directive.
If your application is evolving and your only option is generating schemas across multiple runs, checking off the Generate Unique Schema Types solves the problem by generating unique namespaces for the complex types.
The best approach is to
make only one run to the plugin and generate all schemas in one batch,
but, as often happens, this solution is not always possible in real life
projects. So, in many cases your best bet is to use the Generate Unique
Schema Types checkbox. Even if the operation does not use share types,
keeping this checkbox checked will do no harm.
Timeouts
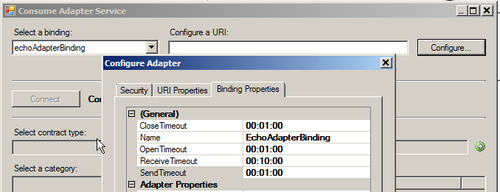
If you've followed the
walkthrough, you should have noticed the group of timeout-related
binding properties available at the design time on the Binding
Properties page of the Configure Adapter dialog.

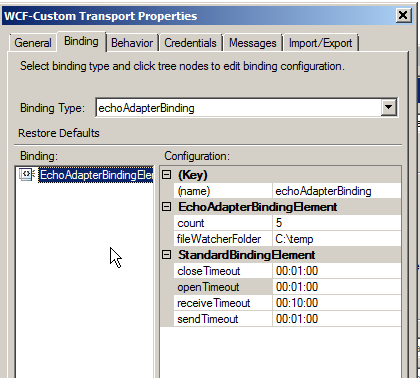
After you imported the binding file generated by the ASDK, these properties are accessible through the Bindings tab of the WCF-Custom Transport properties dialog.

The purpose of each property and the default values as set by the ASDK are listed in the following table:
|
Property
|
Purpose
|
|---|
|
openTimeout
|
Open connection timeout. The default value is 1 minute.
|
|
closeTimeout
|
Close connection time out. The default value is 1 minute.
|
|
sendTimeout.
|
Outbound request-response timeout. This property specifies for how long
the adapter waits for the response from the target LOB before throwing
an exception. The default value is 1 minute.
|
|
receiveTimeout
|
Receive operation timeout. Essentially, this property specifies for how
long adapter waits for an inbound message from the target LOB. Default
value is 10 minutes.
|
When dealing with the
timeout exceptions in the outbound scenarios, it may be tempting to
solve the problem by simply increasing the sendTimeout value. However,
your first line of defense should be communicating with the LOB
application administrator to determine whether the problem can be
resolved by optimizing performance on the LOB application side. Masking
the problem by blindly increasing the sendTimeOut value is definitely not the best solution.
For the inbound operations, you
have to set the receiveTimeout property to the value large enough to
not interfere with your particular receive location configuration. If
you are pulling your hair out trying to figure out why your adapter is
behaving totally "unexplainably"—for example, polling the database at
random with no apparent pattern intervals instead of using the dedicated
configuration properties, the first thing to check is the
receiveTimeout settings. In many cases, adjusting this property
magically resolves even seemingly unrelated problems.
Tracing and message logging
In the situations when
your adapter is behaving not as expected, tracing and message logging
are handy features provided by the ASDK to help you identify the root of
the problem .They are especially useful in the inbound scenarios, where
the ASDK adapters and their underlying LOBs may act as clients. In such
scenarios, possible exceptions, for example the receive timeouts that
we've just discussed, will not be propagated to your BizTalk
application. At best, the exceptions may appear in the Event Viewer of your BizTalk computer, or not at all at worst, leaving you guessing in the dark.
Using the tracing and message
logging capabilities, you can trace and log communication between
BizTalk Server and ASDK adapters, within ASDK adapters, and also between
ASDK adapters and their target LOB applications in the case of the SAP
adapter. In a nutshell, to activate tracing, all you have to do is add
tracing options to your application configuration file—Visual Studio for
design-time tracing or BizTalk server for runtime. We have put the file
names and their locations in the following table:
|
Application/Environment
|
Location
|
|---|
|
Visual Studio,32-bit environment
|
<installation drive>:\Program Files \Microsoft Visual Studio 10.0\Common7\IDE\devenv.exe.config
|
|
Visual Studio,64-bit environment
|
<installation drive>:\Program Files (x86)\Microsoft Visual Studio 10.0\Common7\IDE\devenv.exe.config
|
|
BizTalkServer,32-bit environment
|
<installation drive>:\Program Files\Microsoft BizTalk Server 2010\BTSNTSvc.exe.config
|
|
BizTalkServer, 64-bit environment
|
<installation drive>:\Program Files (x86)\Microsoft BizTalk Server 2010\BTSNTSvc.exe.config for 32-bit host instances
<installation drive>:\Program Files (x86)\Microsoft BizTalk Server 2010\BTSNTSvc64.exe.config for 64-bit host instances
|
The product documentation
offers ready-to-use configuration sections that you can copy-paste to
the appropriate configuration file. Currently, it is available at http://msdn.microsoft.com/en-us/library/cc185440(BTS.10).aspx. If the location changes, you can search using your favorite search engine by "WCF LOB SDK Diagnostic tracing".