People who use the Dynamics AX application often, probably must have already noticed the Display dimensions button on some forms. Normally it is displayed on its own or under the Inventory
button. This button always comes on the forms that have an inventory
item and its dimensions, for example Sales order or Purchase order
forms. Normally, item dimensions are Configuration, Size, Color, Warehouse,
and so on depending on the license and system configuration. The button
invokes a dialog that allows controlling the number of displayed
inventory dimensions in the overview grid.
In this recipe, we will
learn how to create such a button and all the associated functionality.
This is very useful when creating custom forms with inventory controls.
For this recipe, we will
define our requirement to have a default item for each item group. So we
are going to add an item number and inventory dimension controls to the Item group form.
How to do it...
1. Open the InventItemGroup table in AOT and add a new field:
|
Property
|
Value
|
|---|
|
Type
|
String
|
|
Name
|
ItemId
|
|
ExtendedDataType
|
ItemId
|
2. Add another field to the same table:
|
Property
|
Value
|
|---|
|
Type
|
String
|
|
Name
|
InventDimId
|
|
ExtendedDataType
|
InventDimId
|
3. In AOT create a new job with the following code:
static void InventItemGroupPopulateDim(Args _args)

{
InventItemGroup inventItemGroup;
InventDimId inventDimIdBlank;
;
inventDimIdBlank =
InventDim::findOrCreateBlank(false).inventDimId;
ttsbegin;
while select forupdate inventItemGroup
{
inventItemGroup.InventDimId = inventDimIdBlank;
inventItemGroup.doUpdate();
}
ttscommit;
}
4. Run the job to populate the empty InventDimId field in the InventItemGroup table:
5. In AOT, create a new class named InventDimCtrl_Frm_ItemGroup with the following code:
class InventDimCtrl_Frm_ItemGroup extends InventDimCtrl_Frm

{
}
public static InventDimCtrl_Frm_ItemGroup construct()

{
return new InventDimCtrl_Frm_ItemGroup();
}
public static InventDimCtrl_Frm_ItemGroup newFromForm(
FormRun _formRun)

{
InventDimAxFormAdapter adapter;
InventDimCtrl_Frm_ItemGroup inventDimCtrl;
;
adapter = InventDimAxFormAdapter::newFromForm(_formRun);
inventDimCtrl = InventDimCtrl_Frm_ItemGroup::construct();
inventDimCtrl.parmCallingElement(adapter);
inventDimCtrl.init();
return inventDimCtrl;
Display dimensions dialogDisplay dimensions dialogcreating, steps}
NoYes mustEnableField(FieldId _dimFieldId)

{
boolean ret;
;
ret = this.dimSearch().find(
inventDimGroupId,
_dimFieldId);
ret = ret && this.dimSearch().dimActive();
return ret;
}
NoYes mustMarkFieldAsMandatory(FieldId _dimFieldId)

{
boolean ret;
Display dimensions dialogDisplay dimensions dialogcreating, steps;
ret = this.mustEnableField(_dimFieldId);
ret = ret && this.dimSearch().dimMandatory();
return ret;
}
6. Open the InventItemGroup form in AOT and add the following line of code to its class declaration:
InventDimCtrl_Frm_ItemGroup inventDimFormSetup;
7. Create the following methods on the same form:
void updateDesign(InventDimFormDesignUpdate _update)

{
InventDimParm inventDimParmVisibleGrid;
InventTable inventTable;
;
switch (_update)
{
case InventDimFormDesignUpdate::Init:
if (!inventDimFormSetup)
inventDimFormSetup =
InventDimCtrl_Frm_ItemGroup::newFromForm(
element);
inventDimParmVisibleGrid.ConfigIdFlag = true;
inventDimParmVisibleGrid.InventSizeIdFlag = true;
inventDimParmVisibleGrid.InventColorIdFlag = true;
inventDimFormSetup.parmDimParmVisibleGrid(
inventDimParmVisibleGrid);
case InventDimFormDesignUpdate::Active:
case InventDimFormDesignUpdate::FieldChange:
inventTable = InventTable::find(
InventItemGroup.ItemId);
inventDimFormSetup.formActiveSetup(
inventTable.DimGroupId);
inventDimFormSetup.formSetControls(true);
break;
default:
throw error(Error::missingParameter(null));
}
}
public void init()

Display dimensions dialogDisplay dimensions dialogcreating, steps{;
super();
element.updateDesign(InventDimFormDesignUpdate::Init);
}
Object inventDimSetupObject()

{
return inventDimFormSetup;
}
8. Add a new data source to the form:
|
Property
|
Value
|
|---|
|
Name
|
InventDim
|
|
Table
|
InventDim
|
|
JoinSource
|
InventItemGroup
|
|
LinkType
|
InnerJoin
|
|
DelayActive
|
No
|
9. Override the active() and validateWrite() methods of the InventItemGroup data source with the following code:
public int active()

{
int ret;
;
ret = super();
element.updateDesign(InventDimFormDesignUpdate::Active);
return ret;
}
public boolean validateWrite()

{
boolean ret;
;
InventItemGroup.InventDimId =
InventDim::findOrCreate(InventDim).InventDimId;
ret = super();
return ret;
Display dimensions dialogDisplay dimensions dialogcreating, steps}
10. Override modified() on the ItemId field on the same data source:
public void modified()

{;
super();
element.updateDesign(
InventDimFormDesignUpdate::FieldChange);
inventDim.clearNotSelectedDim(
element.inventDimSetupObject().parmDimParmEnabled());
}
11. Add a new StringEdit control to the form's grid:
|
Property
|
Value
|
|---|
|
Name
|
InventItemGroup_ItemId
|
|
DataSource
|
InventItemGroup
|
|
DataField
|
ItemId
|
12. Also add a new Group control to the form's grid:
|
Property
|
Value
|
|---|
|
Name
|
InventoryDimensionsGrid
|
|
DataSource
|
InventDim
|
|
DataGroup
|
InventoryDimensions
|
|
AutoDataGroup
|
Yes
|
13. Add a new TabPage control to the form's Tab:
|
Property
|
Value
|
|---|
|
Name
|
Dimension
|
|
Caption
|
Dimension
|
14. Add a new Group control to the created tab page:
|
Property
|
Value
|
|---|
|
Name
|
InventoryDimensions
|
|
DataSource
|
InventDim
|
|
DataGroup
|
InventoryDimensions
|
|
AutoDataGroup
|
Yes
|
15. And finally, add a new MenuItemButton control to the form's ButtonGroup:
|
Property
|
Value
|
|---|
|
Name
|
InventoryDimensions
|
|
DataSource
|
InventDim
|
|
DataGroup
|
InventoryDimensions
|
|
AutoDataGroup
|
Yes
|
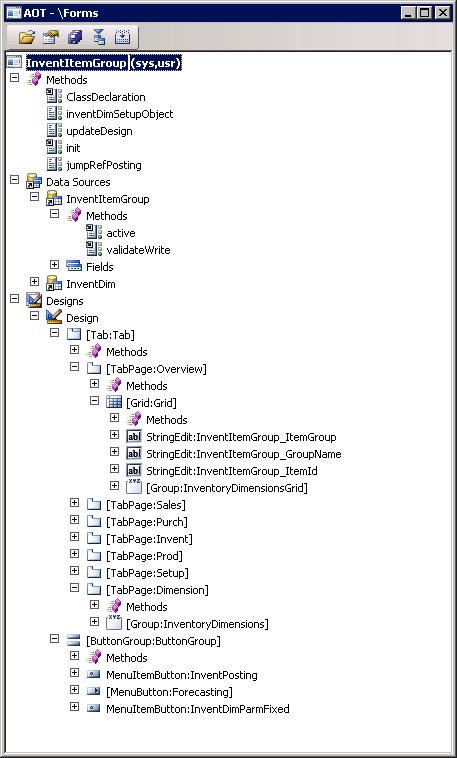
16. As a result, the form should look like following in AOT:
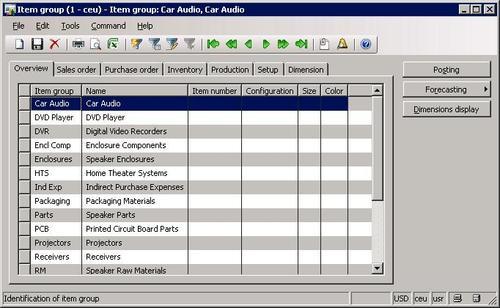
17. Now open Inventory management | Setup | Item group and notice the new inventory dimensions controls:
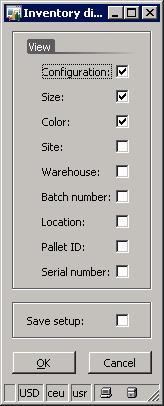
18. Use the Dimensions display button to control which dimension fields should be visible on the form:
How it works...
In Dynamics AX each unique combination of inventory dimensions (Configuration, Size, Color, Warehouse, etc.) is stored in the InventDim
table and has a unique identification number. This prevents us from
having redundant information in every table where we need to store
inventory dimensions. By using this principle instead of having a number
of fields for each dimension separately, we have only one field
referring to the InventDim table.
In this demonstration, the first step is to add two new fields to the InventItemGroup
table. One field will store inventory item number and the other one,
the number of the inventory dimension combination. In order to maintain
data integrity of the existing item group, it is also important to
populate the InventDimId field with the value of empty dimension combination. We create and run a new job named InventItemGroupPopulateDim,
which does exactly that. Such a task is not necessary when creating new
tables, which obviously initially do not have any data. The job loops
through all item group records and fills the InventDimId field with the value representing the empty dimension combination, which is found by calling findOrCreateBlank() on the InventDim table.
Now when fields and data are ready, we need to create a helper class called InventDimCtrl_Frm_ItemGroup and design it to correctly handle dimension controls on the Item group form. This class extends InventDimCtrl_Frm,
which contains all the generic functionality. We only need to create
new and override several existing member methods in order to implement
custom behavior:
construct() is used to return a new instance of this class.
newFromForm() creates a new instance of this class and additionally ensures correct integration with the form.
mustEnableField() is used to
determine whether dimension control is enabled. It accepts a dimension
field number as an argument. Here we check if a particular dimension is
active for the current dimension group, which is assigned to the current
item. This method is automatically called every time the item number
changes or the user selects a new line to make sure that the correct
dimension controls are enabled or disabled.
mustMarkFieldAsMandatory() is used
to determine whether the dimension control requires mandatory user
input. In this method, first we check if the current dimension is
enabled and if it is then it is defined as mandatory in settings. The
method returns true if both checks are positive.
And finally, we modify the InventItemGroup form. We start with its methods:
In its class declaration we declare the InventDimCtrl_Frm_ItemGroup object..
A new updateDesign()
is called from a number of other places. The method is split into two
parts one for initialization and another one for updating form design
when something changes. The initialization section uses newFromForm() of the InventDimCtrl_Frm_ItemGroup
class to create a new instance, if it is not created yet. Here we can
also specify which dimension controls are visible initially by calling parmDimParmVisibleGrid() on the inventDimFormSetup object. In this recipe, we chose to show Configuration, Size, and Color controls by default. The second section updates inventDimFormSetup
with a new item dimension group if the user changes an item or selects
another line. As we have seen before, the item dimension group is used
to determine which dimension controls should be enabled and be
mandatory.
Form's init() calls updateDesign() to make sure that the inventDimFormSetup object is initialized properly.
inventDimSetupObject() is used to get the reference to the inventDimFormSetup instance from the Inventory dimensions dialog.
A new data source InventDim has to be added to the form and it will be a source for dimension controls. It is connected to InventItemGroup using an inner join.
We also need to override several InventItemGroup data source methods to make sure everything works correctly:
active() calls the form's updateDesign(), which updates dimension controls. active() is called every time the user selects another record.
In validateWrite() we use findOrCreate() of the InventDim table to search for an existing inventory dimension combination. This method accepts a InventDim data source as a buffer for retrieving user input values. findOrCreate() creates a new dimension combination and its number if no existing dimension is found.
modified() on the ItemId field behaves the same way as active() does, plus it clears non relevant dimension controls once the user selects a new item.
The final step is to add
the item and its dimensions to the overview grid. We also add an
additional tab page where all dimensions are listed. This ensures that
the user has access to the required dimension even if it is hidden on
the overview page. And of course, we add a new MenuItemButton button, which calls the InventDimParmFixed menu item upon user selection, to open dimension setup form.
