Electronic payments these days are being used more
often. They save time and reduce paperwork. Although Dynamics AX
provides a number of standard out-of-the-box electronic payment formats
for various countries, there is always the case when the required format
is not present or does not exactly match customer bank requirements. In
such cases, we either modify the existing format that is the closest
match to the required one or even create a totally new format from
scratch.
In this recipe, we will
create a custom electronic payment format and will process a vendor
payment using it. We will learn the general principles of building such
functionality.
How to do it...
1. Open AOT and create a new class called VendOutPaymRecord_Test with the following code:
class VendOutPaymRecord_Test extends VendOutPaymRecord

{
}
void output()

{
str outRecord;
Name companyName;
BankAccount bankAccount;
;
outRecord = strrep(' ', 50);
companyName = substr(
custVendPaym.recieversCompanyName(), 1, 40);
bankAccount = substr(
custVendPaym.recieversBankAccount(), 1, 8);
outRecord = strpoke(outRecord, companyName, 1);
outRecord = strpoke(outRecord, bankAccount, 43);
file.write(outRecord);
}
2. Create another class named VendOutPaym_Test with the following code:
class VendOutPaym_Test extends VendOutPaym

{
}
public PaymInterfaceName interfaceName()

{
return "Test payment format";
}
public classId custVendOutPaymRecordRootClassId()

{
return classnum(VendOutPaymRecord_Test);
}
protected Object dialog(
DialogRunbase _dialog,
boolean _forceOnClient)

{
DialogRunbase dialog;
electronic payment formatelectronic payment formatcreating, steps;
dialog = super(dialog, _forceOnClient);
this.dialogAddFileName(dialog);
return dialog;
}
boolean validate()

{
return true;
}
void open()

{
#LocalCodePage
;
file = CustVendOutPaym::newFile(filename, #cp_1252);
if (!file || file.status() != IO_Status::Ok)
{
throw error(
strfmt("File %1 could not be opened.", filename));
}
file.outFieldDelimiter('');
file.outRecordDelimiter('\r\n');
file.write("Starting file:");
}
public void close()

{;
file.write("Closing file.");
}
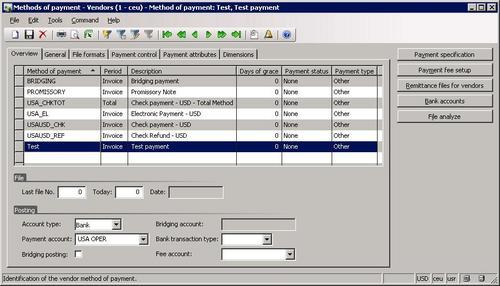
3. Open Accounts payable | Setup | Payment | Methods of payment and create a new record as follows:
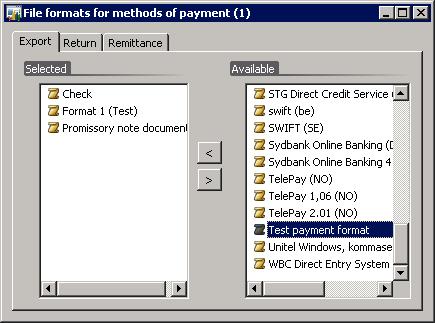
4. Open the File formats tab page, click on the Setup button and move Test payment format from the right to the left:
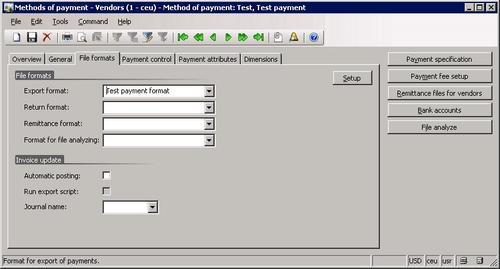
5. Then go back to the Methods of payment form and select this format as Export format:
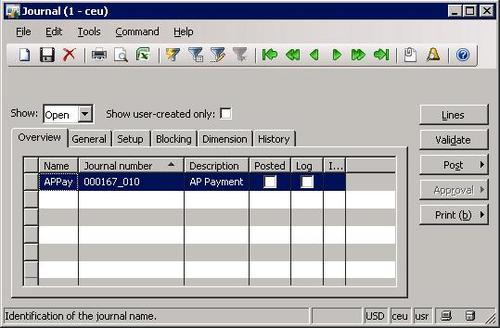
6. Open Accounts payable |Journals | Payments | Payment journal and create a new journal:
7. Click on the Lines button to open the journal lines and create a new line (make sure you set Method of payment to Test):
8. Next, click Functions | Generate payments. Fill in the dialog fields as below:
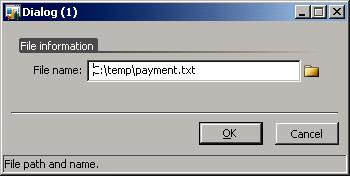
9. Click OK and choose the export file name:
10. Click OK to complete the process and notice that the journal line's Payment status changed from None to Sent. That means payment was generated successfully.
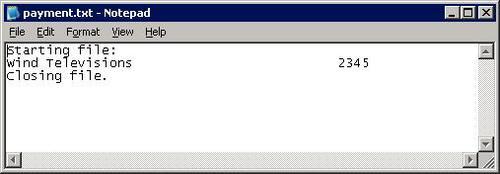
11. Open the created file with any text editor, for example Notepad to check its content:
How it works...
In this recipe we created
two new classes, which are required for generating vendor payments,
which are normally presented as text files to be sent to the bank. The
first one is VendOutPaymRecord_Test, which is responsible for formatting payment lines and the second one VendOutPaym_Test, which generates header and footer records and creates the payment file itself.
The VendOutPaymRecord_Test class extends VendOutPaymRecord and inherits all required methods. We only need to override its output() to define our own logic for formatting payment lines. The idea here is to format a string variable, which represents a single payment line. We use outRecord for this purpose, which we initially fill in with 50 spaces using strrep()
function. For demonstration purposes, we will only have two
values— company name and bank account number— in
each line. The global custVendPaym already holds that information and we only need to use the relevant methods— recieversCompanyName() and recieversBankAccount()—
to retrieve it. Let's assume here that a bank requirement is to have
the company name starting from position 1 and its length should be 40
symbols, and the bank account number should start from position 43 and
its length should be 8 symbols (normally a bank provides specifications
of its format). So first, we need to make sure that our value does not
exceed the required length by trimming it using the substr() function. Next, we use the strpoke() function to insert the prepared values into outRecord at the 1st and 43rd positions. And finally, we insert this into the file by calling write() on the global file variable.
VendOutPaym_Test extends VendOutPaym
and also inherits most of the common member methods. We only need to
override those that are either mandatory or specific to our custom
format:
interfaceName() returns a name of the payment format. Normally, this text is shown in that user interface.
custVendOutPaymRecordRootClassId() returns a number of the class, which generates payment lines. In our case, it is VendOutPaymRecord_Test.
dialog() is used only if we need
to add something to the user dialog when generating payments. Our
payment is a text file so we need to ask a user to specify its name. We
do that by calling dialogAddFileName(),
which is a member method of the parent class. It will automatically add a
file selection control and we do not have to worry about things like a
label or how to get its user input. There are a number of other standard
controls, which can be added to the dialog by calling various dialogAdd...() member methods. Additional controls can also be added here by using addField() or similar methods of the dialog object.
validate() is one of the
mandatory methods. Normally, user input validation should go here. Our
example does not have any validation, so we simply return true.
In open(), we are responsible for preparing a file object for further processing. Here we use newFile() on the CustVendOutPaym class to create a new file instance. After standard validations we set field and row delimiters by calling its outFieldDelimiter() and outRecordDelimiter() respectively. In this example, the values in each line should not be separated by any symbol, so we call outFieldDelimiter() with an empty string. We call outRecordDelimiter() with \r\n
to define that every line ends with a line break. Note that the last
line of this method writes some text to the file header. This probably
will not make any sense to the bank, but it will definitely make sense
to us. We will see that text later in the generated file.
And the last one is close(),
which is used to perform additional actions before the file is closed.
Here we specify some text for simple tracking of what goes where in the
generated file.
Now this new payment
format is ready to be used. After some setup we can start creating
vendor payment journals with this type of payment. Note the file
generated in the example before. We can clearly see all texts and
variables defined in the classes. These places should be replaced with
your own code to build custom electronic payment formats for Dynamics
AX.
