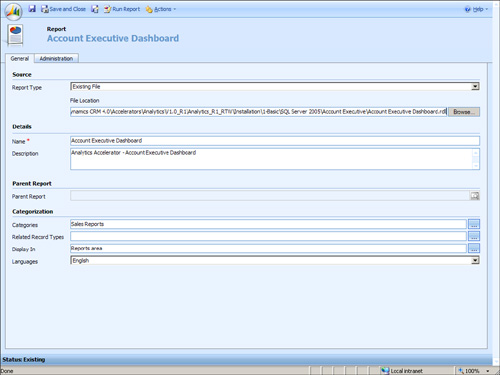
1. | Within CRM, navigate to Workplace, Reports, New. You’ll be prompted with a New Report screen. Configure each field as follows:
- Report Type: Existing File
- File Location:
\Installation\1-Basic\SQL Server 2005\Account Executive\ Account
Executive Dashboard.rdl (making sure the full path to your extracted
files exists)
- Name: Account Executive Dashboard
- Description: Analytics Accelerator - Account Executive Dashboard
- Categories: Sales Reports
- Related Record Types: Blank
- Display In: Reports Area
- Administration Tab, Viewable By: Organization
After you’ve completed the configurations, your New Report screen should match Figure 2.
|
2. | Click Save and New to create the new CRM report and then create the next report.
|
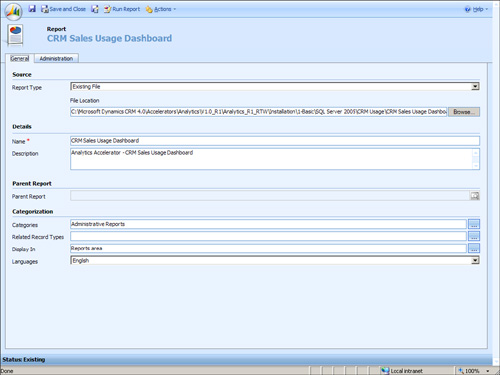
3. | Add the CRM Sales Usage dashboard report and configure each field as follows:
- Report Type: Existing File
- File Location:
\Installation\1-Basic\SQL Server 2005\CRM Usage\ CRM Sales Usage
Dashboard.rdl (making sure the full path to your extracted files exists)
- Name: CRM Sales Usage Dashboard
- Description: Analytics Accelerator - CRM Sales Usage Dashboard
- Categories: Administrative
- Related Record Types: Blank
- Display In: Reports Area
- Administration Tab, Viewable By: Organization
After you’ve completed the configurations, your New Report screen should match Figure 3.
|
4. | Click Save and New to create the new CRM report and then create the next report.
|
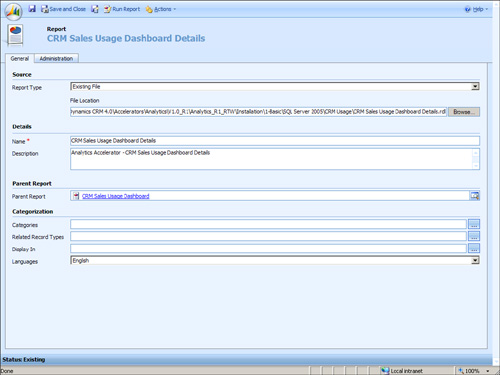
5. | Add the CRM Sales Usage Dashboard Details subreport and configure each field as follows:
- Report Type: Existing File
- File Location:
\Installation\1-Basic\SQL Server 2005\CRM Usage\ CRM Sales Usage
Dashboard Details.rdl (making sure the full path to your extracted files
exists)
- Name: CRM Sales Usage Dashboard Details
- Description: Analytics Accelerator - CRM Sales Usage Dashboard Details
- Parent Report: CRM Sales Usage Dashboard
- Categories: Blank
- Related Record Types: Blank
- Display In: Blank
- Administration Tab, Viewable By: Organization
After you’ve completed the configurations, your New Report screen should match Figure 4.
|
8. | Click Save and New to create the new CRM Report and then create the next report.
|
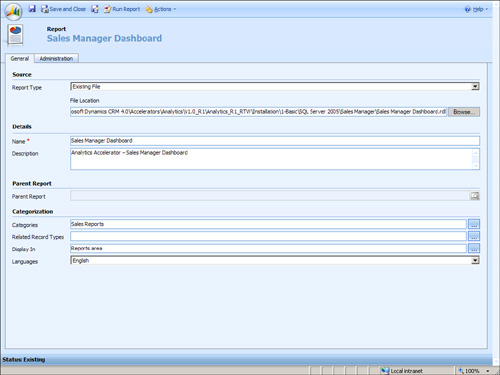
9. | Add the Sales Manager Dashboard report and configure each field as follows:
- Report Type: Existing File
- File Location:
\Installation\1-Basic\SQL Server 2005\Sales Manager\ Sales Manager
Dashboard.rdl (making sure the full path to your extracted files exists)
- Name: Sales Manager Dashboard
- Description: Analytics Accelerator - Sales Manager Dashboard
- Categories: Sales Reports
- Related Record Types: Blank
- Display In: Reports Area
- Administration Tab, Viewable By: Organization
After you’ve completed the configurations, your New Report screen should match Figure 5.
|
10. | Click Save and New to create the new CRM Report and then create the next report.
|
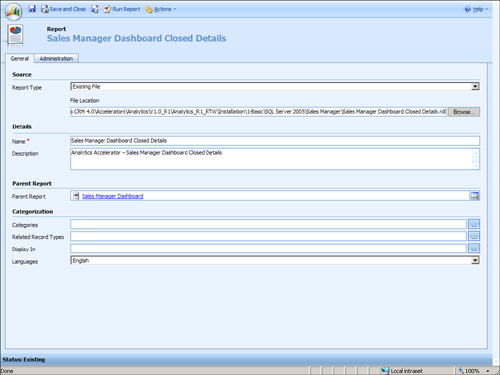
11. | Add the Sales Manager Dashboard Closed Details report and configure each field as follows:
- Report Type: Existing File
- File Location:
\Installation\1-Basic\SQL Server 2005\Sales Manager\ Sales Manager
Dashboard Closed Details.rdl (making sure the full path to your
extracted files exists)
- Name: Sales Manager Dashboard
- Description: Analytics Accelerator - Sales Manager Dashboard Closed Details
- Parent Report: Sales Manager Dashboard Closed Details
- Categories: Blank
- Related Record Types: Blank
- Display In: Blank
- Administration Tab, Viewable By: Organization
After you’ve completed the configurations, your New Report screen should match Figure 6.
|
12. | Click Save and New to create the new CRM Report, and then create the next report.
|
13. | Add the Sales Manager Dashboard Open Details report and configure each field as follows:
- Report Type: Existing File
- File Location:
\Installation\1-Basic\SQL Server 2005\Sales Manager\ Sales Manager
Dashboard Open Details.rdl (making sure the full path to your extracted
files exists)
- Name: Sales Manager Dashboard Open Details
- Description: Analytics Accelerator - Sales Manager Dashboard Open Details
- Parent Report: Sales Manager Dashboard
- Categories: Blank
- Related Record Types: Blank
- Display In: Blank
- Administration Tab, Viewable By: Organization
After you’ve completed the configurations, your New Report screen should match Figure 7.

|
14. | Click Save and New to create the new CRM Report and then create the next report.
|
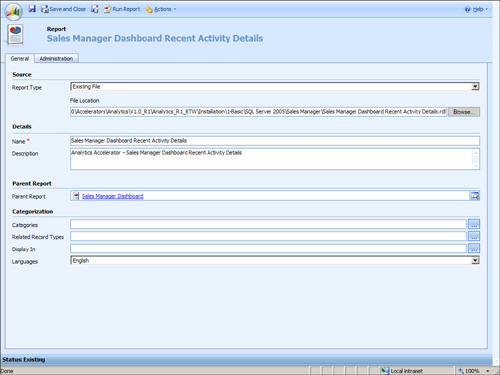
15. | Add the Sales Manager Dashboard Recent Activity Details report and configure each field as follows:
- Report Type: Existing File
- File Location:
\Installation\1-Basic\SQL Server 2005\Sales Manager\ Sales Manager
Dashboard Recent Activity Details.rdl (making sure the full path to your
extracted files exists)
- Name: Sales Manager Dashboard Recent Activity Details
- Description: Analytics Accelerator - Sales Manager Dashboard Recent Activity Details
- Parent Report: Sales Manager Dashboard
- Categories: Blank
- Related Record Types: Blank
- Display In: Blank
- Administration Tab, Viewable By: Organization
After you’ve completed the configurations, your New Report screen should match Figure 8.
|
16. | Click Save and New to create the new CRM Report and then create the next report.
|
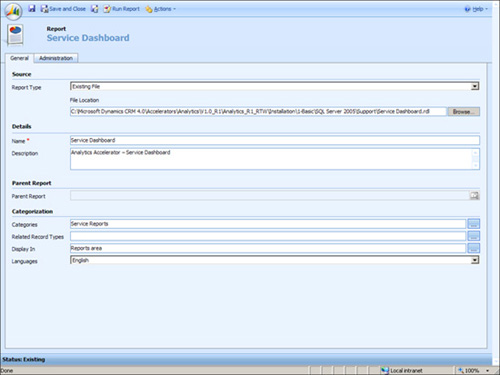
17. | Add the Service Dashboard report and configure each field as follows:
- Report Type: Existing File
- File Location: \Installation\1-Basic\SQL Server 2005\Support\Service Dashboard.rdl (making sure the full path to your extracted files exists)
- Name: Service Dashboard
- Description: Analytics Accelerator - Service Dashboard
- Categories: Service Reports
- Related Record Types: Blank
- Display In: Reports Area
- Administration Tab, Viewable By: Organization
After you’ve completed the configurations your New Report screen should match Figure 9.
|
18. | Click Save and New to create the new CRM Report and then create the next report.
|
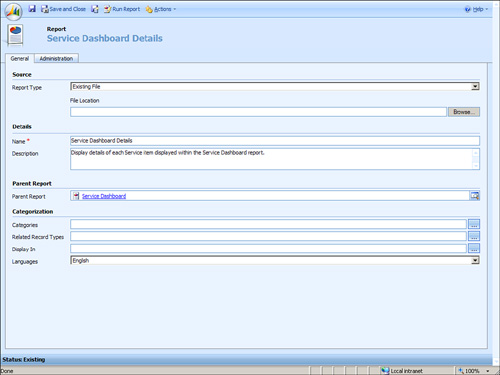
19. | Add the Service Dashboard Details report and configure each field as follows:
- Report Type: Existing File
- File Location:
\Installation\1-Basic\SQL Server 2005\Support\Service Dashboard
Details.rdl (making sure the full path to your extracted files exists)
- Name: Service Dashboard Details
- Description: Analytics Accelerator - Service Dashboard Details
- Parent Report: Service Dashboard
- Categories: Blank
- Related Record Types: Blank
- Display In: Blank
- Administration Tab, Viewable By: Organization
After you’ve completed the configurations, your New Report screen should match Figure 10.
|
20. | Click Save and Close to create the new CRM report and then close.
|
