Logo
programming4us
programming4us
programming4us
programming4us
Home
programming4us
XP
programming4us
Windows Vista
programming4us
Windows 7
programming4us
Windows Azure
programming4us
Windows Server
programming4us
Windows Phone
 
Windows Server

Securing Exchange Server 2010 with ISA Server : Monitoring ISA from the ISA Console (part 2)

- Free product key for windows 10
- Free Product Key for Microsoft office 365
- Malwarebytes Premium 3.7.1 Serial Keys (LifeTime) 2019
3/29/2011 11:30:03 AM

Monitoring Session and Services Activity

The Services tab, shown in Figure 5, allows for a quick-glance view of the ISA services, if they are running, and how long they have been up since last being restarted. The services can also be stopped and started from this tab.
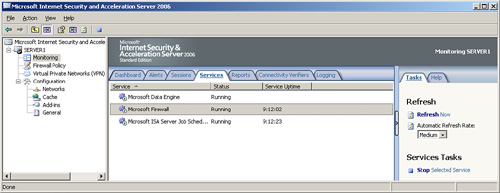
Figure 5. Monitoring ISA services.

The Sessions tab allows for more interaction, as individual unique sessions to the ISA server can be viewed and disconnected as necessary. For example, it might be necessary to disconnect any users who are on a VPN connection, if a change to the VPN policy has just been issued. This is because VPN clients that have already established a session with the ISA server are only subject to the laws of the VPN policy that was in effect when they originally logged on. To disconnect a session, right-click on the session, and choose Disconnect Session, as shown in Figure 6.
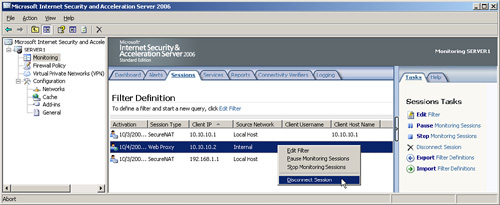
Figure 6. Disconnecting a session.

Creating Connectivity Verifiers

Connectivity verifiers can be a useful way of extending ISA’s capabilities to include monitoring of critical services within an environment, such as domain name system (DNS), Dynamic Host Configuration Protocol (DHCP), HTTP, or other custom services. Connectivity verifiers are essentially a quick-and-dirty approach to monitoring an environment with very little cost, as they take advantage of ISA’s alerting capabilities and the Dashboard to display the verifiers.

For example, the following step-by-step process illustrates setting up a connectivity verifier that checks the status of an internal SharePoint server:

1.
On the Monitoring tab of the ISA console, click the Connectivity tab of the details pane.

2.
On the Tasks tab of the tasks pane, click the Create New Connectivity Verifier link.

3.
Enter a name for the connectivity verifier, such as Web Server Verifier, and click Next.

4.
In the Connectivity Verification Details dialog box, enter the server FQDN, the group type (which simply determines how it is grouped on the Dashboard), and the type of verification method to use—in this case, an HTTP GET request, as shown in Figure 7.
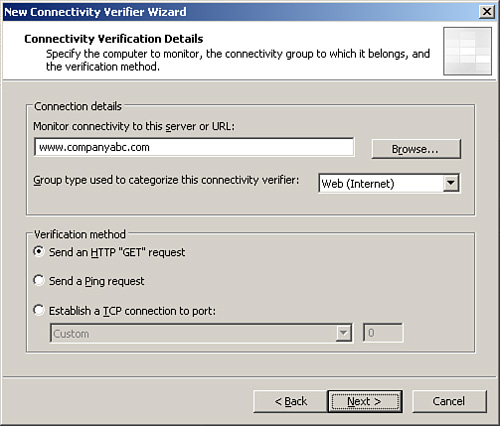
Figure 7. Configuring a SharePoint HTTP connectivity verifier.

5.
Click Finish.

6.
Click Yes when prompted to turn on the rule that allows ISA Server to connect via HTTP to selected servers.

7.
Click Apply and then click OK.

After being created, connectivity verifiers that fit into the major group types are reflected on the Dashboard. Creating multiple connectivity verifiers in each of the common group types can make the Dashboard a more effective monitoring tool.

Other -----------------
- Securing Exchange Server 2010 with ISA Server : Logging ISA Traffic
- Securing Exchange Server 2010 with ISA Server : Managing and Controlling Simple Mail Transfer Protocol (SMTP) Traffic
- BizTalk 2010 Recipes : Document Mapping - Calling Compiled Assemblies
- BizTalk 2010 Recipes : Document Mapping - Creating Functoid If-Then-Else Logic
- Windows Server 2008 Server Core : Managing Directory Services Using the WMIC NTDomain Alias
- Windows Server 2008 Server Core : Securing the System - Converting Event Trace Logs with the TraceRpt Utility
- Leveraging Social Networking Tools in SharePoint 2010 : Components of My Sites (part 2) - Using Bookmarklets
- Leveraging Social Networking Tools in SharePoint 2010 : Components of My Sites (part 1) - Creating and Exploring a My Site
- Leveraging Social Networking Tools in SharePoint 2010 : User Profile Job Review
- Leveraging Social Networking Tools in SharePoint 2010 : Mapping a SharePoint Profile Field to Active Directory
 
 
Top 10
- Microsoft Visio 2013 : Adding Structure to Your Diagrams - Finding containers and lists in Visio (part 2) - Wireframes,Legends
- Microsoft Visio 2013 : Adding Structure to Your Diagrams - Finding containers and lists in Visio (part 1) - Swimlanes
- Microsoft Visio 2013 : Adding Structure to Your Diagrams - Formatting and sizing lists
- Microsoft Visio 2013 : Adding Structure to Your Diagrams - Adding shapes to lists
- Microsoft Visio 2013 : Adding Structure to Your Diagrams - Sizing containers
- Microsoft Access 2010 : Control Properties and Why to Use Them (part 3) - The Other Properties of a Control
- Microsoft Access 2010 : Control Properties and Why to Use Them (part 2) - The Data Properties of a Control
- Microsoft Access 2010 : Control Properties and Why to Use Them (part 1) - The Format Properties of a Control
- Microsoft Access 2010 : Form Properties and Why Should You Use Them - Working with the Properties Window
- Microsoft Visio 2013 : Using the Organization Chart Wizard with new data
 
programming4us
Windows Vista
programming4us
Windows 7
programming4us
Windows Azure
programming4us
Windows Server