Using Broadcasts with Lmhosts
The broadcast
transmission method of NetBIOS name resolution by itself is suitable
only for small, single-segment networks, because broadcast transmissions
do not propagate beyond the boundaries of the LAN. However, it is
possible to use broadcasts in combination with an Lmhosts file to
provide a complete NetBIOS name resolution method for multi-segment
networks.
Tip
The
broadcast name resolution method requires no manual configuration or
administration. NetBIOS computers that you have not configured as WINS
clients use broadcasts to resolve names automatically. However, to
provide name resolution for NetBIOS computers on other networks, you
must create an Lmhosts file and deploy it on each NetBIOS computer. |
An Lmhosts file is a lookup table containing NetBIOS
names and their equivalent IP addresses. Because you have to create the
Lmhosts file manually, the easiest way to implement this solution is to
create a single file and deploy it on all the NetBIOS computers on your
network. To do this, you create the file and store it on a network share
that is accessible from all the NetBIOS computers. On each NetBIOS
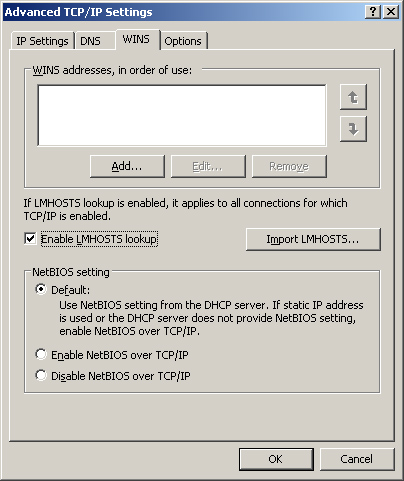
computer, you open the Advanced TCP/IP Settings dialog box in the
Internet Protocol (TCP/IP) Properties dialog box, click the WINS tab,
and select the Enable Lmhosts Lookup check box (see Figure 1). Then you click Import Lmhosts and browse to the file you created, to copy it to the computer.
Once
you have completed this procedure, the computer will use the broadcast
method to resolve NetBIOS names, and if this method fails, it will try
to look up the name in the Lmhosts file. If the computer does not find
the name in the Lmhosts file, name resolution fails.
Creating an Lmhosts File
Creating an Lmhosts
file is largely a matter of typing the NetBIOS names and IP addresses of
the computers on your network that clients must be able to access.
There are some additional options that increase the efficiency of the
file. In most cases, the use of Lmhosts files is practical only when
clients require access to a few key servers on other networks. Creating
and maintaining an Lmhosts file that contains entries for all the
computers on the network can be an administrative nightmare that is
easily avoided by installing WINS servers.
Lmhosts is a text file that you can create using Windows Notepad or any text editor and save to the %Systemroot%\System32\Drivers\Etc
folder of a computer running Windows. The basic entries of the Lmhosts
file consist of an IP address followed by at least one space, and then
the NetBIOS name associated with that address. Following the NetBIOS
name and separated by at least one more space, you can insert a pound
(#) symbol and type a comment. The system ignores everything on that
line after the pound symbol when processing the file. Each entry must
appear on a separate line, as shown in the following example:
192.168.5.65         Hrserver          #Human Resources server
192.168.9.34         Fservel           #File server 1
192.168.2.110        Smtp              #Internet e-mail server
In
addition to the standard name-to-address mappings, Lmhosts also
supports a number of extensions that can increase the efficiency of name
resolution and simplify the deployment of Lmhosts files. These
extensions are as follows:
#PRE Preloads Lmhosts entries into the computer’s NetBIOS name cache
#DOM:domain Associates the entry with the domain specified by the domain variable
#INCLUDE pathname Causes the system to locate and parse an Lmhosts file at a remote location, identified by pathname, as if it were local
#BEGIN_ALTERNATE and #END_ALTERNATE
Surrounds a group of #INCLUDE extensions, causing the system to process
each statement in turn until it locates one of the included Lmhosts
files successfully
\Onn Allows the use of non-printing characters in NetBIOS name entries
Using the #PRE Extension
The most useful of these extensions, as far as the efficiency of
NetBIOS name resolution is concerned, is the #PRE tag. When this
extension is added to any standard Lmhosts entry, after the NetBIOS name
and before any comments (separated by at least one space), the computer
reads the entry during system startup and loads it into memory as part
of the NetBIOS name cache. As a result, the computer can resolve the
name immediately, using the information stored in memory without having
to perform a broadcast name resolution or search the Lmhosts file on
disk. An example of the #PRE extension follows:
192.168.9.34 Fservel #PRE #File server 1
Using the #INCLUDE Extension
The #INCLUDE extension can simplify the process of deploying Lmhosts
files. Rather than create and maintain a separate file for each NetBIOS
computer, you can create a single Lmhosts file and store it on a network
share that is accessible to all clients. For each computer, you then
create an Lmhosts file that contains an #INCLUDE entry specifying the
location of the common Lmhosts file on the network, as follows:
#INCLUDE \\Fserve1\Admin\Lmhosts
You
use standard Universal Naming Convention (UNC) notation for the path
name specifying the location of the common Lmhosts file. However, it is
important to remember that the computer must have a way to resolve the
NetBIOS name of the server hosting the common file (in this case
Fserve1). The best way to ensure this is to create a #PRE entry for that
server’s name in each computer’s Lmhosts file. The #PRE entry should
precede the #INCLUDE statement so that the name is already in the
NetBIOS name cache when the system processes the #INCLUDE. In addition,
for the computer to be able to access the common Lmhosts file, you must
add the name of the share where the common Lmhosts file is stored (in
this case \Admin) to the list of shares in the
HKEY_LOCAL_MACHINE\SYSTEM\CurrentControlSet\Services\Lanman-server\Parameters\Nullsessionshares
registry key on the server.
You can also
maintain multiple common Lmhosts files on various network shares, for
fault tolerance, configuring your NetBIOS clients to access each share
in turn until it successfully accesses a file. An example of this
technique follows:
#BEGIN_ALTERNATE
#INCLUDE \\Fserve1\Admin\Lmhosts
#INCLUDE \\Fserv2\Admin\Lmhosts
#END_ALTERNATE
Deploying WINS Servers
In most cases, if
your network has a continuing commitment to NetBIOS, it is much easier
to install WINS servers than it is to create and maintain Lmhosts files.
The WINS service on a computer running Windows Server 2003 is capable
of registering and resolving NetBIOS names immediately after
installation. Once you have installed the WINS servers, you configure
the WINS clients on your NetBIOS computers to use them.
Off the Record
When
a client computer starts, it transmits its NetBIOS name to its
designated WINS server along with its IP address, and the server
automatically creates a record for that computer in its database. This
process is called name registration. Once the computer has registered its NetBIOS name with WINS, any other WINS client on the network can resolve that name. |
A single WINS server
can provide name resolution services for up to 10,000 clients. However,
as with DNS, you should always install multiple WINS servers to provide
fault tolerance and load balancing. Although WINS servers require no
configuration to register and resolve names, you do have to configure
them manually to replicate their databases. When you have multiple WINS
servers on your network, and you divide your NetBIOS clients among them,
each server has its own separate database. To enable each WINS server
to resolve any NetBIOS name on the network, you must configure all the
WINS servers to replicate their databases with each other.
Configuring WINS Replication
WINS servers can
replicate their databases by pushing data to or pulling data from other
servers, or both. When you configure a WINS server as a push partner,
the server sends messages to all its pull partners whenever the
database changes. The pull partners then respond by requesting an
update, and the push partner transmits any new database records. A WINS
server that you configure as a pull partner
issues requests to its push partners for database records with version
numbers higher than the last record it received during the previous
replication.
Planning
The
basic difference between push and pull partnerships is that push
partners trigger replication events when a specific number of database
changes have occurred, while pull partners initiate replication
according to a predetermined schedule. Therefore, a push partnership is
preferable when you connect the WINS servers by a fast link and don’t
mind if replication occurs at any time. Pull partnerships are preferable
for servers connected by slower links, such as WAN connections, because
you can schedule replication to occur during off hours, when traffic is
low. |
Because the records on
any WINS server can change, it is important for each server to replicate
its data to all the other servers. This way, every WINS server has a
complete listing of the NetBIOS computers on the network. For the
replication process to function properly, you must configure each WINS
server to be both a push and a pull partner, but the two partnerships
don’t necessarily have to be with the same server.
Obviously, if you
have only two WINS servers on your network, they must be partners with
each other. You configure each server to be a push/pull partner with the
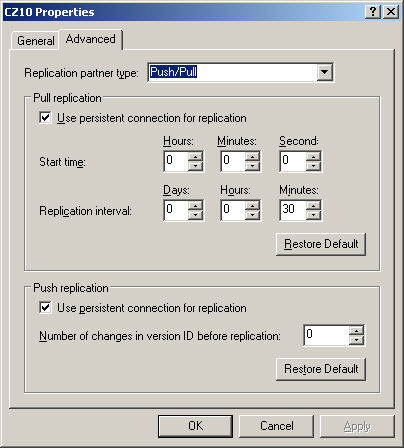
other in the WINS console. After creating the replication partner, you
click the Advanced tab in that partner’s Properties dialog box, shown in
Figure 2.
For the pull partnership, you specify when the pull replication should
occur and the interval between pull replications. For the push
partnership, you specify the number of updates to the WINS database that
must occur before the next replication event.
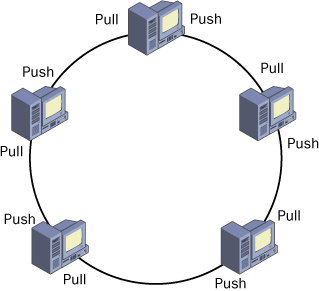
When you have more than
two WINS servers on your network, you have greater flexibility in
designing your replication topology. When all the WINS servers are
connected by fast links, such as LAN connections, one common solution is
to configure them in the form of a ring, with each server acting as the
push partner to its downstream neighbor and the pull partner to its
upstream neighbor, as shown in Figure 3.
To configure the replication for this topology, you create two
partnerships on each WINS server, making one a push partner and one a
pull partner.
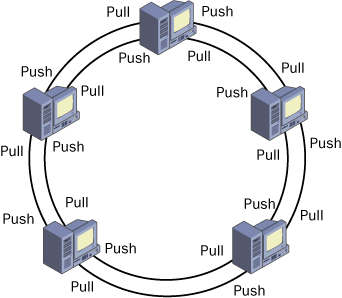
One problem with
this topology is that a failure of any one connection between two WINS
servers prevents all the servers from being updated properly. To address
this problem, you can create redundant partnerships, traveling in the
other direction, to form a double ring topology, as shown in Figure 4. The only additional cost is the amount of network traffic generated by the replication process.
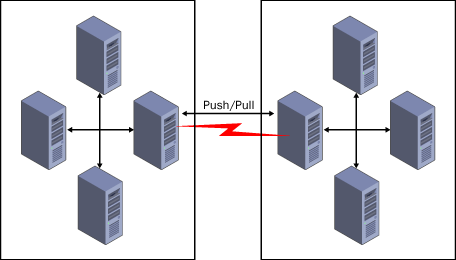
If
your network consists of multiple sites connected by WAN links, you
probably want to minimize the WINS replication traffic passing over
those links. The strategy for this is to create only a single push/pull
partnership over each link, with replication scheduled to occur during
low-traffic hours. For example, in Figure 5,
the WINS servers at each site all replicate among themselves, using
high-speed LAN connections. The administrator then chooses one server at
each site to partner a server at the other site. This way, only one
connection uses the WAN link, instead of two or more.
