Let’s now look in detail at the various site-level
administrative tasks you can perform on IIS. How to manage Web sites or
virtual servers created using the WWW service is covered first, followed
by sections about FTP sites and SMTP and NNTP virtual servers.
You’ve already
briefly examined the configuration items used at the site level for
administering individual Web sites, and you’ll now see the various tabs
and their settings in detail. The Default Web Site is the one configured
in this section.
Note
A Server Extensions 2002
tab is also present if FrontPage extensions are configured on the Web
site.
Web Site Tab
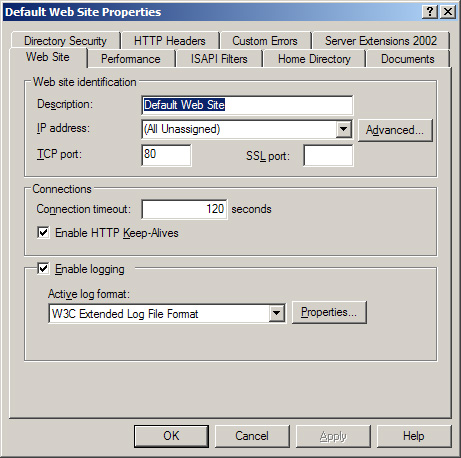
The Web Site tab of the Properties page, shown in Figure 1,
allows you to specify Web site identities, configure a connection
timeout, enable or disable HTTP Keep-Alives, and enable IIS logging on
your server. Let’s examine how to assign identities to Web sites first.

Web Site Identification
Each
Web site hosted on an IIS machine must have a unique identity so that
browser clients can connect to it to download its content. Web sites are
defined using three parameters: IP address, TCP port number, and host
header name.
The identity for a Web site
is specified on the Web Site tab of the Properties window for the
particular Web site under consideration. For Web sites on the same
machine to have unique identities, they must differ from each other in
at least one of the three parameters just mentioned. Let’s look at some
different ways of specifying Web site identities by considering how to
host several different Web sites on the same server.
Configuring Multiple IP Addresses on the Server’s Network Card
You can configure
multiple IP addresses on the server’s network card or install multiple
network cards, each with a different IP address. Select a different IP
address for each Web site. Leave each site’s Transmission Control
Protocol (TCP) port set to 80 (the default TCP port for HTTP), and don’t
configure host header names. The advantage here is that clients can
connect easily to each site by using the site’s IP address in the URL
they request (or by using a fully qualified DNS name if a unique host
name has been configured on the DNS server for each of the IIS machine’s
IP addresses).
Configuring Only One IP Address for the Server’s Network Card
The disadvantage is that
if many sites must be hosted on the machine, many IP addresses must be
obtained and assigned to it. This isn’t a problem on a private
internetwork when using one of the private IP address blocks such as
10.y.z.w, 172.16-31.z.w, or 192.168.z.w. On
servers directly connected to the Internet, however, you must obtain a
sufficient number of IP addresses from your Internet service provider.
Nevertheless, this method of specifying Web site identities is the
preferred and commonly used one.
Specify a different TCP
port (above 1023) for each Web site hosted on the machine. The main
disadvantage here is that clients must know the port number of the Web
site to which they want to connect. For example, if the DNS name of the
server is server.example.com and a Web site on the server is assigned
port 8023, the client has to use the URL http://server.example.com:8023 to access the site.
Configuring One IP Address and Leaving the TCP Port Set to Default
Configure only one IP
address for the server’s network card, and leave the TCP port set to the
default value of 80 for each site. Configure a unique host header name
for each site, using the Advanced button. Host header names are a
feature of HTTP 1.1, which is supported by IIS 6. The host header name
associated with each site is typically the fully qualified DNS name that
is assigned to the site in the database of an available DNS server (or
in the local Hosts file on the clients).
Note
When you open
the Properties window for the Default Web Site and select the Web Site
tab, the IP address is specified as (All Unassigned). This means that
this Web site responds to any IP addresses that aren’t specifically
assigned to other Web sites on the machine. That’s actually what makes
this site the Default one, and only one Web site on an IIS machine can
have its IP address specified this way.
When the client requests a URL such as http://sales.example.com, the client passes the host header name sales.example.com in the HTTP request headers that it sends to the server. The server parses the host
header name, identifies which Web site the client is requesting, and
returns the appropriate files. One disadvantage is that the client must
also support host header names—that is, the ability to pass the DNS name
of the site in its HTTP request headers. Host header names are
supported by Microsoft Internet Explorer 3 or later and by Netscape
Navigator 2 or later. Another disadvantage is that host header names
don’t work with Secure Sockets Layer (SSL) connections because the HTTP
session is encrypted.
If you’re working
with older browsers that don’t support host header names, you can
implement a cookie-based mechanism to enable the browsers to distinguish
between Web sites having the same IP address and TCP port number. See
the online documentation for more information about how to do this.
Connections
The
Web Site tab also allows you to enable or disable HTTP Keep-Alives and
specify a connection timeout value. HTTP Keep-Alives are a feature of
HTTP 1.1 that enables a client to keep open a TCP connection with a
server after downloading a file, in case other files need to be
immediately downloaded from the server. If clients start complaining
about the server being sluggish or that they’re frequently receiving
HTTP 500: Busy errors, try decreasing the connection timeout value so
that unused TCP connections time out more quickly.
Note
Connection timeouts
specified on the Web Site tab are for active TCP sessions. TCP has its
own settings for automatically terminating half-open TCP connections,
such as those created during a Denial of Service (DoS) attack that tries
to bring down a Web server by flooding its network connection with TCP
SYN packets.
IIS Logging
The Web Site tab also
allows you to enable IIS logging on your server. This feature is enabled
by default and allows administrators to monitor access to the site by
client browsers. Logging information can be saved in a variety of
formats, including the following:
Microsoft IIS Log Format This option creates a fixed-format ASCII file.
NCSA Common Log File Format
The National Center for Supercomputing Applications (NCSA) common log
file format option creates a space-delimited ASCII file with a
predetermined set of fields.
ODBC Logging
This option logs IIS traffic to any Open Database Connectivity
(ODBC)–compliant database using the specified data source name (DSN) for
the database.
W3C Extended Log File Format
The World Wide Web Consortium (W3C) extended log file format option is
the default value. It creates a space-delimited ASCII file with a group
of fields that the administrator can specify.
New IIS logs can be
created hourly, daily, weekly, or monthly, or when the existing log file
grows to a specified size. Logs are stored by default in the
\%WinDir%\System32\LogFiles folder, but you can use the Properties
button to modify this setting. Note that the older Microsoft IIS Log
File Format (supported under IIS 4, but not under IIS 5) has made a
triumphant return.
Note
Enabling
IIS logging on the Web Site tab doesn’t actually mean that visits to
all parts of your site are logged. In the Web site’s dialog box, you can
select the Log Visits check box on the Home Directory tab to enable or
disable the logging of access to content located in the site’s home
directory. On other tabs, you can similarly track visits to other
directories or even individual files.
Performance Tab
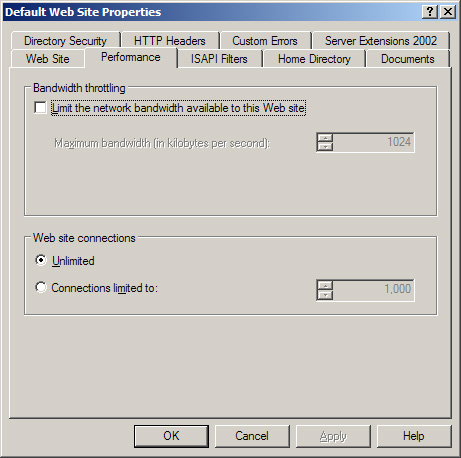
You can tune performance for individual Web sites using the Performance tab of the site’s Properties page, shown in Figure 2. On this tab you can configure the following settings:
Bandwidth throttling
You can turn on and specify a limit if you want to limit a Web site’s
bandwidth to a certain range. This is useful in a situation in which
certain sites have lower priority than others, such as when you want
employee personal pages to have lower priority than the online catalog
for your company.
Web site connections You can limit the active connections count to a specific number or leave it as Unlimited.

ISAPI Filters Tab
Internet Server
Application Programming Interface (ISAPI) filters are optional
dynamic-link libraries (DLLs) that perform specific actions when IIS
processes an HTTP request from a client. You can use the ISAPI Filters
tab to install a series of these filters and specify the order in which
IIS processes them. Filters installed here at the site level are used
only by the selected site; filters installed at the server level apply
to all sites on the server.
ISAPI
filters perform their action before the server actually responds to the
HTTP request itself. For example, you can design an ISAPI filter to
perform custom authentication, encrypt data, write traffic information
to a custom log file, or perform some other action.