One of the options in RRAS is the Basic
Firewall. The Basic Firewall is a stateful firewall that can be enabled
for any public interface, including an interface used to provide NAT.
The Basic Firewall cannot be configured for the private interface of an
RRAS server. Static packet filters can be configured.
To configure the Basic Firewall, you must enable
RRAS and select the Basic Firewall service, configure firewall
properties, and then configure inbound and outbound filters. The
following instructions for configuring the firewall assume that RRAS has
already been enabled.
To enable RRAS and select the Basic Firewall
service, begin by opening the Routing and Remote Access console.
Right-click the server and select Enable Routing and Remote Access.
Click Next. Select "Custom configuration" and click Next. Click NAT and
Basic Firewall, then click Next, followed by Finish.
When prompted, click Yes to start the service. In
the console, expand the IP Routing node. Right-click NAT/Basic Firewall
and select New Interface. Select a public (external interface) and click
OK to open the Network Address Translation Properties page. Select the
NAT/Basic Firewall tab and select "Public interface connected to the
Internet." Select the "Enable a basic firewall on this interface"
checkbox, as shown in Figure 1.
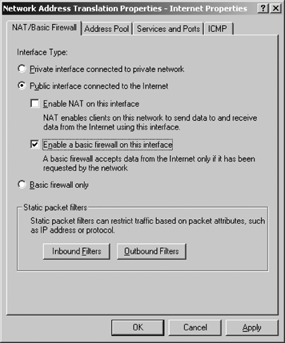
Click "Basic firewall only." Configure the
firewall properties and any static filters. Then click OK when you have
finished; this will return you to the RRAS console.
To configure firewall properties, right-click on
the NAT/Basic Firewall node and select Properties. Select the General
tab, and then configure event logging by selecting among the choices
shown in Figure 2.

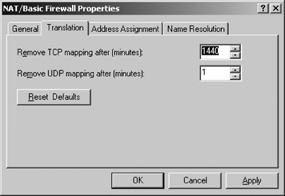
Click the Translation tab as shown in Figure 3
and adjust the mapping after minutes. Mapping after minutes indicate
the duration of any TCP and/or UDP mapping. When outbound traffic uses
the firewall interface, information is added to a table so that the
firewall can accept inbound responses to this traffic. These mappings
should be removed if not active.
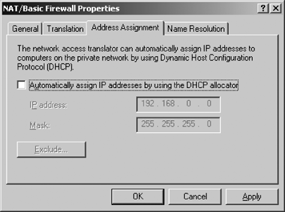
If NAT is also configured on the page displayed
from the General tab and a DHCP server will not be used to allocated
addresses, click the Address Assignment tab as shown in Figure 4 to configure a range of addresses for the DHCP allocator to use.
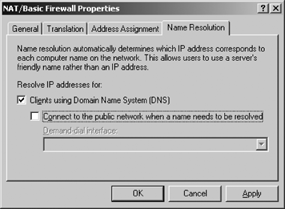
If services on the local, private network are accessible from the private network, select the Name Resolution tab as shown in Figure 5 and make the selection to allow clients to use DNS for name resolution.
When you have finished configuring the firewall service, click OK to
close the Properties pages of the firewall and return to the RRAS
console.
Next, configure the firewall interface. Select the
NAT/Basic Firewall node. In the details pane of the console,
right-click the interface and select Properties. Select the Address Pool
tab as shown in Figure 6.
This address pool is used if your ISP assigns multiple addresses. Each
address can be used by any connection, or it can be reserved for use by a
particular service.
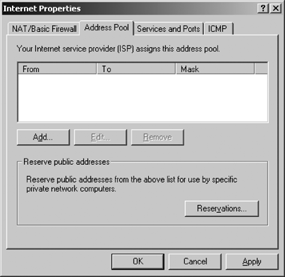
Click the Add button to add IP addresses assigned
to the interface. These addresses are usually assigned by your ISP. Add
the start address, mask, and end address, then click OK. Click the
Reservations button to add addresses from this range for a specific
computer on the private network. The reservation matches a public IP
address with a private internal address. Click the Add button. In the
Add Reservations box shown in Figure 7, enter the public IP address and the corresponding IP address of the computer that the reservation should be used for.
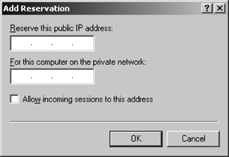
If incoming traffic to this address is allowed,
check the "Allow incoming sessions to this address" box and then click
OK. Click OK twice to return to the Properties page. Select the Services
and Ports tab as shown in Figure 8.
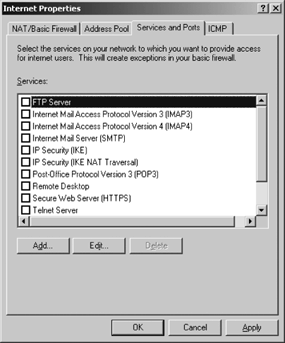
Select a service that is provided on the private
network that is accessible to the public network. Click the Edit button.
In the Edit Service page shown in Figure 9,
select either "On this interface," or "On this address pool entry." If
the address pool entry selection is made, enter the IP address.
Enter the "Private address." If additional
services are required and are present in the list, click on the Services
and Ports tab to repeat the process.
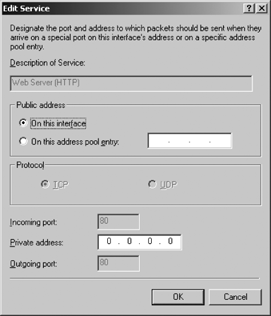
If the service you need is not present, you can
define it by clicking the Add button and using the Add Service page to
add the incoming and outgoing ports and the private address.
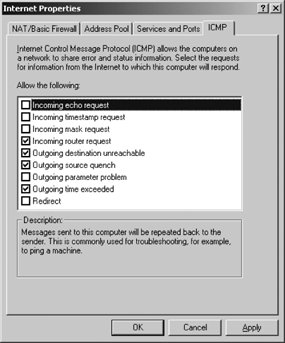
Select the ICMP tab, as shown in Figure 10. Select any additional ICMP messages that are allowed. The four messages that are selected in Figure 9-34 are the defaults.
Click OK to close the Properties page.
Starting the RRAS Basic Firewall creates a
stateful firewall. The firewall blocks all unsolicited traffic. To allow
access to services such as web servers, use the interface Properties
pages as just described. To allow other inbound traffic, or to block
outbound traffic, you must configure protocol filters
.
To configure inbound and/or outbound static
filters, right-click the NAT/Basic Firewall node and select Properties.
Click the NAT/Basic Firewall tab, and then click the Inbound Filters or
the Outbound Filters button. Configure the required static filters.
The RRAS basic firewall can be used to
provide basic perimeter firewall services. It is simple to configure.
One of the steps in its configuration is the setting of inbound and/or
outbound static protocol filters. You don't have to configure the RRAS
firewall, however, to take advantage of static filters. They can be set
directly on the network connection using RRAS remote access policies,
IPSec filters, and TCP/IP
.
