Sharing a folder makes it visible and accessible to
the users and groups that have been granted share-level permissions
across the network. Share-level permissions are different from NTFS
permissions. NTFS permissions are rooted in the file system, while share
permissions provide for network accessibility to a folder. When you
implement folder sharing, you will also set permissions for each of the
shares that are created in your network.
1. Create a Shared Folder
When you are ready to start making folders available across your network, you will need to do the following:
Locate the desired folder.
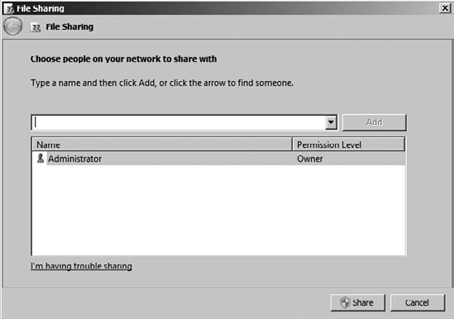
Click Share. The File Sharing dialog box will open (see Figure 1).
Type in the name of the user or group with whom the folder will be shared, and click Add.
By default the user permissions will be assigned as Read unless you change them to Read/Write.
Set the desired permission level.
Click the Share button.
Notice that the network path to the share is displayed.

Once a folder is
shared, it becomes accessible from other network locations. The
permissions on the share provide some degree of control on the level of
access to the folder.
Share permissions are
implemented with either an Allow or Deny option. The levels of
permission are Full Control, Change, and Read.
2. Implement Advanced Sharing
To implement advanced sharing, follow these steps:
Locate the desired folder.
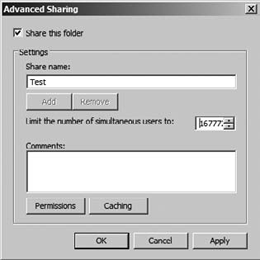
Click the Advanced Sharing button. The Advanced Sharing dialog box will open (see Figure 2).
At
this point, you have the option to select the box to share the folder.
One of the great features of using advanced sharing is the ability to
limit the number of simultaneous users on a shared folder. You will
notice that by default "only" 16,777,216 users can connect to this
share. That seems a little high to us. Change that to a number that is
appropriate for your share.
Click the Permissions button.
Click Add to include users or groups for permissions to this share.
Click OK to close the Permissions dialog box.
Click OK to close the Advanced Sharing dialog box.

We know you saw that extra
button labeled Caching and wondered why it was there. In short, caching
can make the share available to users when they are not actually
connected to the network.
3. Resolve Permission Conflicts
When you implement shared
folders from an NTFS file system, there are two different permissions
that are going to be applied to each user or group that attempts access
to the folder. If these two types of permissions are complementary,
meaning that they are both set to allow the same level of access, then
there are no real issues to address. However, if there is a difference
in the level of permissions assigned, then the level of access will be
limited.
When resolving disparate permissions in shared NTFS folders, a couple of simple rules make this process easy to understand:
Rule 1: Deny permissions always override Allow permissions.
Rule 2: When the share and NTFS permissions are different from one another, the most restrictive permission will be applied.
Let's say you had a shared
folder that had a test user who was assigned Read permissions to the
share. The same test user is also assigned Write permissions to the NTFS
folder. The two permissions are not complementary, so the most
restrictive takes precedent. The user would have an effective permission
of Read.
Let's say that test user 2 has
Full Control permission on the same share and has been denied Read
access on the NTFS folder. These permissions are definitely not
complementary, and the Deny permission would override Allow Full
Control. The effective permission would be Deny Read.
These two simple rules will
suffice to handle the vast majority of cases in which permissions are
not complementary between NTFS and shared folders. The recommendation is
that you plan as you assign permissions to folders in NTFS and folder
shares.