Creating a File Screen Template
Windows Server 2008 R2
provides several functional file screen templates, but when customized
file screens are required, administrators can create new file screen
templates. A file screen template includes file groups, screening
policies, and notification settings:
File groups— The administrator can define the file types into groups, such as Office 2007 file groups containing *.docx Microsoft Word files and *.xlsx Microsoft Excel files.
Active screening and passive screening—
An active screen does not enable a user to save file types by design,
whereas a passive screen allows the file type, but it is logged for
monitoring and reporting functionality.
Notifications—
When a user attempts to save a file that matches the file screen
designation, a notification can be generated. The notification can be
the automatic generation of an email warning or event log, a script can
be executed, and a report can be generated and sent out immediately.
To create a new file screen template, perform the following steps:
1. | Open the File Server Resource Manager and expand it.
|
2. | Double-click File Screening Management.
|
3. | Select File Screen Templates. In the Actions pane, click Create File Screen Template.
|
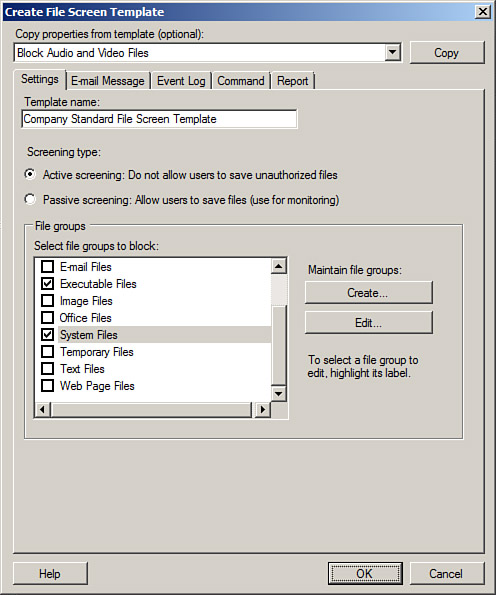
4. | In the Create File Screen Template window, enter a name for the template—for example, Company Standard File Screen Template.
|
5. | Select the Active Screening option button.
|
6. | In the File Group section, check the boxes next to the following file groups:
Audio and Video Files Backup Files Executable Files System Files
|
7. | Configure the notification settings on the E-mail, Event Log, Command, and Report tabs, as required.
|
8. | On the Settings tab, review the configuration, and click OK to create the new file screen, as shown in Figure 6.
|
The new file screen template can now be used to create a new file screen.
Note
It
is important to note that file screens are based on the filename or
filename extensions defined within the file groups applied to the file
screen. A savvy end user can simply rename a screened file to bypass the
file screen, but Windows Server 2008 R2 has the ability to detect some
files by their characteristics and not necessarily by the file extension
name, so extended testing should be performed when very strict file
screening enforcement is required to ensure the highest level of
reliability.
File Screen Exceptions
In many cases, as with
quotas, file screen standards can be created and applied to server
storage, but certain file types might be required or certain users might
require storage of blocked file types. In these cases, file screen
exceptions can be created and applied to subfolders of a file-screened
parent folder. For example, in the previous example, a template was
created to block executables but a file screen exception could be
created to allow executable files in a subfolder. Of course, the
subfolder should be secured by NTFS permissions to limit who can save
these types of files to the folder.
Generating Storage Reports with FSRM
The File Server Resource
Manager provides the ability to create or automatically generate reports
for quota and file screen activity. The various reports that can be
generated include the following:
Generating Reports in Real Time
Reports can be generated on a
real-time basis to view the file storage information on demand. To
generate a report, right-click the Storage Reports Management node of
the FSRM utility, and choose Generate Reports Now. Then do the
following:
1. | Click on the Add button to define the scope of the volumes or folders that the report will be based on (for example E:\UserShares) and click OK to return to the Storage Report Task Properties window.
|
2. | Choose which report or reports will be generated by checking the check box for the particular report type.
|
3. | Choose
the report format for the new report (for example, the default option
of DHTML) by checking the appropriate check box in the Report Formats
section of the window.
|
4. | Click OK when the report options are configured.
|
5. | A
new window opens, prompting you to decide to wait for the report to
generate and automatically display the report or to generate the report
in the background and store it in the default report location. Select
the Wait for Reports to be Generated and Then Display Them option and
click OK.
|
6. | Each report will be displayed in a separate browser window or tab; close or save the reports as desired.
|
Scheduling Reports to Be Generated on a Regular Basis
Reports can be generated
on a regular basis (such as weekly or monthly), typically for the
purpose of reporting file storage information to management. To schedule
a report, right-click the Storage Reports Management node of the FSRM
utility, and choose Schedule a New Report Task. Then do the following:
1. | Click on the Add button to choose the volume or file share that you want to generate a report, such as R:\UserShares.
|
2. | Choose which report or reports will be generated; by default, all reports will be selected except the Files by Property report.
|
3. | Choose the report format you want to use—for example, the default option of DHTML.
|
4. | Select the Delivery tab if the report should be emailed as well as stored in the global StorageReports folder.
|
5. | Select
the Schedule tab, and click the Create Schedule button to create a
schedule for the automated report generation. Click OK when the desired
schedule or schedules are defined.
|
6. | Click OK when you are finished.
|
The report or reports
specified will be generated at the scheduled intervals and any email
addresses specified on the Delivery tab will have the reports emailed to
them when the reports are generated. The scheduled report will be
listed in the tasks pane when the Storage Reports Management node is
selected. The scheduled report can be generated at will by
right-clicking on the scheduled report and selecting Run Report Task
Now.
File Classification Management
Windows Server 2008 R2 FSRM includes a new feature called file
classification, based on the new File Classification Infrastructure or
FCI. File classification allows an organization to define properties and
rules that will add specific file properties to better define the
characteristics of the classified files. File classification properties
are supported on a Windows Server 2008 R2 NTFS partition and the file
classification properties
will follow Microsoft Office 2007 files and SharePoint files when moved
around. All other files that are classified will have their properties
stored within the NTFS volume they are hosted on, but if the files are
moved to other Windows Server 2008 R2 NTFS volumes, these properties
will follow the files.
File classification in
Windows Server 2008 R2 is the first release of this feature and is sure
to be more and more valuable as third-party Microsoft partners and
independent software vendors extend the functionality included with the
default framework provided. Currently, out of the box, Microsoft Windows
Server 2008 R2 allows administrators to create file properties and
automatically classify files with these properties based on the file
location and, in some cases, based on the content stored within the
file. The steps to file classification include, first, enabling and
defining file properties that can be used for classification and,
second, creating classification rules that will actually classify files
according to the criteria defined within the rule, and properties and
values that are applied to this rule. Once files are classified, file
management tasks can be created to perform tasks upon classified files,
such as moving files to designated folders or performing custom tasks
such as running automated scripts to perform any number of tasks related
to the particular file classifications.
The best way to
understand file classification is to start defining file classification
properties, file classification rules, and file management tasks on data
that has been copied from a server share to an isolated lab server
running Windows Server 2008 R2. Once a file is classified and has
properties defined, these properties cannot be removed—they can only be
overwritten or merged with other properties, so performing any sort of
learning or testing on production data can result in undesired changes
that would require heavy manual work to reverse. To begin using the file
classification features of Windows Server 2008 R2, install the File
Server Resource Manager service and tool , then perform the steps outlined in the proceeding sections.
