Classification Properties
Classification properties
are used to categorize files to be used later for file management tasks
or reporting. A classification property, as included with Windows
Server 2008 R2, includes the following classification property types:
Yes/No Date-time Number Ordered List String Multichoice Multistring
To get a good
understanding of how classification can be used, this section and the
following sections provide an example of how classification can be used
to classify files based on content that includes the word password.
To do this, we will create a file property type of Yes/No and create a
classification rule to search the E:\ITDept folder for any files
containing the word and to classify these files as necessary. To perform
this task, we must first create the classification property. Perform
the following steps to create the classification property:
1. | Log on to a Windows Server 2008 R2 system with the FSRM service and tool installed, with an account with administrative rights.
| 2. | Click Start, click All Programs, click Administrative Tools, and select Server Manager.
| 3. | Expand
Roles, expand File Services, expand Share and Storage Management, and
double-click on the File Server Resource Manager node beneath it.
| 4. | Double-click Classification Management and select the Classification Properties node.
| 5. | In the Actions pane, click on the Create Property link to start the creation of the classification property.
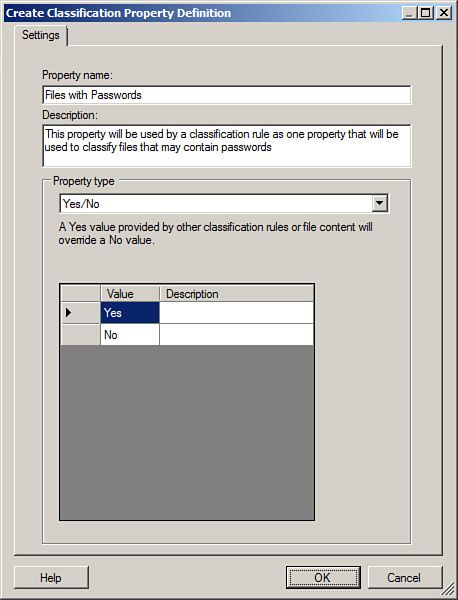
| 6. | In the Create Classification Property Definition window, type Files with Passwords in the Property name section, enter a description, and choose the Property type of Yes/No.
| 7. | In the Value section, enter a description as desired and click OK to create the classification property, as shown in Figure 7.
|
Once the new classification
property is created, we can create a classification rule that will use
this property to classify files that the rule determines to meet the
criteria.
Classification Rules
Once
the file administrator has created the necessary file classification
properties, they can proceed in creating classification rules that will
actually process and classify the files that meet the rule criteria, by
applying the necessary classification property values to the file
collections. To create a new classification rule, perform the following
steps:
1. | Log
on to the same Windows Server 2008 R2 system that the Files with
Passwords classification property was previously defined on, with an
account with administrative rights.
| 2. | Click Start, click All Programs, click Administrative Tools, and select Server Manager.
| 3. | Expand
Roles, expand File Services, expand Share and Storage Management, and
double-click on the File Server Resource Manager node beneath it.
| 4. | Double-click Classification Management and select the Classification Rules node.
| 5. | In the Actions pane, click on the Create a New Rule link to start the creation of a new classification rule.
| 6. | In the Classifications Rule Definitions window, type in the name of the rule as Classify files with passwords and enter a description.
| 7. | In
the Scope section of the page, click the Add button to define the
volumes and or folders that this classification rule will be applied to.
For our example, we will apply this rule to E:\ITDept. When the
location is specified, all subfolders will be included.
| 8. | Once
the name, description, and file locations are defined, click on the
Classification tab and select Content Classifier from the Classification
mechanism drop-down menu.
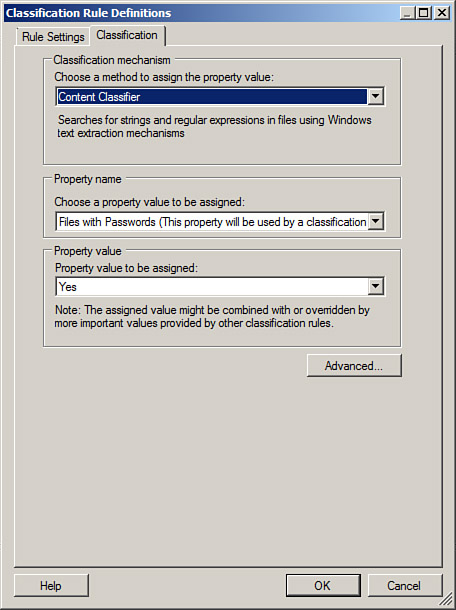
| 9. | In
the Property Name section, select the Files with Passwords property and
set the property value to be assigned as Yes, as shown in Figure 8.
| 10. | Click
the Advanced button to set the additional parameters that will actually
be used to determine if the files match the criteria and should be
classified with the property defined in this rule.
| 11. | In
the Additional Rule Parameters window, select the Additional
Classification Parameters tab. On this tab, administrators can define
three different types of criteria used to search with a files content.
These three types are as follows:
- RegularExpression— The
RegularExpression is the same as is used with .NET programming and can
be used to find complex or multiple types of data formats, for more
complex searches.
- String— The String type is used to find a very specific string, such as password that will not be dependent on the case of the string, although the string must be an exact match. For example, the string password will not match passwords, as that is a different string.
- StringCaseSensitive—
The StringCaseSensitive is the same as the string, in that the entire
string must be an exact match, but the case must match. For example, the
StringCaseSensitive string of Password will not match the string password.
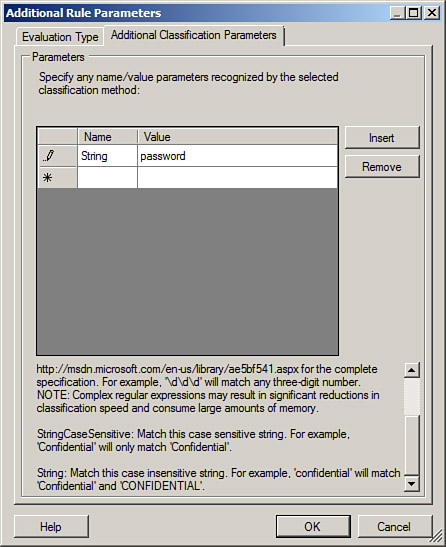
| 12. | For our example, we will specifically look for the word password and will not care about the case. In the Name section, type in String and in the value type in password, as shown in Figure 9. Click OK when completed.
| 13. | Back on the Classification Rule Definitions page, click OK to complete the rule creation.
|
Once the rule is created, it
can be scheduled or run manually. To run all of the rules manually, in
the tasks pane, right-click on the Classification Rules node and select
Run Classification with All Rules Now. Follow the steps to select the
type of report that will be generated and whether the administrator will
wait for the classification to complete and display the window or to
have the process run in the background. If a schedule or a manual run is
performed, any files that meet the properties of any enabled
classification rules will be classified, unless these files have been
previously classified.
File Management Tasks
File Management tasks is a new
feature within the FSRM console. File Management tasks can be run out of
the box on a Windows Server 2008 R2 system, to either expire classified
files that meet a certain criteria, by moving these files to a
designated folder location, or to perform a custom task. This can be a
handy tool to automatically move files that have not been accessed in an
extended period of time. Or, in the case of sensitive data, such as
files that might contain passwords, this tool can be used to create a
custom script to move the classified
files to a designated, secured folder, and leave a link or note in the
original location to instruct any users on how to regain access to that
file. Of course, this logic would need to be created by an administrator
because this functionality is not included out of the box. As an
example, to create a new File Management Task to move files that have
not been accessed in over a year, perform the following steps on a
Windows Server 2008 R2 system with the FSRM service and tool installed:
1. | Log on to a Windows Server 2008 R2 system with the FSRM service and tool installed, with an account with administrative rights.
| 2. | Click Start, click All Programs, click Administrative Tools, and select Server Manager.
| 3. | Expand
Roles, expand File Services, expand Share and Storage Management, and
double-click on the File Server Resource Manager node beneath it.
| 4. | Double-click File Management Tasks node beneath the File Server Resource Manager node.
| 5. | In the Actions pane, click the Create File Management Task link to start the process.
| 6. | In the Create File Management Task window, on the General tab, type in a task name of Move Data not accessed in 1 year and enter a description as desired.
| 7. | In the Scope section, click the Add button to locate and add the folder, folders, or volumes to this task.
| 8. | Click
on the Action tab and for action type, choose File Expiration, and in
the expiration directory, type or browse to a volume and folder location
to where the files that meet this criteria should be moved.
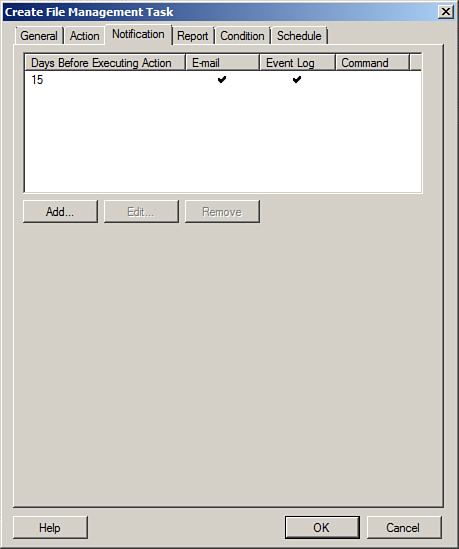
| 9. | Click
on the Notification tab and click the Add button to add notifications
to users and administrators so they can be notified of when particular
files will be considered expired and moved to the expiration directory,
as shown in Figure 10.
| 10. | Back
in the Create File Management Task window, click on the Condition tab
and check the Day Since File Was Last Accessed check box and enter a
value of 365.
| 11. | In
the Effective Starting section, enter the date that files will actually
begin expiration; this date should be more than the amount of days
included in any notification.
| 12. | Click
on the Schedule tab, click the Create button and create a new schedule.
Click OK until the windows are closed to complete the creation of the
file management task. Depending on the date chosen for the effective
date, a pop-up might open stating that the effective date must be pushed
forward to ensure that users are notified in advance before their data
is moved.
|
Once the task is completed, it
will run on the designated schedule and will begin notifying
administrators and users when files will be moved. One important point
to consider is that
once a file is expired and moved, there will be no indication of where
or when that file was moved when users go to the original location of
the expired file. Much more can be done with file management tasks,
including performing custom actions on files that have been previously
classified, and it is recommend that any organization wanting to
leverage this new File Classification Infrastructure test it thoroughly
on copied data in an isolated lab network.
|
