Installing Windows
Server 2008 R2 as the Host Operating System
The first step is to install
Windows Server 2008 R2 with Hyper-V as the host operating system. The
step-by-step guidance for the installation of the Windows operating
system . Typically, the installation of a Windows Server 2008 R2 to run
the Hyper-V role is a new clean server installation.
Running Server Manager
to Add the Hyper-V Role
After the base image of
Windows Server 2008 R2 has been installed. The basic tasks are as follows:
1. | Change
the server name to be a name that you want the virtual server to be.
|
2. | Configure the server to have a static IP address.
|
3. | Join the server to an Active Directory domain (assuming
the server will be part of a managed Active Directory environment with
centralized administration).
|
4. | Run Windows Update to confirm that all patches and
updates have been installed and applied to the server.
|
After these basic tasks have
been completed, the next step is to add the Hyper-V role to the server
system. Do the following to add the server role to the system:
1. | Make sure
you are logged on to the server with local Administrator or Domain
Admin privileges.
|
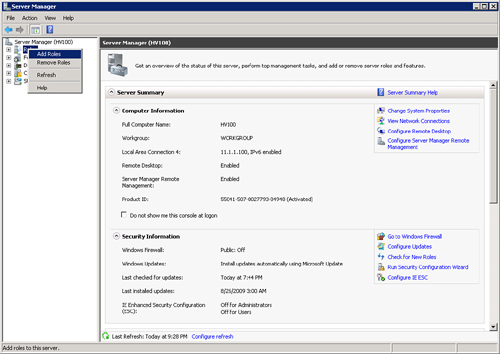
2. | Start the
Server Manager console if it is not already running on the system.
|
3. | Right-click on Roles in the left pane of the console,
and select Add Roles, as shown in Figure 1.
|
4. | After the
Add Roles Wizard loads, click Next to continue past the Welcome screen.
|
5. | On the Select Server Roles page, select the Hyper-V
role, and click Next.
Note
Hyper-V requires a supported
version of hardware-assisted virtualization. Both Intel VT and AMD-V
chipsets are supported by Hyper-V. In addition, virtualization must be
enabled in the BIOS. Check your server documentation for details on how
to enable this setting.
|
6. | On the
Hyper-V page, read the notes and information about the role; then click
Next.
|
7. | On the
Create Virtual Networks page, select the LAN adapter(s) you want to have
shared with guest sessions. Click Next to continue.
Note
It is recommended that you
reserve one network adapter for remote access to the host server. To
reserve a network, do not select it to be used as a virtual network.
|
8. | On the
Confirm Installation Selections page, review the selections made, and
then click Install.
|
9. | On the Installation Results page, review the results,
and click Close.
|
10. | When
prompted to restart the server, click Yes.
|
11. | After the server restarts, log on to the server with
local Administrator or Domain Admin privileges.
|
12. | After logging on, the installation and configuration
will continue for a few more moments. When complete, the Installation
Results page will be displayed. Review the results on the page and
confirm that the Windows Hyper-V role has been installed successfully.
Click Close.
|
Note
The server’s network
configuration will change when virtual networking is installed. When
network adapters are used in virtual networks, the physical network
adapter becomes a Microsoft virtual switch and a new virtual network
adapter will be created. By default, this virtual network adapter is
shared between the host and the guest VMs.
It is important to note that the
new virtual adapter will not inherit the old physical adapter’s IP
settings. It will become a DHCP client, which can be reconfigured to use
the old physical adapter’s configuration.
