6. Manage Zone Database Files
When you work with DNS, you
have many files to manage. Each DNS server may be responsible for many
different DNS zones. Each zone contains its own files and folders that
will require some degree of effort in order to create, maintain, update,
manage, and secure.
As you work with your DNS
environment, you will likely break down your forest into smaller
segments that in DNS are referred to as zones.
If the records in your DNS zone database are designed to allow the
resolution of a name to an IP address, you would say the zone is working forward, and the zone database type you would create is called a forward lookup zone.
If your object is to provide an option for the finding of names based
on a provided IP address, then you would say your zone is working in reverse, or you would create a reverse lookup zone.
What if you wanted a DNS server that only resolved the names of other
authoritative DNS servers in your environment? You would create a stub zone to serve your purposes.
Each of the different zone
types serves a particular purpose in DNS. You will likely want more than
one server for each zone in order to maximize availability to your
clients and to add some degree of fault tolerance to your network.
6.1. Creating a Forward Lookup Zone
As you learned earlier, when
you install DNS as part of Active Directory, the appropriate forward
lookup zones for the domain are created automatically. If you choose to
add zones or if you are not using DNS as an integrated part of Active
Directory, you will use DNS Manager to create and manage forward lookup
zones. Not all forward lookup zones are created equally; there are
actually three different types, called primary zones, secondary zones, and stub zones.
Primary zones are zones that
are created and stored on the local server. They can be updated and
maintained directly on the server and can also receive replicated
updates from other servers.
Secondary zones are zones that
are stored on the local server; however, all of their information comes
from updates received from another designated primary server. Secondary
servers are a good way to help share the workload that might otherwise
be forced onto a standard primary server.
Stub zones create a copy of
only the name server records for a given zone. This zone type is useful
in helping clients find and query the appropriate internal DNS name
server.
To create a new forward lookup zone, follow these steps:
Right-click the name of the server.
Click Next in the Welcome To The New Zone Wizard.
Select the type of zone you want to create.
Choose
whether you want the zone stored in Active Directory by selecting the
box at the bottom of the Zone Type screen, as shown in Figure 7.
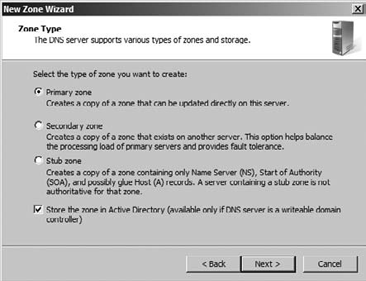
Depending on what type of
zone you choose, the wizard will offer you the appropriate options from
this point forward, including options for replication, zone name, and
the types of updates you will allow.
6.2. Changing the Zone Type
One of the nice things
about DNS zones is that they are pretty flexible. If you needed, you
could actually change a primary zone to a secondary or stub zone, or
vice versa. Usually you would do something like this if you were doing
maintenance on a server and wanted to limit the effect on DNS or the
clients that rely on DNS services. Changing the zone type is a simple
procedure:
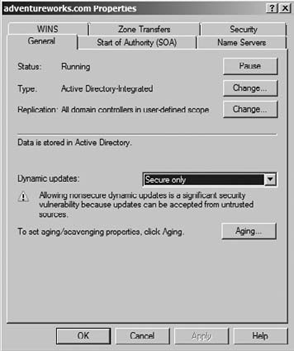
Find the chosen zone, and right-click it.
Next to Type on the General tab, as shown in Figure 8, click Change.
Select the new zone type, and click OK.

6.3. Managing Resource Records
DNS zones contain
resource records of various types. These records are created as you
create DNS servers, clients, services, and applications. Generally
speaking, once a resource record has been created, there is not much you
need to do to maintain these records. You may want to change the DACL
security permissions if your resource records are part of Active
Directory, or you may need to modify a record or even delete one.
You can manage records in the DNS zone using DNS Manager or dnscmd. You simply need to find the resource record in the designated zone.
If you are interested in changing the DACL for a resource record, follow these steps:
Locate the zone that contains the resource record.
Right-click the resource record.
Edit the permission to the resource record, and click OK.
If you want to delete the
record, simply right-click the record, and choose Delete. When the
message appears asking for confirmation to delete the record, simply
click OK.
6.4. Configuring Dynamic Update
When you work with DNS
servers, it is ideal to have them update one another with their
information. Windows Server 2008 R2 allows the use of dynamic updates
between configured DNS servers. This really eliminates the need for you
to spend your valuable time administering zone databases. Clients who
use DHCP can easily get access to an updated DNS server without having
to call your help desk. You can configure each of your zones for dynamic
updates. If you are using Active Directory integrated zones, you can
also specify that the updates are done in a secure fashion and are based
on the information in the DACL.
Locate the zone where you want to enable dynamic updates.
Right-click the zone, and choose Properties.
On the General tab, open the Dynamic Updates drop-down list, as shown in Figure 9.
Choose the type of updates you want to allow, and click OK.
As you probably
noticed, dynamic updates can be configured as nonsecure and secure. We
know some of you are wondering why you would ever consider using
nonsecure updates. Imagine if all the DNS servers for the zone were
residents of your own private network. You already have tight control
over the servers, so you might not choose to enable secure updates only.
If your DNS zones are not part of Active Directory, you will not have
the option for secure dynamic updates only.
If you are using Active
Directory integrated zones, it really does not make sense to use
nonsecure updates. Nonsecure updates will provide exposure to your DNS
servers to accept updates from unknown, disreputable, or downright
malicious sources, and they will open your DNS infrastructure to
potential threats. It just doesn't make sense to use anything but secure
updates.
6.5. Zone Transfer Settings
DNS servers transfer zone
data between one another based on a schedule. You can control how the
zone is transferred based on the following settings. Each of the
settings can be changed or updated, so it is important to note that
these settings will be limited if your DNS servers are Active Directory
integrated.
Whether or not the zone is transferred to any other server and to which servers it may be transferred
The refresh interval, which describes how often the zone files will be transferred
The retry interval, which describes how long a DNS server will wait to request a transfer after a transfer has failed
The expire interval, which describes how long the DNS zone data is valid
The list of servers that are notified when zone data changes
To configure zone transfer settings, follow these steps:
Right-click the zone, and choose Properties.
Click the Zone Transfers tab.
Select the box to allow zone transfers.
Specify the servers that you will allow transfers with, as shown in Figure 10.
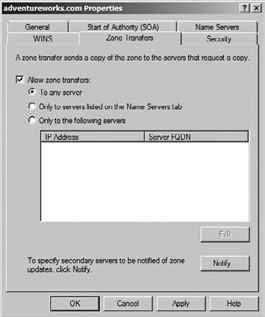
When you configure zone transfers, you can also build something called a notification list,
which contains a list of servers that will be notified by the master
DNS server in your domain when changes are made to the zone. Simply
click the Notify button on the Zone Transfers tab to build a
notification list.
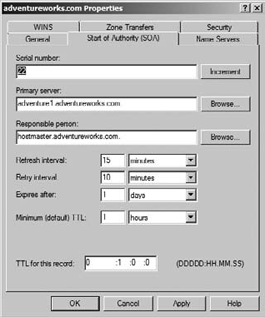
The settings for Refresh Interval, Retry Interval, Expires After, and Minimum (Default) TTL are on the SOA tab.
Right-click the zone, and choose Properties.
Click the Start Of Authority (SOA) tab.
Set the values for the selected interval or TTL, as shown in Figure 11.
6.6. Securing a Zone
DNS provides name
resolution services to clients. The information provided by DNS has a
direct effect on the functional operation of your network. You want to
make sure that you take security into consideration for each of your DNS
zones. Generally, DNS has two potential security problems that you
would worry about. First, you want to make sure that the zone files are
secure from unauthorized changes. If an illicit source can update your
zone database files, they could really cause problems for your network.
Generally, these attacks occur as dynamic updates are pushed to your DNS
servers from outside your organization. The easiest way to prevent this
type of attack is to enable only secure dynamic updates.
Second, you want to make sure
you have taken precautions to prevent unauthorized access to your zone
files. Imagine if someone outside your organization set up a secondary
server and managed to get updates from your internal primary server. You
would effectively be sharing your DNS zone information with an
imposter. The easiest way to prevent this type of attack is by
configuring a list of servers to which you will allow zone transfers.
If your zones are
Active Directory integrated, you can of course use the DACLs associated
with the zone to further control access to the files.
Window Server 2008 R2 moves
one step further when it comes to protecting the zone database files and
adds something called Domain Name System Security Extensions (DNSSEC).
DNSSEC allows the DNS zone and all the records in the zone to be
cryptographically signed. When a DNS server receives a request for the
signed zone files, it returns the files along with the digital
signatures. By obtaining a public key, a resolver can verify that the
files have not been tampered with.
7. Configure Single-Label DNS Resolution
The vast majority of
networks use DNS as the primary name resolution system, but there are
alternatives. For example, for many years Windows Internet Name Service
(WINS) was used as an alternative, and in many networks it still is in
use. Unfortunately, as you move forward to the next version of TCP/IP,
which is called IPV6, there is no support for WINS. You will need
another way to resolve single-label host names besides WINS. If there is
no WINS, a DNS client can still resolve a single-label name by
appending a dns suffix to the name and trying to find it in DNS.
If you are planning on using
IPV6, all name resolution will go through DNS. If you still have
single-label names in your network, Windows Server 2008 R2 uses a
special zone called a global names zone
(GNZ) to house these records and facilitate the resolution of those
names through DNS. GNZ is not a replacement for WINS; instead, it
provides an avenue for name resolution while you transition WINS out of
your network. The GNZ is created and managed much the same as a standard
primary zone. You should not enable dynamic updates for the GNZ to
prevent its resource records from being registered into the zone.
7.1. Creating the GNZ
The process of creating the GNZ begins with DNS Manager:
Right-click the name of the server.
Click Next in the Welcome To The New Zone Wizard.
Select the Primary Zone type, make sure the Store In Active Directory check box is selected, and click Next.
Select All DNS servers running on Domain Controllers in this forest.
Click Forward Lookup Zone.
Type GlobalNames in the Zone Name box, and click Next.
Select Do Not Allow Dynamic Updates, and click Next.
It is also possible to enable GNZ from the command line using the dnscmd tool and the following command:
DNSCMD /config /enableglobalnamesupport 1
Either method will work to enable GNZ, and in both cases you will still need to configure the appropriate records for the zone.
After the forward lookup GNZ has been created, you will need to add the alias resource records (called the CNAME),
for each of the single-label clients in the network. This can prove to
be a daunting task if you have lots of single-label clients and may
provide the motivation necessary to quickly upgrade them to traditional
DNS clients. To add new CNAME records for the single-label clients,
follow these steps:
Right-click the zone, and choose New Alias (CNAME).
Type in the fully qualified domain name.
