2.
Viewing and Changing Resource Assignments
If you're a PC
veteran, you probably remember struggling with MS-DOS and early versions
of Windows to resolve device conflicts, most often when two or more
pieces of hardware lay claim to the same IRQ. On modern computers with an Advanced
Configuration and Power Interface (ACPI) BIOS, those sorts of conflicts
are practically extinct. In the original design of the IBM Personal
Computer, IRQs were
in short supply, with a total of 15 available, and many of those were
reserved by system devices, such as communications ports, keyboards, and
disk controllers. With older Windows versions, problems could occur
when adding a new device such as a sound card or network adapter. If the
new device was hardwired to a specific IRQ that was already in use, or
if there were no free IRQs, the device
simply would not work.
On computers running
Windows 2000, Windows XP, Windows Server 2003, Windows Server 2008,
Windows Vista, or Windows 7 with a mix of PCI add-in cards, the
operating system takes advantage of the ACPI features on the motherboard
to share scarce IRQs
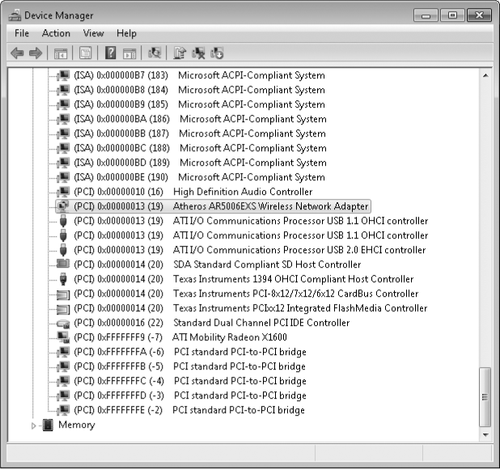
among multiple devices. In Device Manager, you can check resource allocations
at a glance by choosing Resources By Type or Resources By Connection
from the View menu. In the example shown next, Windows 7 has assigned
more than 130 IRQs; IRQs 19 and 20 are each
being shared successfully by four PCI devices.

Under most
circumstances, you cannot use Device Manager to change resource settings
for a specific PCI or USB device. Resources are allocated automatically
by the operating system at startup, and the controls to change resource
settings are unavailable. Resource conflicts are most common with legacy
devices that are not fully compatible with Plug and Play. In the rare
event that you experience a resource conflict, you might be able to
adjust resource settings manually from the Resources tab: clear the Use
Automatic Settings check box, and cycle through different settings to
see if any of the alternate configurations resolve the conflict.
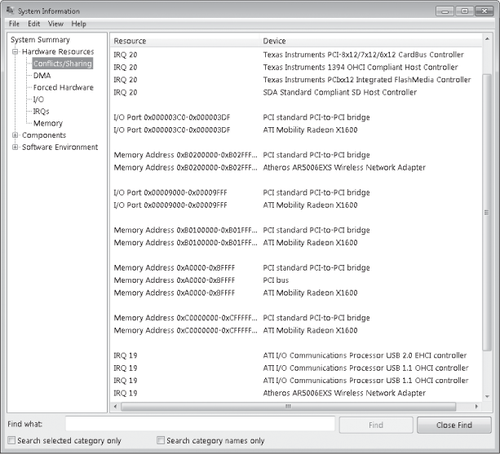
If you suspect that a
hardware problem is caused by a resource conflict, you can access an
overview of resource usage by opening the System Information utility
(Msinfo32.exe), which is found on the All Programs menu under
Accessories, System Tools. Open Hardware Resources in the console pane,
and pay special attention to the Conflicts/Sharing entry, shown in Figure
2, and the Forced Hardware item. Don't
be alarmed if you see a number of devices sharing a single IRQ; that's perfectly normal.
For legacy devices whose resources can't be
assigned by Windows, you'll need to adjust jumpers on the card or
device, or use a software-based setup/configuration utility to change
resource settings for that device.

|
Resource conflicts
prevent a device from working
If two devices are in
conflict for a system resource, try any of these strategies to resolve
the problem:
With PCI and PCI
Express devices, try swapping cards, two at a time, between slots. On
some motherboards, IRQs
and other resources are assigned on a per-slot basis, and moving a card
can free up the proper resources. Check the motherboard documentation
to see which IRQs
are assigned to each slot, and experiment until you find an arrangement
that works. If
the conflict is caused by a legacy (ISA) device, replace it with a Plug and
Play–compatible PCI device. Use jumpers or a software utility to change
settings on a legacy device so that it reserves a different set of
resources. You will need documentation from the manufacturer to
accomplish this goal.
If you have problems
with PCI devices, the device itself might not be to blame. When drivers
and ACPI BIOS code interact improperly, conflicts can result. Check for
an updated hardware driver (especially if the current driver is
unsigned), and look for a motherboard BIOS update as well.
|