3. Setting Program Access and Computer Defaults
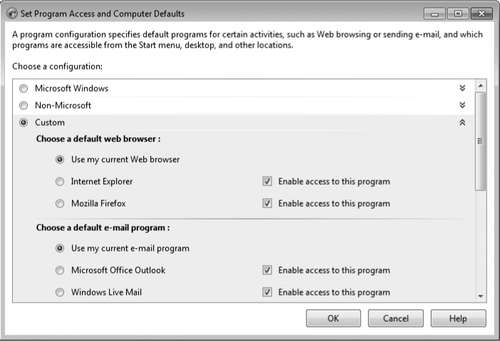
The dialog box that appears when you choose Default Programs on the Start menu and click Set Program Access And Computer Defaults (shown in Figure 9) became a fixture of Windows
at the time of Windows XP Service Pack 1. It was introduced to the
operating system as a settlement condition in an antitrust suit brought
by the United States Department of Justice against Microsoft. It is
designed to give Windows users the option to remove access to a number of Microsoft programs that were previously tightly integrated into Windows.

In the Set
Program Access And Computer Defaults dialog box, the default selection
on all newly installed systems is Custom. This essentially means that
you are willing to make your own decisions about what Microsoft
middleware programs are visible and accessible on your system. This
works for most users. If you want to remove the evidence of a particular
Microsoft item, such as Internet Explorer, clear the Enable Access To
This Program check box beside the program's name. Note that this action
does not uninstall the program; it merely removes the program from the
Start menu, desktop, and other locations. To abjure all Microsoft
middleware, select the Non-Microsoft
option. If you change your mind and want the Microsoft tools back,
return to the dialog box and click Microsoft Windows or Custom.
4. Turning Windows Features On or Off
If you want to disable certain default Windows features, you can use the Set Program Access And Computer
Defaults dialog box just shown. A simpler, more direct, and more
versatile way to get the job done is to open Control Panel, choose
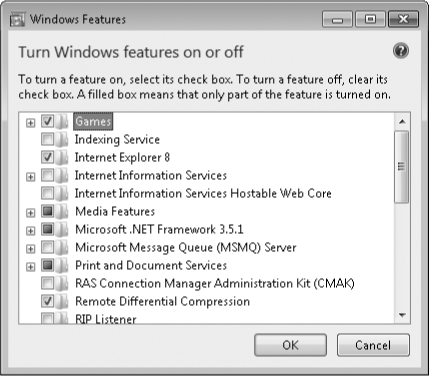
Programs, and then, under Programs And Features, choose Turn Windows Features On Or Off. As Figure 10
shows, you can disable or re-enable many different Windows features in
the Windows Features dialog box that appears. Some of the entries in
this list (those with outline controls beside them) contain subentries.
You can disable subentries without lopping off the whole category by
opening the outline heading. To banish Spider Solitaire, for example,
while leaving the other games in place, you open the Games entry and
clear the Spider Solitaire check box.

Note that the
Windows Features dialog box lists features that are not enabled by
default. The Indexing Service entry, for example, refers to a service
that was used in earlier versions of Windows, not the service that
builds and maintains the Windows 7 search index. Unless you are sure you
need a feature that is not enabled by default, it's better to leave its
setting alone.
5. Setting AutoPlay Options
AutoPlay
is the feature that enables Windows to take appropriate action when you
insert a CD or DVD into a drive. The operating system detects the kind of
disc you have inserted—an audio disc, a program, or a DVD movie, for
example—and takes the action that you have requested for that type of
media. If you have not already made a decision about what the operating
system should do, an AutoPlay dialog box appears when the disc is
detected, and Windows presents a list of possible actions (including in
some cases an option to do nothing at all). A check box in this dialog
box lets you specify that the action you're currently choosing should be
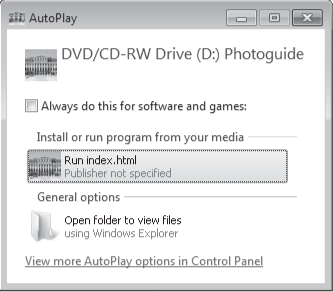
the default for all discs of the current type. Figure 11 shows an example of the AutoPlay dialog box.
If you have used the AutoPlay dialog box shown in Figure 11
to set a default action for a particular media type, and you
subsequently change your mind and want a different default, open the
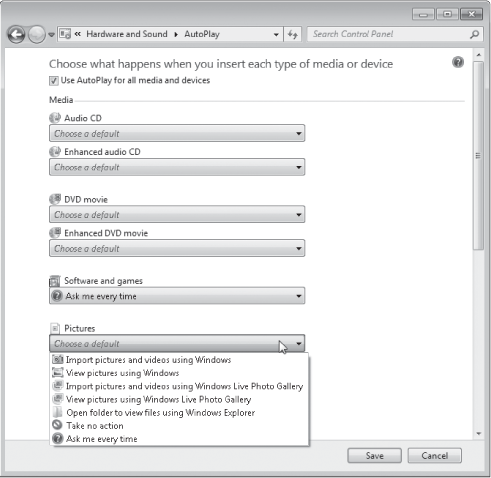
Start menu, click Default Programs, and then click Change AutoPlay Settings. The dialog box that appears, shown in Figure 12,
provides a drop-down list of possible actions for each media type. You
can make your selection from this list and then click Save.
|
To have no
default action for a given optical media type, choose Ask Me Every
Time. To suppress the AutoPlay dialog box completely, choose Take No
Action.
|


|
AutoRun is the mechanism that proposes a default action when you insert an optical disc in the drive. In Figure 11, for example, the contents of a file called AutoRun on the inserted CD is responsible for suggesting the action Run index.html.
Because of the rising incidence of malware that uses AutoRun to induce
unwary users into running Trojan horses (the Conficker worm, about which
you can read at w7io.com/0505,
is a conspicuous example at the time of this writing), the designers of
Windows 7 decided to disable AutoRun capability on USB devices other
than removable optical media.
Because of this
security change, some devices that executed programs automatically when
plugged into a Windows Vista computer might appear not to work in
Windows 7. If your device seems inert when attached to your Windows 7
system, don't assume it's broken. Open Computer in Windows Explorer, and
then open the entry for your device. You will probably find a file
there called AutoRun. Opening that file in Notepad will reveal the name
of the program that would run automatically had AutoRun not been
disabled for your device. Run that program from Windows Explorer.
|